Polycube - Complete Installation on Raspberry Pi CM4

  1. Adding backports and stretch package locations to /etc/apt/source.list

    deb https://deb.debian.org/debian bullseye-backports main contrib non-free
    deb https://deb.debian.org/debian/ stretch-backports main contrib non-free
    deb https://deb.debian.org/debian/ stretch main contrib non-free
  2. Update local cache

    sudo apt update
  3. Install packages

    sudo apt-get -y install git build-essential cmake bison flex \
           libelf-dev libllvm9 llvm-9-dev libclang-9-dev libpcap-dev \
           libnl-route-3-dev libnl-genl-3-dev uuid-dev pkg-config \
           autoconf libtool m4 automake libssl-dev kmod jq bash-completion  \
           gnupg2 golang-go-1.19 tmux bc libfl-dev libpcre2-dev libpcre3-dev
  4. Add go to your $PATH in .bashrc; this needs to be done for root user, as well.

    export PATH=/usr/lib/go-1.19/bin:$PATH
  5. Verify go is in $PATH

    go version
    go version go1.19.4 linux/arm64
  6. Install pistache - needed for the RESTful control daemon, polycubed

    git clone https://github.com/oktal/pistache.git
    cd pistache
    # known working version of pistache
    git checkout 117db02eda9d63935193ad98be813987f6c32b33
    git submodule update --init
    mkdir -p build && cd build
    cmake -G "Unix Makefiles" -DCMAKE_BUILD_TYPE=Release -DPISTACHE_USE_SSL=ON ..
    make -j $(getconf _NPROCESSORS_ONLN)
    sudo make install
  7. Install libtins

    cd
    git clone --branch v3.5 https://github.com/mfontanini/libtins.git
    cd libtins
    mkdir -p build && cd build
    cmake -DLIBTINS_ENABLE_CXX11=1 \
     -DLIBTINS_BUILD_EXAMPLES=OFF -DLIBTINS_BUILD_TESTS=OFF \
     -DLIBTINS_ENABLE_DOT11=OFF -DLIBTINS_ENABLE_PCAP=OFF \
     -DLIBTINS_ENABLE_WPA2=OFF -DLIBTINS_ENABLE_WPA2_CALLBACKS=OFF ..
    make -j $(getconf _NPROCESSORS_ONLN)
    sudo make install
    sudo ldconfig
  8. Install libyang

    cd
    git clone https://github.com/CESNET/libyang.git
    cd libyang
    git checkout libyang1
    mkdir build; cd build
    cmake ..
    make
    sudo make install
  9. Clone polycube repository that contains the necessary changes to config.cpp

    cd
    git clone https://github.com/ajokela/polycube
    cd polycube
    git submodule update --init --recursive
  10. Build prometheus-cpp

    cd src/libs/prometheus-cpp
    mkdir build; cd build
    cmake .. -DBUILD_SHARED_LIBS=ON
    make -j4
    sudo make install
  11. Configure polycube
    cd; cd polycube
    mkdir build; cd build
    cmake .. -DBUILD_SHARED_LIBS=ON \
               -DENABLE_PCN_IPTABLES=ON     \
               -DENABLE_SERVICE_BRIDGE=ON   \
               -DENABLE_SERVICE_DDOSMITIGATOR=OFF \
               -DENABLE_SERVICE_FIREWALL=ON   \
               -DENABLE_SERVICE_HELLOWORLD=OFF     \
               -DENABLE_SERVICE_IPTABLES=ON     \
               -DENABLE_SERVICE_K8SFILTER=OFF     \
               -DENABLE_SERVICE_K8SWITCH=OFF     \
               -DENABLE_SERVICE_LBDSR=OFF     \
               -DENABLE_SERVICE_LBRP=OFF     \
               -DENABLE_SERVICE_NAT=ON     \
               -DENABLE_SERVICE_PBFORWARDER=OFF     \
               -DENABLE_SERVICE_ROUTER=ON     \
               -DENABLE_SERVICE_SIMPLEBRIDGE=ON     \
               -DENABLE_SERVICE_SIMPLEFORWARDER=ON     \
               -DENABLE_SERVICE_TRANSPARENTHELLOWORLD=OFF \
               -DENABLE_SERVICE_SYNFLOOD=OFF     \
               -DENABLE_SERVICE_PACKETCAPTURE=OFF     \
               -DENABLE_SERVICE_K8SDISPATCHER=OFF
    
  12. Build polycube (this will take a while; you might want to use tmux)

    tmux
    make -j4
    To detach from the tmux terminal, press CTL+b, d

    To reattached, execute:

    tmux attach -t 0


    Grab a coffee and go stare at your phone for a while.

  13. If all goes well, you should see the following:

    [100%] Building CXX object src/polycubed/src/CMakeFiles/polycubed.dir/load_services.cpp.o
    [100%] Building CXX object src/polycubed/src/CMakeFiles/polycubed.dir/version.cpp.o
    [100%] Linking CXX executable polycubed
    [100%] Built target polycubed
  14. Try to execute polycubed; we should get some sort of error(s)
    sudo src/polycubed/src/polycubed
    [2023-01-27 13:57:22.022] [polycubed] [info] loading configuration from /etc/polycube/polycubed.conf
    [2023-01-27 13:57:22.023] [polycubed] [warning] default configfile (/etc/polycube/polycubed.conf) not found, creating a new with default parameters
    terminate called after throwing an instance of 'spdlog::spdlog_ex'
      what():  Failed opening file /var/log/polycube/polycubed.log for writing: No such file or directory
    Aborted
    
  15. This is progress and we can handle this by making a directory.
    sudo mkdir /var/log/polycube
  16. Run polycubed again, and you should run into kernel header files not being foundation
    sudo src/polycubed/src/polycubed 
    [2023-01-27 14:01:21.048] [polycubed] [info] loading configuration from /etc/polycube/polycubed.conf
    [2023-01-27 14:01:21.051] [polycubed] [info] configuration parameters:
    [2023-01-27 14:01:21.051] [polycubed] [info]  loglevel: info
    [2023-01-27 14:01:21.051] [polycubed] [info]  daemon: false
    [2023-01-27 14:01:21.052] [polycubed] [info]  pidfile: /var/run/polycube.pid
    [2023-01-27 14:01:21.052] [polycubed] [info]  port: 9000
    [2023-01-27 14:01:21.052] [polycubed] [info]  addr: localhost
    [2023-01-27 14:01:21.052] [polycubed] [info]  logfile: /var/log/polycube/polycubed.log
    [2023-01-27 14:01:21.052] [polycubed] [info]  cubes-dump-file: /etc/polycube/cubes.yaml
    [2023-01-27 14:01:21.052] [polycubed] [info]  cubes-dump-clean-init: false
    [2023-01-27 14:01:21.052] [polycubed] [info]  cubes-dump-enable: false
    [2023-01-27 14:01:21.052] [polycubed] [info] polycubed starting...
    [2023-01-27 14:01:21.052] [polycubed] [info] version v0.9.0+ [git: (branch/commit): master/75da2773]
    modprobe: FATAL: Module kheaders not found in directory /lib/modules/5.15.61-v8+
    Unable to find kernel headers. Try rebuilding kernel with CONFIG_IKHEADERS=m (module) or installing the kernel development package for your running kernel version.
    chdir(/lib/modules/5.15.61-v8+/build): No such file or directory
    [2023-01-27 14:01:21.092] [polycubed] [error] error creating patch panel: Unable to initialize BPF program
    [2023-01-27 14:01:21.093] [polycubed] [critical] Error starting polycube: Error creating patch panel
  17. We need to get the Raspberry Pi Linux kernel source.
    cd /usr/src
    sudo git clone --depth=1 https://github.com/raspberrypi/linux
    We need to see what kernel version the Raspberry Pi
    uname -a
    Linux polycube-network 5.15.61-v8+ #1579 SMP PREEMPT Fri Aug 26 11:16:44 BST 2022 aarch64 GNU/Linux
    We are using 5.15.61-v8+. We will need to checkout the correct branch of the kernel. First move linux to linux-upstream-5.15.61-v8+
    sudo mv linux linux-upstream-5.15.89-v8+
    cd linux-upstream-5.15.89-v8+
    Now, checkout the correct branch. It takes a format like rpi-5.15.y which corresponds to version 5.15.89
    sudo git checkout rpi-5.15.y
  18. Make a symlink from within /lib/modules to our source directory
    cd /lib/modules/5.15.61-v8+
    sudo ln -s /usr/src/linux-upstream-5.15.89-v8+ build
  19. Build a new kernel to auto-generate the necessary header files.

    cd /usr/src/linux-upstream-5.15.89-v8+
    sudo make ARCH=arm64 bcm2711_defconfig
    sudo make -j4
    Grab another cup of coffee and stare at your phone for a while; this will take some time to complete. Doing this in situ will be slower than cross-compiling on a faster laptop or desktop, but the point of these instructions is not to productionize the process, it is to show how to make polycube compile and run on Arm-based systems, specifically, Raspberry Pi 4b or CM4 systems.

    It might be unnecessary to completely build recompile a kernel; maybe experiment a bit with it. 19. Installing and running. Make sure go is available in your PATH for root user; it is needed to compile polycubectl.

    sudo su -
    cd ~pi/polycube/build
    make install
    make install should finished a message of Installation completed successfully. Now we can run polycubed and it will find all the associated shared libraries for the functionality we will be investigating in the next post.
    sudo polycubed
    You should get output that looks like this:
    [2023-01-27 17:13:46.791] [polycubed] [info] loading configuration from /etc/polycube/polycubed.conf
    [2023-01-27 17:13:46.793] [polycubed] [info] configuration parameters:
    [2023-01-27 17:13:46.793] [polycubed] [info]  loglevel: info
    [2023-01-27 17:13:46.793] [polycubed] [info]  daemon: false
    [2023-01-27 17:13:46.793] [polycubed] [info]  pidfile: /var/run/polycube.pid
    [2023-01-27 17:13:46.793] [polycubed] [info]  port: 9000
    [2023-01-27 17:13:46.793] [polycubed] [info]  addr: localhost
    [2023-01-27 17:13:46.793] [polycubed] [info]  logfile: /var/log/polycube/polycubed.log
    [2023-01-27 17:13:46.794] [polycubed] [info]  cubes-dump-file: /etc/polycube/cubes.yaml
    [2023-01-27 17:13:46.794] [polycubed] [info]  cubes-dump-clean-init: false
    [2023-01-27 17:13:46.794] [polycubed] [info]  cubes-dump-enable: false
    [2023-01-27 17:13:46.794] [polycubed] [info] polycubed starting...
    [2023-01-27 17:13:46.794] [polycubed] [info] version v0.9.0+ [git: (branch/commit): master/75da2773]
    prog tag mismatch 3e70ec38a5f6710 1
    WARNING: cannot get prog tag, ignore saving source with program tag
    prog tag mismatch 1e2ac42799daebd8 1
    WARNING: cannot get prog tag, ignore saving source with program tag
    [2023-01-27 17:14:03.905] [polycubed] [info] rest server listening on '127.0.0.1:9000'
    [2023-01-27 17:14:03.906] [polycubed] [info] rest server starting ...
    [2023-01-27 17:14:04.010] [polycubed] [info] service bridge loaded using libpcn-bridge.so
    [2023-01-27 17:14:04.050] [polycubed] [info] service firewall loaded using libpcn-firewall.so
    [2023-01-27 17:14:04.149] [polycubed] [info] service nat loaded using libpcn-nat.so
    [2023-01-27 17:14:04.277] [polycubed] [info] service router loaded using libpcn-router.so
    [2023-01-27 17:14:04.340] [polycubed] [info] service simplebridge loaded using libpcn-simplebridge.so
    [2023-01-27 17:14:04.370] [polycubed] [info] service simpleforwarder loaded using libpcn-simpleforwarder.so
    [2023-01-27 17:14:04.413] [polycubed] [info] service iptables loaded using libpcn-iptables.so
    [2023-01-27 17:14:04.553] [polycubed] [info] service dynmon loaded using libpcn-dynmon.so
    [2023-01-27 17:14:04.554] [polycubed] [info] loading metrics from yang files
    

Polycube on Arm-based SBC: Follow-up #2 (WIP)

After emailing three of the committers to the original Polycube project, and receiving short replies from each of that basically said, polycube was never tested on an arm-based system will likely not work without significant efforts as well as, I believe the [polycube] project is no longer active, I wanted to follow through and test the former statement and really see how much effort would it take to get a compiled binary of polycubed running on an Arm-based system.

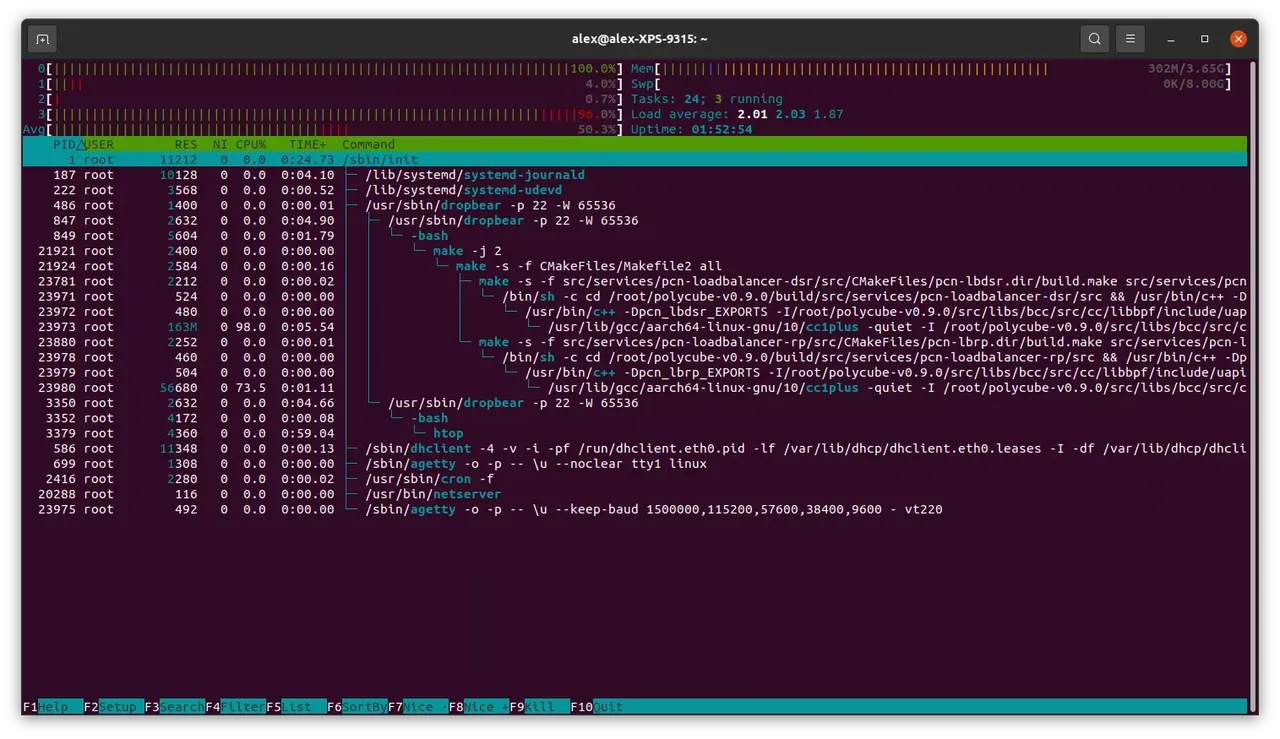
With my previous Work In Progress, I appeared to be able to successfully build and compile an executable, but when run, the program did nothing but consume 100% of one core of the Raspberry Pi's processes.

What does this mean? A hung process, consuming 100% of one core; that feels to me like it is getting stuck in a loop without having an exit/break condition met. I started by doing what any ham-handed developer would do: I started at main() in polycubed.cpp and started to put std::cerr << "Code gets to this spot #1" << std:endl; into the code.

I narrowed this initial issue of the process hang to the following:

try {

    if (!config.load(argc, argv)) {
        exit(EXIT_SUCCESS);
    }

    std::cerr << "Configs loaded..." << std::endl;

} catch (const std::exception &e) {

    // The problem of the error in loading the config file may be due to
    // polycubed executed as normal user
    if (getuid())
        logger->critical("polycubed should be executed with root privileges");

    logger->critical("Error loading config: {}", e.what());
    exit(EXIT_FAILURE);
}

Both of the cerr statements that I added were never getting called. This narrowed down the issue to config.load(argc, argv).

Looking at config.cpp and specifically at the method, load(int argc, char *argv[]), you will find the following:

bool Config::load(int argc, char *argv[]) {
  logger = spdlog::get("polycubed");

  int option_index = 0;
  char ch;

  // do a first pass looking for "configfile", "-h", "-v"
  while ((ch = getopt_long(argc, argv, "l:p:a:dhv", options, &option_index)) !=
         -1) {
    switch (ch) {
    case 'v':
      show_version();
      return false;
    case 'h':
      show_usage(argv[0]);
      return false;
    case 4:
      configfile = optarg;
      break;
    }
  }

  load_from_file(configfile);
  load_from_cli(argc, argv);
  check();

  if (cubes_dump_clean_init) {
    std::ofstream output(cubes_dump_file);
    if (output.is_open()) {
      output << "{}";
      output.close();
    }
  }

  return true;
}

Through some amateur debugging statements, I determined that while (( ch = getopt_long..) != -1) was never ceasing. The while loop never exited. Why would this statement work flawlessly on Intel amd64-based systems and not on Arm64 systems? I am still stumped as why it would matter. However, implementing the while look as the following got me slightly further in the start-up process:

  while(true) {
    const auto ch = getopt_long(argc, argv, "l:p:a:dhv", options, &option_index);

    switch (ch) {
    case 'v':
      show_version();
      return false;
    case 'h':
      show_usage(argv[0]);
      return false;
    case 4:
      configfile = optarg;
      break;
    }

    if(-1 == ch) {
      break;
    }
  }

Maybe someone with more systems experience and C++ knowledge might have an idea as to why these two blocks of code behave differently when run on different architectures.

Anyway, being able to get a little farther into the start-up process was a sign I should keep looking into the issue. Using my Bush-league skills of debugging (e.g. liberal use of std::cerr), I determined that things were getting bound up on:

load_from_cli(argc, argv);

A look at that method reveals another, similar, while statement:

void Config::load_from_cli(int argc, char *argv[]) {
  int option_index = 0;
  char ch;
  optind = 0;
  while ((ch = getopt_long(argc, argv, "l:p:a:dhv", options, &option_index)) !=
         -1) {
    switch (ch) {
    case 'l':
      setLogLevel(optarg);
      break;
    case 'p':
      setServerPort(optarg);
      break;
    case 'd':
      setDaemon(optarg ? std::string(optarg) : "true");
      break;
    case 'a':
      setServerIP(optarg);
      break;
    case 'c':
      setCertPath(optarg);
      break;
    case 'k':
      setKeyPath(optarg);
      break;
    case '?':
      throw std::runtime_error("Missing argument, see stderr");
    case 1:
      setLogFile(optarg);
      break;
    case 2:
      setPidFile(optarg);
      break;
    case 5:
      setCACertPath(optarg);
      break;
    case 6:
      setCertWhitelistPath(optarg);
      break;
    case 7:
      setCertBlacklistPath(optarg);
      break;
    case 8:
      setCubesDumpFile(optarg);
      break;
    case 9:
      setCubesDumpCleanInit();
      break;
    case 10:
      //setCubesNoDump();
      setCubesDumpEnabled();
      break;
    }
  }
}

Again, I determined that while (( ch = getopt_long..) != -1) was never breaking from the while loop. Changing it to:

  while(true) {

    const auto ch = getopt_long(argc, argv, "l:p:a:dhv", options, &option_index);

    ...

    if(-1 == ch) {
      break;
    }

  }

This did the trick, as it had done with the previous while loop. I was able to execute polycubed but ran into a new error:

[2023-01-26 15:25:19.131] [polycubed] [info] configuration parameters:
[2023-01-26 15:25:19.131] [polycubed] [info]  loglevel: info
[2023-01-26 15:25:19.131] [polycubed] [info]  daemon: false
[2023-01-26 15:25:19.131] [polycubed] [info]  pidfile: /var/run/polycube.pid
[2023-01-26 15:25:19.131] [polycubed] [info]  port: 9000
[2023-01-26 15:25:19.131] [polycubed] [info]  addr: localhost
[2023-01-26 15:25:19.131] [polycubed] [info]  logfile: /var/log/polycube/polycubed.log
[2023-01-26 15:25:19.131] [polycubed] [info]  cubes-dump-file: /etc/polycube/cubes.yaml
[2023-01-26 15:25:19.132] [polycubed] [info]  cubes-dump-clean-init: false
[2023-01-26 15:25:19.132] [polycubed] [info]  cubes-dump-enable: false
[2023-01-26 15:25:19.132] [polycubed] [info] polycubed starting...
[2023-01-26 15:25:19.132] [polycubed] [info] version v0.9.0
modprobe: FATAL: Module kheaders not found in directory /lib/modules/5.15.84-v8+
Unable to find kernel headers. Try rebuilding kernel with CONFIG_IKHEADERS=m (module)
chdir(/lib/modules/5.15.84-v8+/build): No such file or directory
[2023-01-26 15:25:19.180] [polycubed] [error] error creating patch panel: Unable to initialize BPF program
[2023-01-26 15:25:19.188] [polycubed] [critical] Error starting polycube: Error creating patch panel

Next, I grabbed the linux kernel source from Raspberry Pi's github and setup a symlink for polycubed to find kernel headers:

git clone --depth=1 https://github.com/raspberrypi/linux.git
mv linux linux-upstream-5.15.89-v8+
sudo ln -s /usr/src/linux-upstream-5.15.89-v8+ /lib/modules/5.15.89-v8+/build
sudo ~/polycube/build/src/polycubed/src/polycubed

This results in:

[2023-01-26 15:40:19.035] [polycubed] [info] configuration parameters:
[2023-01-26 15:40:19.035] [polycubed] [info]  loglevel: trace
[2023-01-26 15:40:19.035] [polycubed] [info]  daemon: false
[2023-01-26 15:40:19.036] [polycubed] [info]  pidfile: /var/run/polycube.pid
[2023-01-26 15:40:19.036] [polycubed] [info]  port: 9000
[2023-01-26 15:40:19.036] [polycubed] [info]  addr: localhost
[2023-01-26 15:40:19.036] [polycubed] [info]  logfile: /var/log/polycube/polycubed.log
[2023-01-26 15:40:19.036] [polycubed] [info]  cubes-dump-file: /etc/polycube/cubes.yaml
[2023-01-26 15:40:19.036] [polycubed] [info]  cubes-dump-clean-init: false
[2023-01-26 15:40:19.036] [polycubed] [info]  cubes-dump-enable: false
[2023-01-26 15:40:19.036] [polycubed] [info] polycubed starting...
[2023-01-26 15:40:19.036] [polycubed] [info] version v0.9.0
bpf: Failed to load program: Invalid argument
jump out of range from insn 9 to 37
processed 0 insns (limit 1000000) max_states_per_insn 0 total_states 0 peak_states 0 mark_read 0

[2023-01-26 15:40:46.751] [polycubed] [error] cannot load ctrl_rx: Failed to load controller_module_rx: -1
[2023-01-26 15:40:46.800] [polycubed] [critical] Error starting polycube: cannot load controller_module_rx

It is entirely possible that I am including the wrong version of bcc;

BPF Compiler Collection (BCC)

BCC is a toolkit for creating efficient kernel tracing and manipulation programs, and includes several useful tools and examples. It makes use of extended BPF (Berkeley Packet Filters), formally known as eBPF, a new feature that was first added to Linux 3.15. Much of what BCC uses requires Linux 4.1 and above.


I decided to step back, and grab a clean copy of polycubed from github.

pi@raspberrypi:~/polycube $ git submodule update --init --recursive
pi@raspberrypi:~/polycube/build $ cmake ..  -DENABLE_PCN_IPTABLES=ON \
                                            -DENABLE_SERVICE_BRIDGE=ON \    
                                            -DENABLE_SERVICE_DDOSMITIGATOR=OFF \     
                                            -DENABLE_SERVICE_FIREWALL=ON    \
                                            -DENABLE_SERVICE_HELLOWORLD=OFF   \
                                            -DENABLE_SERVICE_IPTABLES=ON    \
                                            -DENABLE_SERVICE_K8SFILTER=OFF    \
                                            -DENABLE_SERVICE_K8SWITCH=OFF    \
                                            -DENABLE_SERVICE_LBDSR=OFF    \
                                            -DENABLE_SERVICE_LBRP=OFF  \
                                            -DENABLE_SERVICE_NAT=ON   \
                                            -DENABLE_SERVICE_PBFORWARDER=ON   \
                                            -DENABLE_SERVICE_ROUTER=ON    \
                                            -DENABLE_SERVICE_SIMPLEBRIDGE=ON    \
                                            -DENABLE_SERVICE_SIMPLEFORWARDER=ON    \
                                            -DENABLE_SERVICE_TRANSPARENTHELLOWORLD=OFF   \
                                            -DENABLE_SERVICE_SYNFLOOD=OFF   \
                                            -DENABLE_SERVICE_PACKETCAPTURE=OFF     -DENABLE_SERVICE_K8SDISPATCHER=OFF
-- The C compiler identification is GNU 10.2.1
-- The CXX compiler identification is GNU 10.2.1
-- Detecting C compiler ABI info
-- Detecting C compiler ABI info - done
-- Check for working C compiler: /usr/bin/cc - skipped
-- Detecting C compile features
-- Detecting C compile features - done
-- Detecting CXX compiler ABI info
-- Detecting CXX compiler ABI info - done
-- Check for working CXX compiler: /usr/bin/c++ - skipped
-- Detecting CXX compile features
-- Detecting CXX compile features - done
-- Version is v0.9.0+ [git: (branch/commit): master/a143e3c0-dirty]
-- Latest recognized Git tag is v0.9.0
-- Git HEAD is a143e3c0325400dad7b9ff3406848f5a953ed3d1
-- Revision is 0.9.0-a143e3c0
-- Performing Test HAVE_NO_PIE_FLAG
-- Performing Test HAVE_NO_PIE_FLAG - Success
-- Performing Test HAVE_REALLOCARRAY_SUPPORT
-- Performing Test HAVE_REALLOCARRAY_SUPPORT - Success
-- Found LLVM: /usr/lib/llvm-9/include 9.0.1 (Use LLVM_ROOT envronment variable for another version of LLVM)
-- Found BISON: /usr/bin/bison (found version "3.7.5")
-- Found FLEX: /usr/bin/flex (found version "2.6.4")
-- Found LibElf: /usr/lib/aarch64-linux-gnu/libelf.so  
-- Performing Test ELF_GETSHDRSTRNDX
-- Performing Test ELF_GETSHDRSTRNDX - Success
-- Could NOT find LibDebuginfod (missing: LIBDEBUGINFOD_LIBRARIES LIBDEBUGINFOD_INCLUDE_DIRS)
-- Using static-libstdc++
-- Could NOT find LuaJIT (missing: LUAJIT_LIBRARIES LUAJIT_INCLUDE_DIR)
-- jsoncons v0.142.0
-- Looking for pthread.h
-- Looking for pthread.h - found
-- Performing Test CMAKE_HAVE_LIBC_PTHREAD
-- Performing Test CMAKE_HAVE_LIBC_PTHREAD - Failed
-- Looking for pthread_create in pthreads
-- Looking for pthread_create in pthreads - not found
-- Looking for pthread_create in pthread
-- Looking for pthread_create in pthread - found
-- Found Threads: TRUE  
-- Performing Test COMPILER_HAS_HIDDEN_VISIBILITY
-- Performing Test COMPILER_HAS_HIDDEN_VISIBILITY - Success
-- Performing Test COMPILER_HAS_HIDDEN_INLINE_VISIBILITY
-- Performing Test COMPILER_HAS_HIDDEN_INLINE_VISIBILITY - Success
-- Performing Test COMPILER_HAS_DEPRECATED_ATTR
-- Performing Test COMPILER_HAS_DEPRECATED_ATTR - Success
-- The following OPTIONAL packages have been found:

 * BISON
 * FLEX
 * Threads

-- The following REQUIRED packages have been found:

 * LibYANG
 * LLVM
 * LibElf

-- The following OPTIONAL packages have not been found:

 * LibDebuginfod
 * LuaJIT

-- Found PkgConfig: /usr/bin/pkg-config (found version "0.29.2")
-- Found OpenSSL: /usr/lib/aarch64-linux-gnu/libcrypto.so (found version "1.1.1n")  
-- Checking for module 'libnl-3.0'
--   Found libnl-3.0, version 3.4.0
-- Checking for module 'libnl-genl-3.0'
--   Found libnl-genl-3.0, version 3.4.0
-- Checking for module 'libnl-route-3.0'
--   Found libnl-route-3.0, version 3.4.0
-- Checking for module 'libtins'
--   Found libtins, version 3.5
-- Found nlohmann_json: /home/pi/polycube/cmake/nlohmann_json/Findnlohmann_json.cmake (Required is at least version "3.5.0")
-- Checking for module 'systemd'
--   Found systemd, version 247
-- systemd services install dir: /lib/systemd/system
-- Configuring done
-- Generating done
-- Build files have been written to: /home/pi/polycube/build
cd ../src/libs/prometheus-cpp
mkdir build; cd build
cmake .. -DBUILD_SHARED_LIBS=ON
make
sudo make install

I made changes to config.cpp to deal with our issue with getopt_long and the while loop. The changes are in my polycube clone.

I also did not have to add any of the #include lines that I had added during my first attempt on a SOQuartz module.

sudo src/polycubed/src/polycubed
[2023-01-26 20:58:06.453] [polycubed] [info] loading configuration from /etc/polycube/polycubed.conf
[2023-01-26 20:58:06.456] [polycubed] [info] configuration parameters:
[2023-01-26 20:58:06.456] [polycubed] [info]  loglevel: info
[2023-01-26 20:58:06.456] [polycubed] [info]  daemon: false
[2023-01-26 20:58:06.456] [polycubed] [info]  pidfile: /var/run/polycube.pid
[2023-01-26 20:58:06.456] [polycubed] [info]  port: 9000
[2023-01-26 20:58:06.456] [polycubed] [info]  addr: localhost
[2023-01-26 20:58:06.456] [polycubed] [info]  logfile: /var/log/polycube/polycubed.log
[2023-01-26 20:58:06.456] [polycubed] [info]  cubes-dump-file: /etc/polycube/cubes.yaml
[2023-01-26 20:58:06.456] [polycubed] [info]  cubes-dump-clean-init: false
[2023-01-26 20:58:06.457] [polycubed] [info]  cubes-dump-enable: false
[2023-01-26 20:58:06.457] [polycubed] [info] polycubed starting...
[2023-01-26 20:58:06.457] [polycubed] [info] version v0.9.0+ [git: (branch/commit): master/a143e3c0-dirty]
prog tag mismatch 3e70ec38a5f6710 1
WARNING: cannot get prog tag, ignore saving source with program tag
prog tag mismatch 1e2ac42799daebd8 1
WARNING: cannot get prog tag, ignore saving source with program tag
[2023-01-26 20:58:23.636] [polycubed] [info] rest server listening on '127.0.0.1:9000'
[2023-01-26 20:58:23.637] [polycubed] [info] rest server starting ...
[2023-01-26 20:58:23.740] [polycubed] [info] service bridge loaded using libpcn-bridge.so
[2023-01-26 20:58:23.779] [polycubed] [info] service firewall loaded using libpcn-firewall.so
[2023-01-26 20:58:23.882] [polycubed] [info] service nat loaded using libpcn-nat.so
[2023-01-26 20:58:24.012] [polycubed] [info] service pbforwarder loaded using libpcn-pbforwarder.so
[2023-01-26 20:58:24.145] [polycubed] [info] service router loaded using libpcn-router.so
[2023-01-26 20:58:24.210] [polycubed] [info] service simplebridge loaded using libpcn-simplebridge.so
[2023-01-26 20:58:24.239] [polycubed] [info] service simpleforwarder loaded using libpcn-simpleforwarder.so
[2023-01-26 20:58:24.282] [polycubed] [info] service iptables loaded using libpcn-iptables.so
[2023-01-26 20:58:24.412] [polycubed] [info] service dynmon loaded using libpcn-dynmon.so
[2023-01-26 20:58:24.412] [polycubed] [info] loading metrics from yang files

The daemon successfully runs. I do, however, need to capture the work I did in getting the linux kernel source headers in place for the daemon to find to compile the eBPF code into byte code.

  1. Clone the Linux repository from Raspberry Pi, https://github.com/raspberrypi/linux, into /usr/src on the Raspberry Pi
  2. In /lib/modules/5.15.84-v8+/ make a symlink named build and point it to /usr/src/linux-upstream-5.15.89-v8+

That will be it for the Work In Progress posts on polycube; I could attempt to recreate the steps taken, but I feel my notes across three posts should be enough. It is also isn't like polycube deployments are in hot demand. There is a strong likely hood that I am the first and only person who has run it on Arm-based hardware. The next post on polycube will be actually using it and in particular, the drop in replacement for iptables; that is what I am most interested in.

Windows 3.1 on Raspberry Pi CM4

I got my start with computers in the late 1980s on an Apple IIe. By 1990, my father had been bringing home a laptop from his work. When he was not working, I would use Microsoft QBasic (here is a JavaScript implementation of QBasic). Three years later, we had a Gateway 2000 desktop computer. It sported an Intel 486 50Mhz with 24MB of ram and about 512MB of disk space. Also in 1993, I was able to get a real copy of Visual Basic 3 from a friend who had gone off to college; he bought it for me from the campus bookstore.

Fast forward thirty years, and here, in 2023, I'm all about single board computers, and in particular, Arm-based SBCs.

Can one run software that was written thirty years ago that was intended to run on a completely different architecture? The answer is yes, and it is damn simple, too.

sudo apt install dosbox

Download Windows 3.11 from archive.org.

Unzip the archive

Run dosbox

dosbox

Mount the Windows 3.11 directory as drive c:

mount c /home/pi/win3.11
c:
setup

Follow the instructions on the screen.

Installing Visual Basic 3.0 is also simple. Download an ISO from archive.org.

Mount the ISO to a directory in your home directory on the Raspberry Pi, copy the contents and execute in Windows 3.11.

mkdir cdrom
sudo mount -o loop VBPRO30.ISO cdrom
mkdir win3.11/cdrom; cp -R cdrom/* win3.11/cdrom/; chmod -R 755 win3.11/cdrom

I found I needed to restart dosbox in order for the new directory to show up. Repeat mounting /home/pi/win3.11 in dosbox.

mount c /home/pi/win3.11
c:
cd Windows
win

Navigate with File Manager to c: drive, open the cdrom folder, go to DISK1 and execute SETUP.EXE

As a helpful note, to release the mouse from dosbox, simply press CTRL+F10

You might be asking, what's the point of this exercise? - It is because it can be done.

Polycube on Arm-based SBC: Follow-up #1 (WIP)

My first attempt at getting Polycube compiling and running on an Arm-based single board computer had the compile part be successful, the running part was not. For that test, I used a Pine64 SOQuartz system on a module, which is pin compatible with a Raspberry Pi CM4. Using Plebian Linux, there were a number of hoops to jump through; not limited to having to #include extra header files, compile certain pre-requisite libraries as well as including Debian packages from a few different versions of Debian.

But, compiling eventually succeeded, producing executables. Enter a Raspberry Pi CM4 running 64 bit Raspberry Pi OS.

The Process

The build process is more straight forward than with Plebian Linux. There is, however, still the need to use packages from several different versions of Debian. This is because Polycube depends upon older packages. These dependencies on old software and fairly brittle build pipeline really does hamper the use and adoption of Polycube.

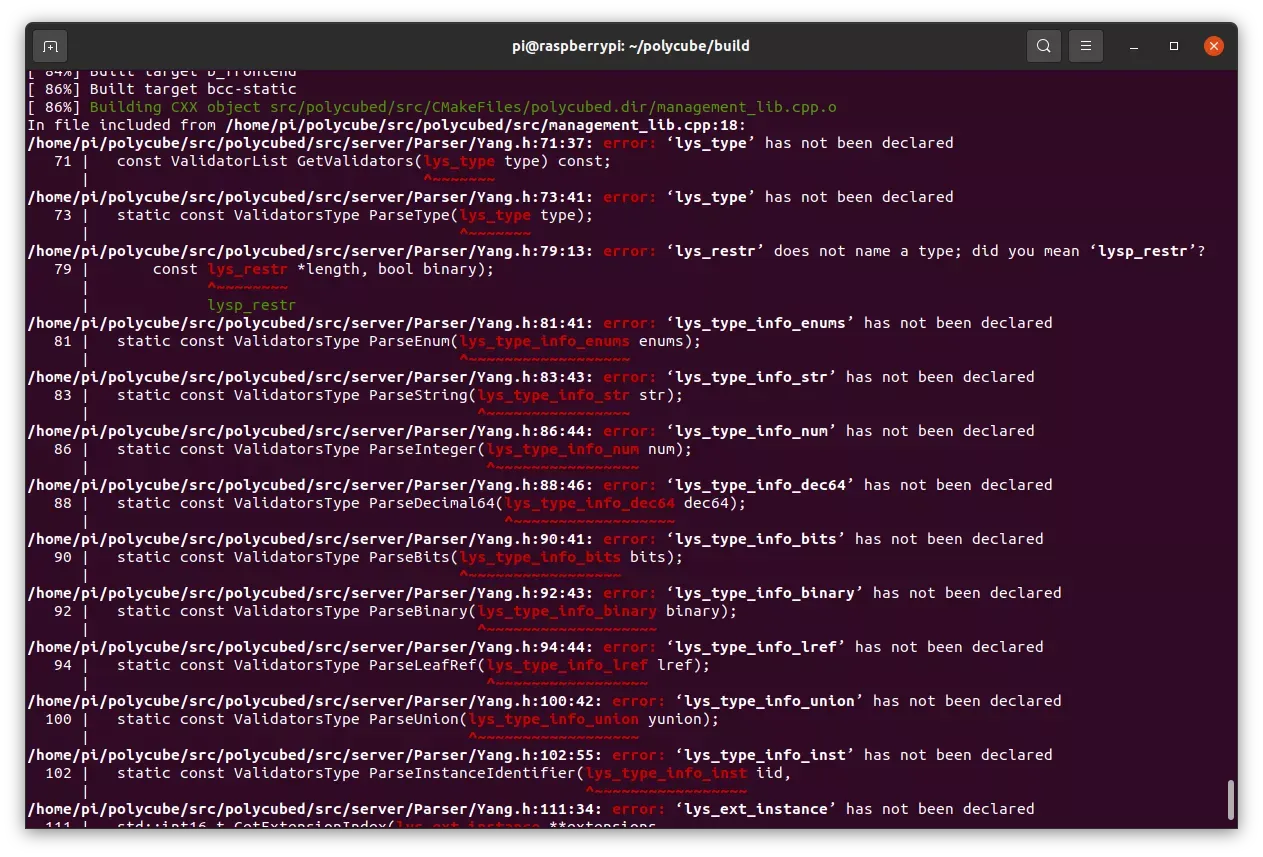
After having what appears to be all the pre-requisite dependencies, the build ultimately fails on not finding a struct that has not been declared.

I ended up having to get a particular version of libyang; specifically v1.0.255. That got me past that error.

Following the rest of my instructions is more or less what I did to successfully compile polycubed. This is where things end just the same as my attempts with a SOQuartz module: running polycubed just hangs and does nothing more than consuming 100% of one core.

Polycube on Arm-based SBCs: Replacement for IPTables - WIP

The Basics - Work in Progress (WIP)

SPOILER ALERT: I have not been able to successfully execute the polycubed daemon. This effort is still a WIP.

Originally called extended Berkeley Packet Filtering, it has since been simply referred to as eBPF. Vanilla BPF has been around for decades and has been used as a packet filter, but eBPF is a more recent creation. And it has distinct advantages over existing Linux networking methods when used at industrial or commercial scales.

Historically, the operating system has always been an ideal place to implement observability, security, and networking functionality due to the kernel’s privileged ability to oversee and control the entire system. At the same time, an operating system kernel is hard to evolve due to its central role and high requirement towards stability and security. The rate of innovation at the operating system level has thus traditionally been lower compared to functionality implemented outside of the operating system.

eBPF changes this formula fundamentally. By allowing to run sandboxed programs within the operating system, application developers can run eBPF programs to add additional capabilities to the operating system at runtime. The operating system then guarantees safety and execution efficiency as if natively compiled with the aid of a Just-In-Time (JIT) compiler and verification engine. This has led to a wave of eBPF-based projects covering a wide array of use cases, including next-generation networking, observability, and security functionality.

Why eBPF? Because it has been gaining use within the world of containerization of work loads. Within the Linux world, this is usually Docker (I wrote a post on running Docker on a Pine64 Quartz Model A). Observability is huge within the world of commercial-scale deployments of containers. Containers allow for millions or tens of millions of virtual workloads to run on thousands and millions of physical systems. You need insight into what your systems are doing and how systems are performing. eBPF, for tiny computers, is overkill. The level complexity it introduces and requires far outweighs the benefits of at such a small scale. But, using it within the confines of tiny computers could be a good introduction to this very powerful technology.

We will be attempting to use Polycube for our eBPF needs.

Polycube is an open source software framework that provides fast and lightweight network functions such as bridges, routers, firewalls, and others.

Polycube services, called cubes, can be composed to build arbitrary service chains and provide custom network connectivity to namespaces, containers, virtual machines, and physical hosts.

For more information, jump to the project Documentation.

There are two ways in which to run Polycube: 1) via Docker; 2) "baremetal". Docker would be simplest if we were using stable builds of Debian or Ubuntu, but we are not.

For the purposes of this article, I am using a Pine64 SOQuartz module. I have tried both Plebian Linux as well as DietPi.

I will walk through "baremetal" because there are not Docker images available for arm64 architecture.

Installing Polycube - baremetal

1. Install polycube and dependencies:

# add stretch packages to apt
# /etc/apt/sources.list
deb https://deb.debian.org/debian/ stretch-backports main contrib non-free
deb https://deb.debian.org/debian/ stretch main contrib non-free
deb https://deb.debian.org/debian/ stretch-backports-sloppy main contrib non-free
deb https://deb.debian.org/debian/ bookworm main contrib non-free
Update packages cache
sudo apt update
Install Polycube dependencies
sudo apt-get install golang-go git build-essential cmake bison flex libelf-dev libpcap-dev \
        libnl-route-3-dev libnl-genl-3-dev uuid-dev pkg-config autoconf libtool m4 \
        automake libssl-dev kmod jq bash-completion gnupg2 libpcre3-dev clang-5.0 \
        clang-format-5.0 clang-tidy-5.0 libclang-5.0-dev libfl-dev \
        iperf luajit arping netperf
Verify golang is at v1.16 or newer
go version
go version go1.19.3 linux/arm64
Install pistache - needed for the RESTful control daemon
git clone https://github.com/oktal/pistache.git
cd pistache
# known working version of pistache
git checkout 117db02eda9d63935193ad98be813987f6c32b33
git submodule update --init
mkdir -p build && cd build
cmake -G "Unix Makefiles" -DCMAKE_BUILD_TYPE=Release -DPISTACHE_USE_SSL=ON ..
make -j $(getconf _NPROCESSORS_ONLN)
sudo make install
Install libtins
cd
git clone --branch v3.5 https://github.com/mfontanini/libtins.git
cd libtins
mkdir -p build && cd build
cmake -DLIBTINS_ENABLE_CXX11=1 \
 -DLIBTINS_BUILD_EXAMPLES=OFF -DLIBTINS_BUILD_TESTS=OFF \
 -DLIBTINS_ENABLE_DOT11=OFF -DLIBTINS_ENABLE_PCAP=OFF \
 -DLIBTINS_ENABLE_WPA2=OFF -DLIBTINS_ENABLE_WPA2_CALLBACKS=OFF ..
make -j $(getconf _NPROCESSORS_ONLN)
sudo make install
sudo ldconfig
Install libyang version 1
cd
git clone https://github.com/CESNET/libyang.git
cd libyang
git checkout libyang1
mkdir build; cd build
cmake ..
make
sudo make install

2. Clone polycube repository;

**Note: ** you will need at least 3GB of disk space to be on the safe side for intermediate build artifacts

cd
git clone https://github.com/polycube-network/polycube.git
cd polycube
git submodule update --init --recursive
Configure build for prometheus-cpp
cd polycube/src/libs/prometheus-cpp
mkdir build && build
cmake .. -DBUILD_SHARED_LIBS=ON
We need to make one modification to one source file
 # edit the ../core/src/histogram.cc
 vi ../core/src/histogram.cc

Below #include <iterator>, add the following:

#include <limits>

Save ../core/src/histogram.cc

Build prometheus-cpp

make
sudo make install
We need to make one modification to one source file
cd
cd polycube
vi src/polycubed/src/server/Types/lexical_cast.cpp

Add the following directly below #include <string>

#include <limits>

Save src/polycubed/src/server/Types/lexical_cast.cpp

We need to make another modification to a source file
cd>
cd polycube
vi src/polycubed/src/server/Resources/Body/ListKey.cpp

Add the following directly below #include <vector>

#include <stdexcept>

Save src/polycubed/src/server/Resources/Body/ListKey.cpp

We need to make another modification to a source file
cd
cd polycube
vi src/services/pcn-dynmon/src/MapExtractor.h

Add the following directly below #pragma once

#include <cstdlib>

Savesrc/services/pcn-dynmon/src/MapExtractor.h

Configure and build polycube; we will also be building the drop in equivalent of iptables, polycube iptables
   
cd
cd polycube
mkdir -p build && cd build
cmake .. -DENABLE_PCN_IPTABLES=ON
make -j 2
go env -w GO111MODULE=off
sudo make install

Attempt to start polycubed

sudo polycubed

And that is where it gets hung up. The daemon never gets to the point of listening on the default port, tcp:9000. There are also no log messages (even turning up the loglevel to debug)

Pine64 ROCKPro64 SATA Software RAID5

I love experimenting with all sorts of single board computers (SBCs) and systems on modules (SoMs) - like the Raspberry Pi CM4 or Pine64 SOQuartz. This extends even to needing to make a network-attached storage (NAS). One of the requirements is the ability to attached a bunch of disks to a tiny computer. The easiest way to accomplish this is using a PCIe SATA controller. To use this, you need a PCIe lane exposed. Luckily, there are a number of system on modules with PCIe support. There is also Pine64 single board computers with an exposed PCIe lanes. These are the Quartz64 model A as well as the ROCKPro64. The former does not have the performance capabilities that the latter does, as such, we will be using the ROCKPro64.

My requirements for a NAS are bare-bones. I want network file system support; and secondarily, Windows' SMB support via the open source project Samba. Samba is of secondary importance because the primary use case for this particular NAS is providing additional disk space to other SBCs that are running some flavor of Linux or BSD (like NetBSD).

When the Turing Pi 2 was being promoted on Kickstarter, I had pledged to the project and then purchased a 2U shallow depth rack ITX server case. The project has been moving along but is taking longer than I had anticipated. In the mean time, I decided to re-purpose the server case and use it for a simple NAS.

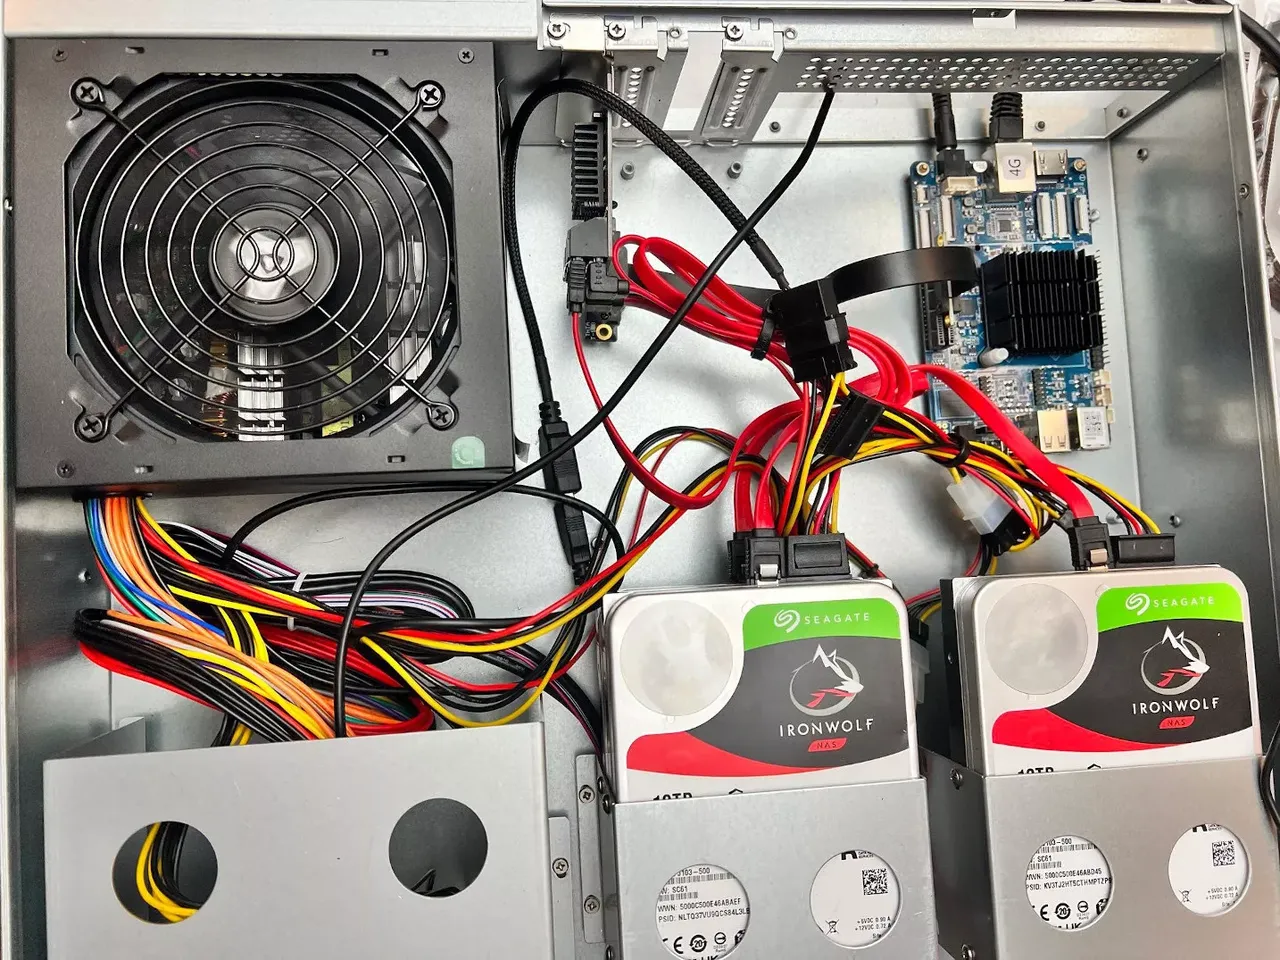
I purchased four Seagate IronWolf 10TB drives. These are spinning metal drives not fancy NVME drives. NVME is too cost prohibitive and would ultimately not be performative; e.g. the bottleneck would be the ROCKPro64.

One of the four drives turned out to be a dud; there are only three in the above picture. The original goal was have 30TB of RAID5 -- 30TB of storage with 10TB for parity. But, because I did not want to spend much more on this project, I opted to return the broken drive and settle for 20TB of storage with 10TB of parity.

The setup is fairly simple. The 2U case, three 10TB drives, a ROCKPro64 4GB single board computer, and a 450W ATX power supply.

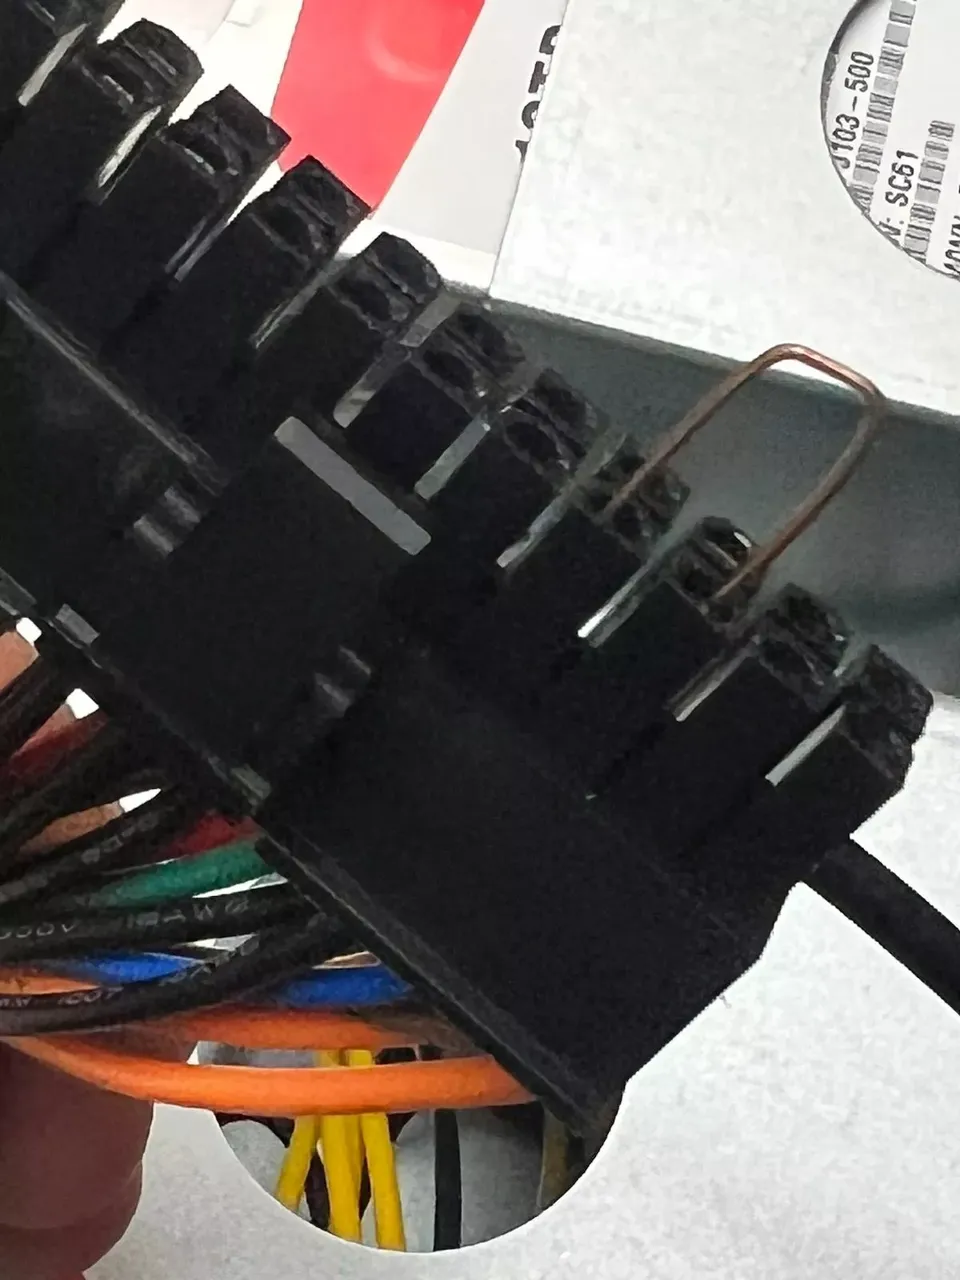
Here's a pro-tip on using a power supply without a motherboard: while holding the power connector with the latching tab towards you, use a paper clip, or in my case, a piece of MIG welding wire, to short out the third and fourth connectors. This probably will void the warranty if something happens to the power supply.

Here is a bit of information on the tech specs of the ROCKPro64.

The drive setup is straight forward. Three drives, running in a RAID5 configuration producing a total of 20TB of usable storage. Setting up software RAID under Linux is simple. I used this as a foundation for setting up software RAID. We are using software RAID because hardware RAID controllers are expensive and have limited support with single board computers. The one that appears to work, is about $600. It is not that I would not be against spending that much on a shiny new controller, it is that I do not feel there would be a noticeable benefit over a pure software solution. I will go into performance characteristics of the software RAID configuration later in this article.

How To Create RAID5 Arrays with mdadm

RAID5 has a requirement of at least three drives. As previously mentioned, this gives you n - 1 drives of storage with one drive's worth of storage for parity. This parity is not stored on the single drive, it is stored across all of the drives but it is equal in total to the size of one drive. There is the assumption that all drives are of equal size.

Get a pretty list of all the available disk:

$ lsblk -o NAME,SIZE,FSTYPE,TYPE,MOUNTPOINT
NAME          SIZE FSTYPE  TYPE  MOUNTPOINT
sda           9.1T         disk  
sdb           9.1T         disk  
sdc           9.1T         disk  
mtdblock0      16M         disk  
mmcblk2      58.2G         disk  
└─mmcblk2p1  57.6G ext4    part  /
mmcblk2boot0    4M         disk  
mmcblk2boot1    4M         disk  

You will see we have three, "10TB" drives.

To create a RAID 5 array with the three 9.1T disks, pass them into the mdadm --create command. We will have to specify the device name you wish to create, the RAID level, and the number of devices. We will be naming the device /dev/md0, and include the disks that will build the array:

sudo mdadm --create --verbose /dev/md0 --level=5 --raid-devices=3 /dev/sda /dev/sdb /dev/sdc

This will start to configure the array. mdam uses the recovery process to build the array. This process can and will take some time to complete, but the array can be used during this time. You can monitor the progress of the mirroring by checking the /proc/mdstat file:

$ cat /proc/mdstat
Personalities : [raid6] [raid5] [raid4] [linear] [multipath] [raid0] [raid1] [raid10]
md0 : active raid5 sda[0] sdc[3] sdb[1]
      19532609536 blocks super 1.2 level 5, 512k chunk, algorithm 2 [3/3] [UUU]
      bitmap: 0/73 pages [0KB], 65536KB chunk

unused devices: <none>

For this 20TB to build, it took over 2000 minutes or about a day and half. Once the building is complete, your /proc/mdstat will look similar to the above.

Make a file system on our new array:

$ sudo mkfs.ext4 -F /dev/md0

Make a directory:

$ sudo mkdir -p /mnt/md0

Mount the new array device

$ sudo mount /dev/md0 /mnt/md0

Check to see if the new array is available:

$ df -h -x devtmpfs -x tmpfs
Filesystem      Size  Used Avail Use% Mounted on
/dev/mmcblk2p1   57G  8.7G   48G  16% /
/dev/md0         19T   80K   18T   1% /mnt/md0

Now, let's save our array's configuration:

$ sudo mdadm --detail --scan | sudo tee -a /etc/mdadm/mdadm.conf

Update initramfsso we can use our new array on boot:

$ sudo update-initramfs -u

Add our device to fstab:

$ echo '/dev/md0 /mnt/md0 ext4 defaults,nofail,discard 0 0' | sudo tee -a /etc/fstab

From some of the other documentation, there is a note that dumping the configuration to /etc/mdadm/mdadm.conf before the array is completely built, could result in the number of spare devices not being set correctly. This is what mdadm.conf looks like:

# mdadm.conf
#
# !NB! Run update-initramfs -u after updating this file.
# !NB! This will ensure that initramfs has an uptodate copy.
#
# Please refer to mdadm.conf(5) for information about this file.
#

# by default (built-in), scan all partitions (/proc/partitions) and all
# containers for MD superblocks. alternatively, specify devices to scan, using
# wildcards if desired.
#DEVICE partitions containers

# automatically tag new arrays as belonging to the local system
HOMEHOST <system>

# instruct the monitoring daemon where to send mail alerts
MAILADDR root

# definitions of existing MD arrays

# This configuration was auto-generated on Thu, 22 Dec 2022 16:46:51 -0500 by mkconf
ARRAY /dev/md0 metadata=1.2 spares=1 name=k8s-controlplane-01:0 UUID=62e3b0e3:3cccb921:0fc8e646:ac33bd0f

Note spares=1 is correct in the case of my set up.

By this point, if you have waited until the array has been successfully built - my 20TB array took about a day and half to complete.

Performance

We now have a shiny, new 20TB of available disk space, but what are the performance characteristics of a 20TB, Software RAID5?

We will be using iozone. Iozone has been around for decades; I first used it while in college and having a rack full of servers was all the rage -- before the creation of utility-scale cloud computing, as well as tiny computers.

Download iozone from iozone.org. Extract and compile:

$ cd iozone3_494/src/current
$ make linux

You will end up with the executable iozone in the src/current directory.

Run iozone:

$ sudo ./iozone -a -b output.xls /mnt/md0

This will both output a lot of numbers as well as take a while to complete. When it is complete, you will have an Excel spreadsheet with the results in output.xls.

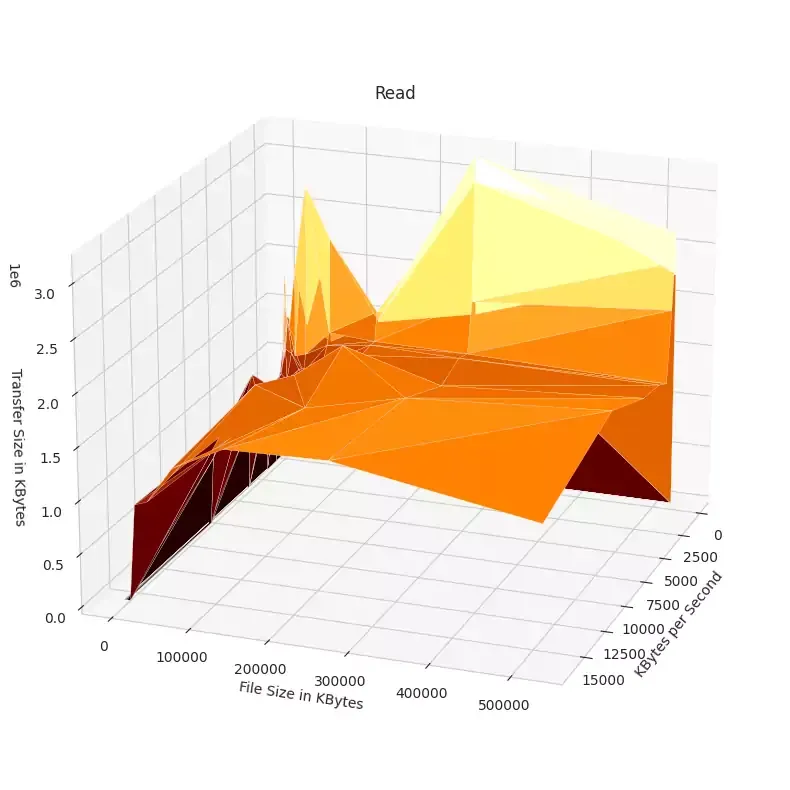
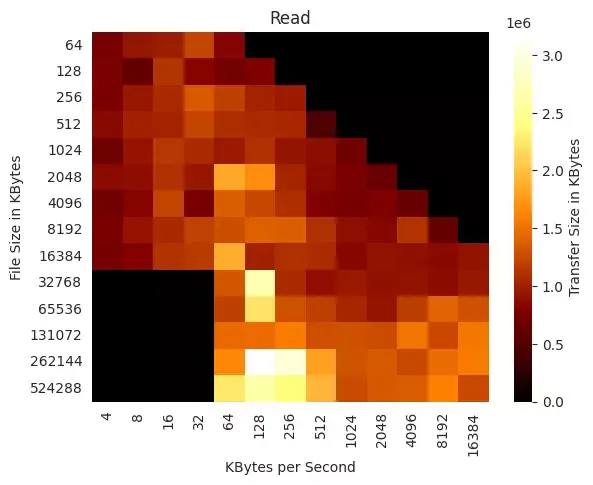
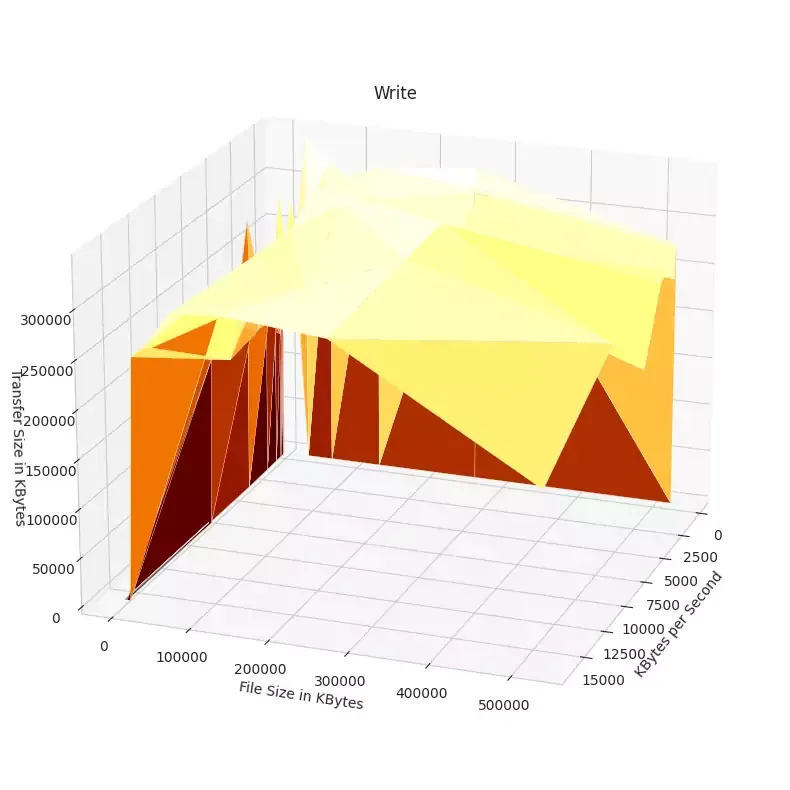
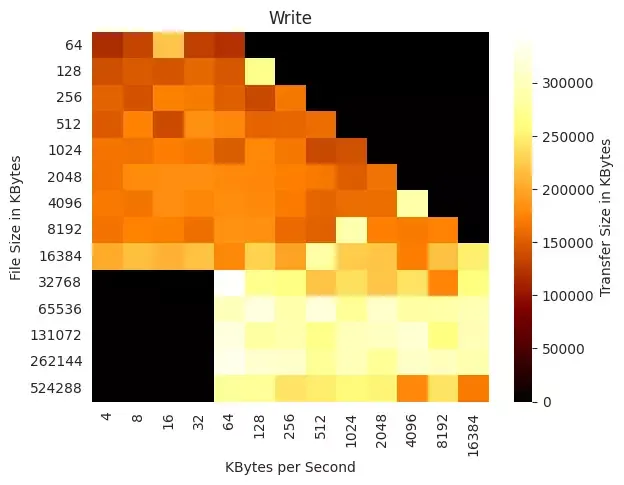
At this point, I am going to stop doing a step by step of what I have executing and running. Why, I am going to show some visualizations and analyses of our results. My steps will be roughly:

  1. Break out each block of metrics into its own csv file; for example, the first block found in output.xls would be saved in its own csv file; let's call it writer.csv; exclude the header Writer Reportfrom the csv. Repeat this step for all blocks of reports.
Writer Report                                                   
4   8   16  32  64  128 256 512 1024    2048    4096    8192    16384
64  703068  407457  653436  528618  566551                              
128 504196  306992  433727  962469  498114  757430                          
256 805021  475990  850282  594276  571198  582035  733527                      
512 660600  573916  439445  1319250 549959  645703  926116  591299                  
1024    1102176 1053512 610617  704230  902151  1326505 1011817 1161176 919928              
2048    608964  1398145 1329751 822175  1140942 841094  1332432 1308682 1082427 1311879         
4096    1066886 1304093 1168634 946820  1467135 881253  1360802 931521  1047309 1018923 1047054     
8192    955344  1295186 1329052 1354035 1019915 1192806 1373082 1197294 1053501 866339  1116235 1368760
16384   1471798 1219970 2029709 1957942 2031269 1533341 1570127 1494752 1873291 1370365 1761324 1647601 1761143
32768   0   0   0   0   1948388 1734381 1389173 1315295 1848047 1916465 1944804 1646551 1632605
65536   0   0   0   0   1938246 1933611 1638071 1910004 1885763 1876212 1844374 1721776 1578535
131072  0   0   0   0   1969167 1962833 1921089 1757021 1644607 1780142 1869709 1566404 1356993
262144  0   0   0   0   2025197 2037129 2036955 1747487 1961757 1954913 1934085 1718841 1596327
524288  0   0   0   0   2041397 2080623 2087150 2049656 2007421 2005253 1930617 1876761 1813078
  1. I used a combination of using Excel (using LibreOffice Calc would work, too) and a Jupyter Notebook. Excel was used to pull out each report's block and then save each to a CSV file; the Notebook contains python code for reading in CSVs, and using matplotlib to produce visualizations.

Select Visualizations

There actually is relatively consistent reads across the file sizes and transfer sizes.

Raspberry Pi Kubernetes Cluster

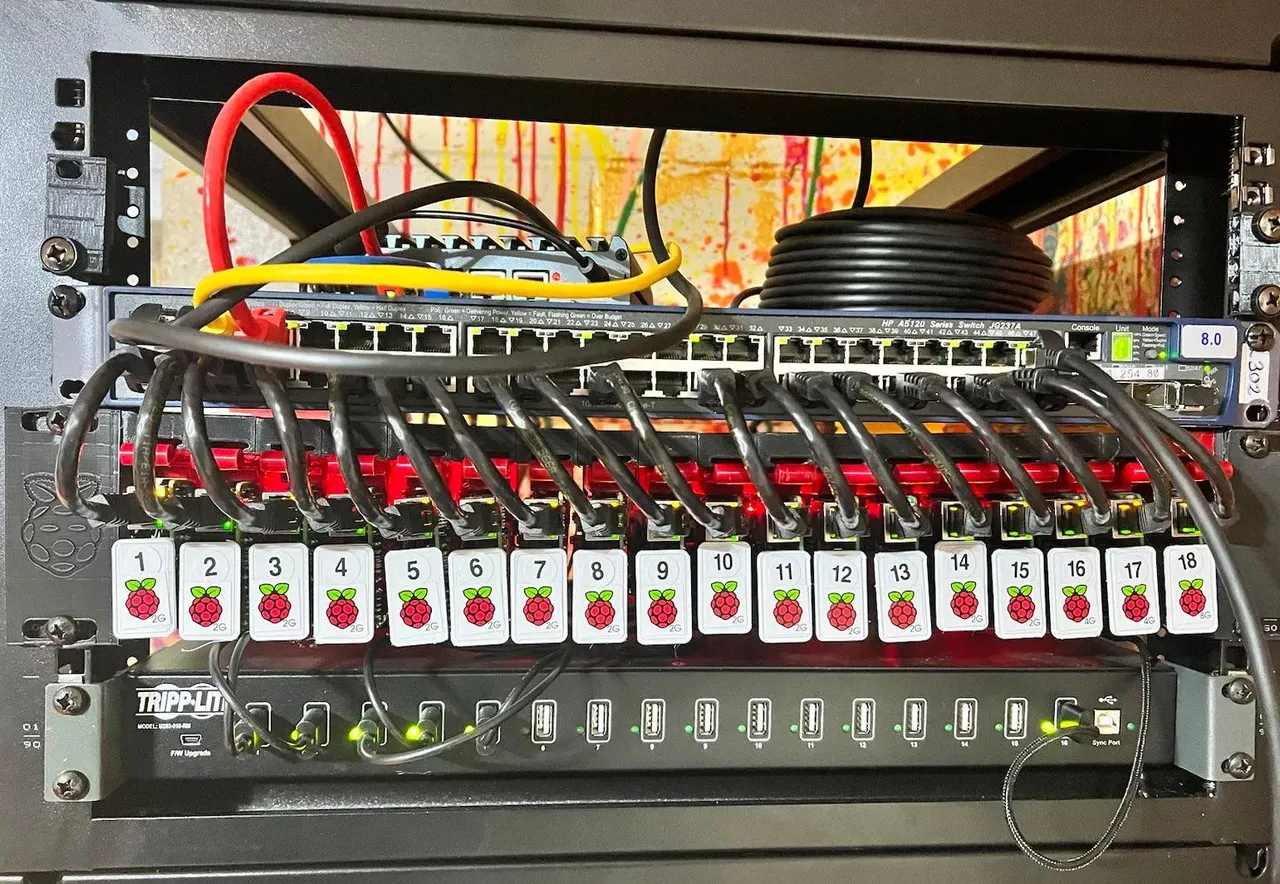
So, you find your with about nineteen Raspberry Pi 4b single board computers, and you want to run Kubernetes?

Over the course of 2022, I slowly assembled the requisite number of Raspberry Pis, despite the fact that all things Raspberry Pi were in short supply. Basically, I used technology to pay attention to sites selling Pis. It was as simple as that. No automatic buying or the like; I would get a text message and then I would have to act quickly.

Why nineteen when there are clearly only eighteen in the above photo? There needs to be a control node (call it master or controlplane). This is the node that orchestrates the building of the cluster.

Now that you have all of your nodes assembled and in a very nice 2U rack mount assembly, it is time to provision things.

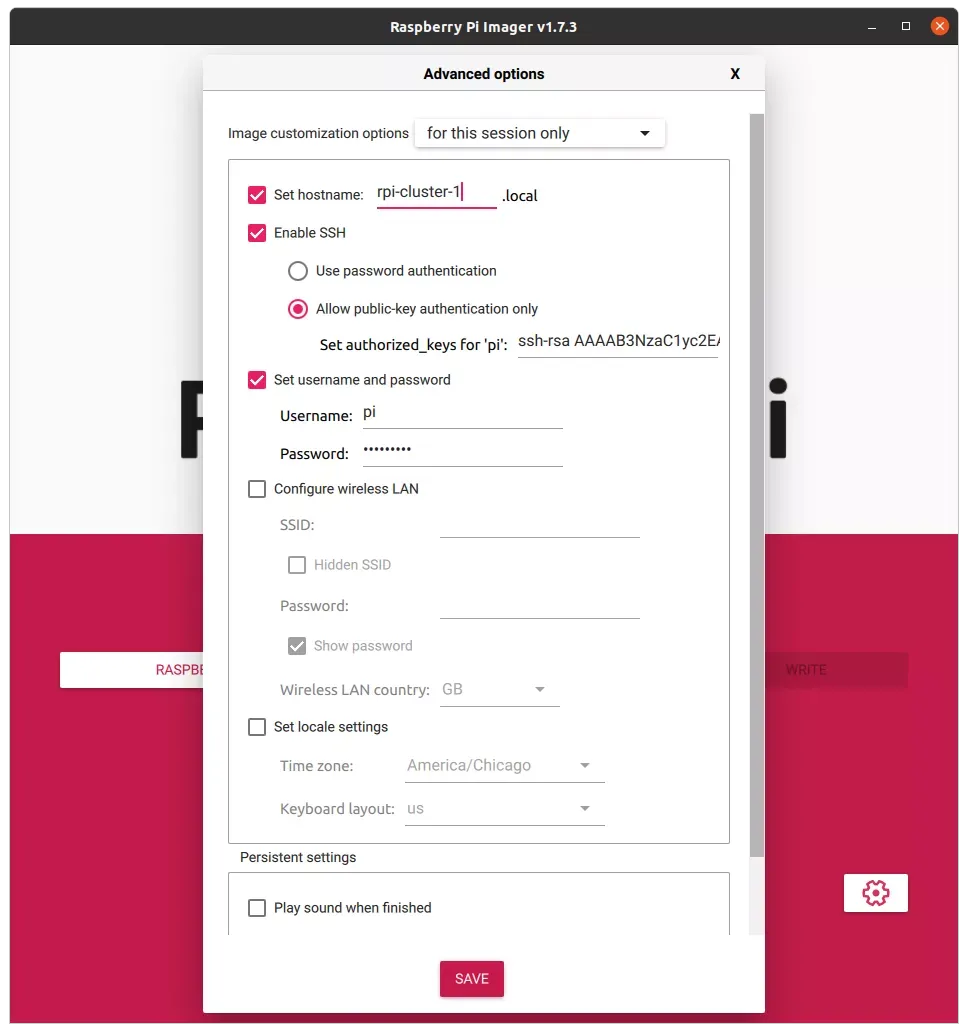
We will be using Ansible for provisioning and it will handle around 95% of the work. The other 5% is manual setup. The manual task is getting a public ssh key onto all of the nodes. If I had been smart, I would have added this into the imaging process with Imager, but I did not. When imaging, if you are not setting initial ssh key within Imager, make sure to set the password on all nodes the same. Ideally, you would want to set the ssh key during imaging; doing so, will take out a small portion of the needed manually tasks.

Pre-game Setup

We will be executing from the controlplane or master node. Before we get into that, let's establish our base parameters and assumptions.

  • All nodes, including master will be running Raspberry Pi OS 64bit
  • The master node will be named rpi-cluster-master
  • Each worker node will be named rpi-cluster-[1-18]; e.g. rpi-cluster-1 and so one
  • Each node, master and workers will have IP addresses ranging from 10.1.1.100 to 10.1.1.18
  • You are using ethernet and not wifi.
  • This is important because the Ansible playbooks that we are going to use assume there is eth0 and not wlan0
  • If you are wanting to insert the ssh key during imaging, run the following command, and then copy the contents of .ssh/id_rsa.pub from the masternode to the Advanced section of the setup in Imager where it says ""

Now, let's distribute our public ssh key. As the user pi on rpi-cluster-master, run the following:

pi@rpi-cluster-master:~ $ ssh-keygen
If needing to transfer the public key manually, make the following script (saved as 'dist-key.sh') on master
#!/bin/bash

ssh-copy-id 10.1.1.101
ssh-copy-id 10.1.1.102
ssh-copy-id 10.1.1.103
ssh-copy-id 10.1.1.104
ssh-copy-id 10.1.1.105
ssh-copy-id 10.1.1.106
ssh-copy-id 10.1.1.107
ssh-copy-id 10.1.1.108
ssh-copy-id 10.1.1.109
ssh-copy-id 10.1.1.110
ssh-copy-id 10.1.1.111
ssh-copy-id 10.1.1.112
ssh-copy-id 10.1.1.113
ssh-copy-id 10.1.1.114
ssh-copy-id 10.1.1.115
ssh-copy-id 10.1.1.116
ssh-copy-id 10.1.1.117
ssh-copy-id 10.1.1.118

Execute!

pi@rpi-cluster-master:~ $ bash dist-key.sh

Assuming you set the default password for the pi user when using Imager, you will be prompted eighteen times to accept the connection and then the enter in your password.

If you are smart and, unlike me, you put your id_rsa.pub key into Imager, it should look like:

And then you will not have to dink-around with transferring your key, individually, to each node.

Now, let's install ansibleon our master node; we will be following this.

pi@rpi-cluster-master:~ $ sudo apt update
pi@rpi-cluster-master:~ $ sudo apt install -y ansible sshpass
pi@rpi-cluster-master:~ $ echo "deb http://ppa.launchpad.net/ansible/ansible/ubuntu trusty main" | sudo tee \
-a /etc/apt/sources.list
pi@rpi-cluster-master:~ $ sudo apt install dirmngr -y
pi@rpi-cluster-master:~ $ sudo apt-key adv --keyserver keyserver.ubuntu.com --recv-keys 93C4A3FD7BB9C367
pi@rpi-cluster-master:~ $ sudo apt update
pi@rpi-cluster-master:~ $ sudo apt install -y ansible
pi@rpi-cluster-master:~ $ ansible --version
ansible 2.10.8
  config file = None
  configured module search path = ['/home/pi/.ansible/plugins/modules', '/usr/share/ansible/plugins/modules']
  ansible python module location = /usr/lib/python3/dist-packages/ansible
  executable location = /usr/bin/ansible
  python version = 3.9.2 (default, Feb 28 2021, 17:03:44) [GCC 10.2.1 20210110]

If you have made it to this point, you should have eighteen nodes with the master node's public ssh key install. You should also have ansible installed.

Let's get Ansible'ing

Now, we will be following the steps outlined in this git repo.

pi@rpi-cluster-master:~ $ git clone https://github.com/ajokela/rpi-k8s-ansible.git

Change directory into rpi-k8s-ansible

pi@rpi-cluster-master:~ $ cd rpi-k8s-ansible

Now, if you want to customize your list of nodes, this is the time. Edit cluster.yml; if you only have sixteen nodes, comment out the two you do not have; there are a couple spots where each node is mentioned.

On to provisioning! These steps are fairly intelligent at being atomic and repeatable without causing issues. In provisioning the cluster in the picture (above), some of the steps had to be repeated because of lost ssh connections and other mysterious errors. Let's first see if we have our basic configuration in working order. The following assumes you are in the directory ~/rpi-k8s-ansible on your master node.

$ ansible -i cluster.yml all -m ping

This will execute a simple ping/pong between your master node and the worker nodes.

rpi-cluster-1.local | SUCCESS => {
    "changed": false,
    "ping": "pong"
}
rpi-cluster-2.local | SUCCESS => {
    "changed": false,
    "ping": "pong"
}
rpi-cluster-3.local | SUCCESS => {
    "changed": false,
    "ping": "pong"
}
...
rpi-cluster-16.local | SUCCESS => {
    "changed": false,
    "ping": "pong"
}
rpi-cluster-17.local | SUCCESS => {
    "changed": false,
    "ping": "pong"
}
rpi-cluster-18.local | SUCCESS => {
    "changed": false,
    "ping": "pong"
}

If you get an error, double you have your nodes correctly named in cluster.yml if all looks good, try Googling the error.

Update all Your Nodes' Packages
$ ansible-playbook -i cluster.yml playbooks/upgrade.yml

As we start to run ansible playbooks, this is where you just might have to rerun a playbook to get beyond an error. The most common error I ran into was peer connections dropped. It is a bit of a mystery why; the aforementioned cluster is connected via a managed HP gigabit switch.

Install Kubernetes
# Bootstrap the master and all slaves
$ ansible-playbook -i cluster.yml site.yml

This will reboot your cluster nodes This might cause issues and force you to repeat this step. After my initial execution of that command, I followed it up with:

# When running again, feel free to ignore the common tag as this will reboot the rpi's
$ ansible-playbook -i cluster.yml site.yml --skip-tags common

This will run everything except the reboot command.

If you want to only rerun a single node and the master node, you can do something like the following:

# Bootstrap a single slave (rpi-cluster-5) and the master node
$ ansible-playbook -i cluster.yml site.yml -l rpi-cluster-master.local,rpi-cluster-5.local
Copy over the .kube/config and verification

We need to copy over your kubernetes configuration file.

# Copy in your kube config
$ ansible-playbook -i cluster.yml playbooks/copy-kube-config.yml

# Set an alias to make it easier
$ alias kubectl='docker run -it --rm -v ~/.kube:/.kube -v $(pwd):/pwd -w /pwd bitnami/kubectl:1.21.3'

# Run kubectl within docker
$ sudo kubectl version
Client Version: version.Info{Major:"1", Minor:"21", GitVersion:"v1.21.3", GitCommit:"ca643a4d1f7bfe34773c74f79527be4afd95bf39", GitTreeState:"clean", BuildDate:"2021-07-15T21:04:39Z", GoVersion:"go1.16.6", Compiler:"gc", Platform:"linux/arm64"}
Server Version: version.Info{Major:"1", Minor:"21", GitVersion:"v1.21.14", GitCommit:"0f77da5bd4809927e15d1658fb4aa8f13ad890a5", GitTreeState:"clean", BuildDate:"2022-06-15T14:11:36Z", GoVersion:"go1.16.15", Compiler:"gc", Platform:"linux/arm64"}

Let's get a little information about the cluster:

$ sudo kubectl  cluster-info
Kubernetes control plane is running at https://10.1.1.100:6443
CoreDNS is running at https://10.1.1.100:6443/api/v1/namespaces/kube-system/services/kube-dns:dns/proxy

To further debug and diagnose cluster problems, use 'kubectl cluster-info dump'.
Helm

If you need to install helm; Helm is a package manager for Kubernetes: Helm is the best way to find, share, and use software built for Kubernetes - follow these instructions:

$ curl https://baltocdn.com/helm/signing.asc | gpg --dearmor | sudo tee /usr/share/keyrings/helm.gpg > \
/dev/null
$ sudo apt-get install apt-transport-https --yes
$ echo "deb [arch=$(dpkg --print-architecture) signed-by=/usr/share/keyrings/helm.gpg] \
https://baltocdn.com/helm/stable/debian/ all main" | \
sudo tee /etc/apt/sources.list.d/helm-stable-debian.list
$ sudo apt-get update
$ sudo apt-get install helm

If you do not have gpg installed, you will need to install it.

Here is a more in depth look at helm and its role within kubernetes.

This is going to be anticlimactic, but we will start to run our first container on our shiny new kubernetes cluster in our next posting.

Raspberry Pi CM4 and Pin Compatible Modules

Hardware, in our modern era, does not exist in a vacuum; it requires software to function and be useful. One of main benefits of living within the Raspberry Pi ecosystem is you get up-to-date software that is maintained by a large network of source code contributors. Just for the linux kernel used in Raspberry Pi OS, there have been over 5,000 people contributing to the project. That's hundreds of thousands of lines of code added, removed and modified. Raspberry Pi is successful because of its ecosystem. It is so large, it is self-sustaining. The Raspberry Pi Compute Module 4 (announcement of the "CM4") was introduced about two years ago. Official Raspberry Pi CM4 Datasheet. It is a followup to the wildly successful Raspberry Pi 4b. The CM4 is a different form factor from the 4b. Unlike the 4b, it requires a carrier or IO board to be useful. The good news is it is compatible with a bewildering array of carrier and IO boards.

Raspberry Pi CM4
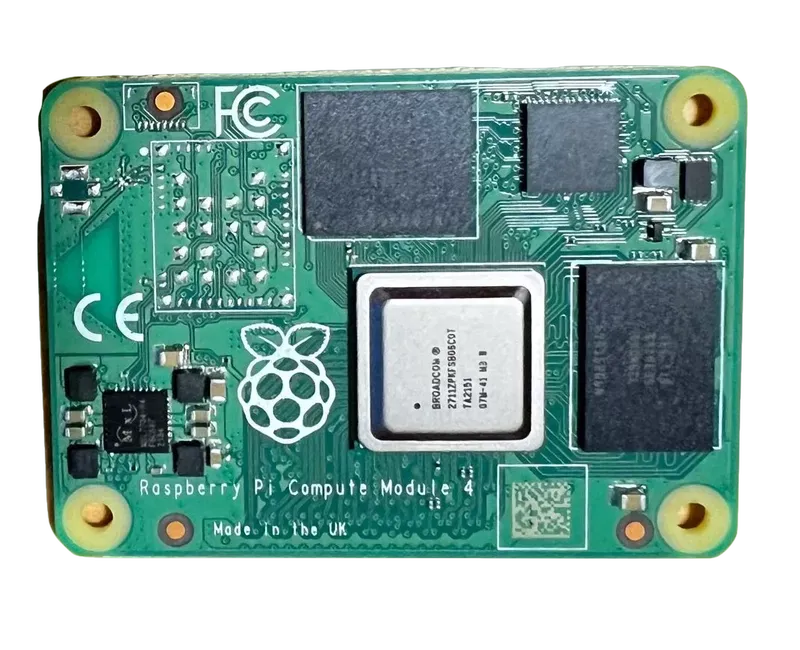

Raspberry Pi Compute Module 4, 1GB memory

There are IO boards that give you the same form factor as the RPi 4b, there are also IO boards that turn your CM4 into a KVM for a server management, there are boards with two ethernet ports -- allowing for the creation of a simple router. There also boards that expose the CM4's PCIe bus. This opens up the possibilities for using peripherals like addition network adapters or SATA controllers. More on that later.

Since the CM4's release, there have been a few pin compatible modules developed by other firms. By pin compatible, I mean that these other modules can correctly be attached via Hirose mating connectors to the IO boards.

One of the primary benefits of using a genuine Raspberry Pi CM4, as I mentioned in the first paragraph, is the ecosystem. The CM4 uses the same operating system as the 4b. This allows for nearly all the same software to be usable across the RPi family of single board computers. This sheds light on one of the most commonly brought up issues with non-Raspberry Pi single board computers: the software ecosystem just is not as robust as Raspberry Pi. This is not limited to the alternatives to the CM4. There are an array of alternatives to the RPi family, like the boards made by Pine64, or Libre, or Hardkernel's Odroid series. These all cannot run the official Raspberry Pi OS.

Jeff Geerling does a fantastic job of reviewing the RPi CM4. I am not going to give a complete, indepth review; Jeff has already done that.

Core Features:

  • Optional eMMC, zero to 32GB
  • Optional Wireless (WiFi and Bluetooth)
  • Variety of memory sizes, 1GB to 8GB

If by some chance you stumbled onto this post and you need assistance in getting Raspberry Pi OS running on a CM4 unit, check out this. I'm not going to go into details here; it is a solved problem.

Many of the alternatives to Raspberry Pi OS have a very similar feel and shallow curve for learning and setting up, but they are not 100% the same. Take for example, the the multi-board Linux distribution Armbian. Armbian supports over 160 different single board computers. If you have a well established board, there is a good chance there's an Armbian build for it. Armbian is very similar to RPi OS; they are both derivatives of Debian, both can use standard Ubuntu and Debian packages, both have a similar method of writing a disk image to an SD card and booting the OS. There is no guarantee, however, that all software designed for the Raspberry Pi OS will run under Armbian. Particularly when dealing with third party shields and GPIO boards as well as things that I tend to ignore like video encoding/decoding and sound.

The common quip as of late goes something like this: because of the shortage of Raspberry Pi computers, some people have turned to alternatives. This might be the case for some, but this is not going to be my justification for using or testing out the three alternatives that will be present throughout the rest of this article.

All Raspberry Pi single board computers and modules are in tight supply for the retail and hobbists markets. Check out Raspberry Pi Locator for places that might have supply. If you are willing to pay a significant premium, eBay has quite a few available.

With the RPi CM4 having been covered extensively - like Jeff Geerling's Review; instead, I'll be looking at the remaining three modules.

Performance Metrics

Geekbench Metrics
Module Single CPU Metrics Multi-CPU Metrics
Raspberry Pi CM4 228 644
Radxa CM3 163 508
Pine64 SOQuartz 156 491
Banana Pi CM4 295 1087
Features Comparison
Raspberry Pi CM4 Radxa CM3 Pine64 SOQuartz Banana Pi CM
Specifications Specifications Specifications Specifications
Core Broadcom BCM2711, Quad core Cortex-A72 (ARM v8) 64-bit SoC @ 1.5GHz Rockchip RK3566, Quad core Cortex-A55 (ARM v8) 64-bit SoC @ 2.0GHz Rockchip RK3566, Quad core Cortex-A55 (ARM v8) 64-bit SoC @ 1.8GHz and Embedded 32-bit RISC-V CPU Amlogic A311D Quad core ARM Cortex-A73 and dual core ARM Cortex-A53 CPU
NPU - 0.8T NPU 0.8 TOPS Neural Network Acceleration Engine 5.0 TOPS
GPU - Mali G52 GPU Mali-G52 2EE Bifrost GPU Arm Mali-G52 MP4 (6EE) GPU
Memory 1GB, 2GB, 4GB or 8GB LPDDR4 1GB, 2GB, 4GB or 8GB LPDDR4 2GB, 4GB, 8GB LPDDR4 4GB LPDDR4
eMMC On module - 0GB to 32GB On module - 0GB to 128GB External - 16GB to 128GB On module - 16GB to 128G)
Network 1Gbit Ethernet - Option for WiFi5 with Bluetooth 5.0 1Gbit Ethernet - Option for WiFi5 with Bluetooth 5.0 1Gbit Ethernet - WiFi 802.11 b/g/n/ac with Bluetooth 5.0 1Gbit Ethernet
PCIe 1-lane 1-lane 1-lane 1-lane
HDMI 2x HDMI 1x HDMI 1x HDMI 1x HDMI
GPIO 28 pin 40 pin 28 pin 26 pin
Extras - - - SATA ports, one shared with USB 3, one shared with PCIe; Audio Codec
Geekbench Score - Single CPU 228 163 156 295
Geekbench Score - Multi CPU 644 508 491 1087
Price of Tested* $65 $69 $49 $105
Power Consumption 7 watts N/A 2 watts N/A
* Prices exclude shipping

Pine64 SOQuartz
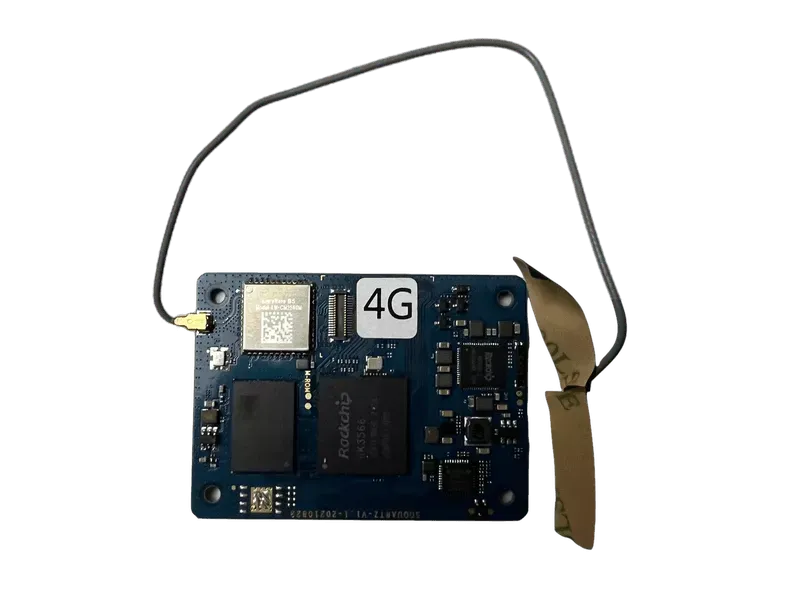

Pine64 SOQuartz Module, 4GB memory

For whatever reason, I really like Pine64's SOQuartz module. It is by far the least performant of the four compute modules I have tried. It has a wonky antenna and needs a far from mainstream variety of Linux to be useful. There are two Linux distributions available: DietPI and Plebian Linux. I settled upon using Plebian. I would have gone with DietPi but my initial use case of making a two ethernet router using a Waveshare Dual Gigabit Ethernet Base Board Designed for Raspberry Pi Compute Module 4, but I was unable to get both ethernet ports working. Plebian was simpler. For those interested in trying Plebian, you can download recent disk images by going to Plebian Linux's Github Actions, and select one of the recent "Build Quartz64 Images"; at the bottom there will be zipped disk image Artifacts to download for the various flavors of Quartz64. Plebian is a bit rough around the edges. It is derived from Debian Testing (currently codenamed bookworm) and runs a release candidate Linux Kernel. Its developer, CounterPillow, also states that "This is a work-in-progress project. Things don't work yet. Please do not flash these images yet unless you are trying to help develop this pipeline." The interactions with the system feel similar to that of NetBSD from the early-2010s. It is not to say it is not a modern flavor of Linux, it is simply lacking some of the usual expectations. You want your network interfaces to be named eth0? How about no. Interfaces have not been aliased, if you can get WiFi drivers working, you will end up with a device named something like wlxe84e069541e6 instead of wlan0. Given that it is running a testing branch of Debian, things like docker and the like will likely not work without some significant wrangling.

Why do I like this compute module? I like Pine64's products. I like the community that has grown up around the products. In the course of trying to get an operating system up and running, I had numerous questions that I asked on Pine64's Discord Server. Everyone was extremely helpful and despite my own feelings that some of my questions were simplistic, no one expressed that sentiment. There were no massive egos to speak of.

Core Features:

  • Variety of memory options: 2gb to 8gb
  • external eMMC module support: 8gb to 128gb
  • Wifi

Getting Plebian running on a SOQuartz module is straightforward; write the appropriate image to an eMMC module, attach the eMMC onto the SOQuartz and place it into a carrier or IO board. You should get working HDMI, one ethernet port, along with USB working. A quick run down of the steps are as follows:

  1. Get a USB to eMMC adapter; Pine64 has one available; you could also try eBay; you may need to get a micro SD to USB adapter, too.

  2. Get an eMMC module. Pine64 has a few available

  3. Obvious step: connect your eMMC to your USB to eMMC adapter and then connect that to your desktop/laptop/etc.

  4. Download a SOQuartz Plebian Linux disk image from Plebian Linux's Github Actions

  5. DownloadSOQuartz CM4 IO Board Image

  6. Unzip the contents
  7. You will end up with a file called plebian-debian-bookworm-soquartz-cm4.img.xz;

  8. Write to your eMMC module. You could use something balena Etcher or, if you're command-line-comfortable, use dd

  9. balena Etcher will take care of decompressing plebian-debian-bookworm-soquartz-cm4.img.xz

  10. using dd, you can do something like this:

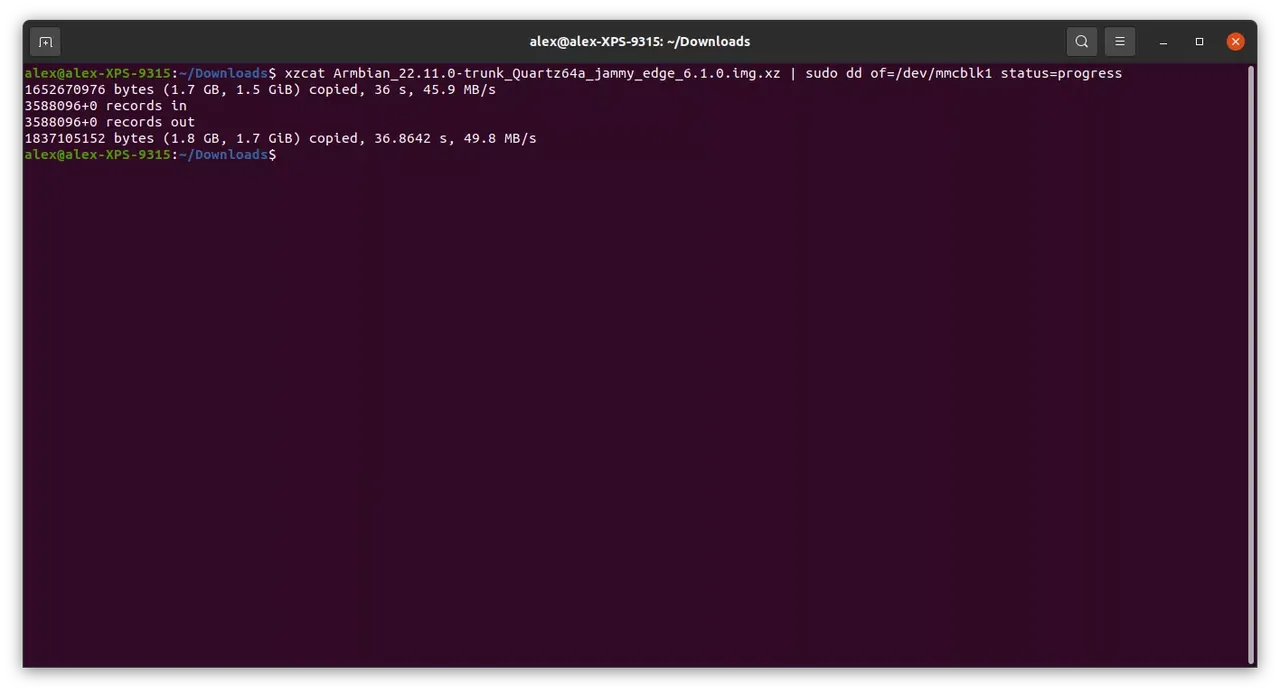
    bash sudo xzcat plebian-debian-bookworm-soquartz-cm4.img.xz | sudo dd of=/dev/mmcblk1 status=progress

    where /dev/mmcblk1 is the correct device for your USB to eMMC adapter.
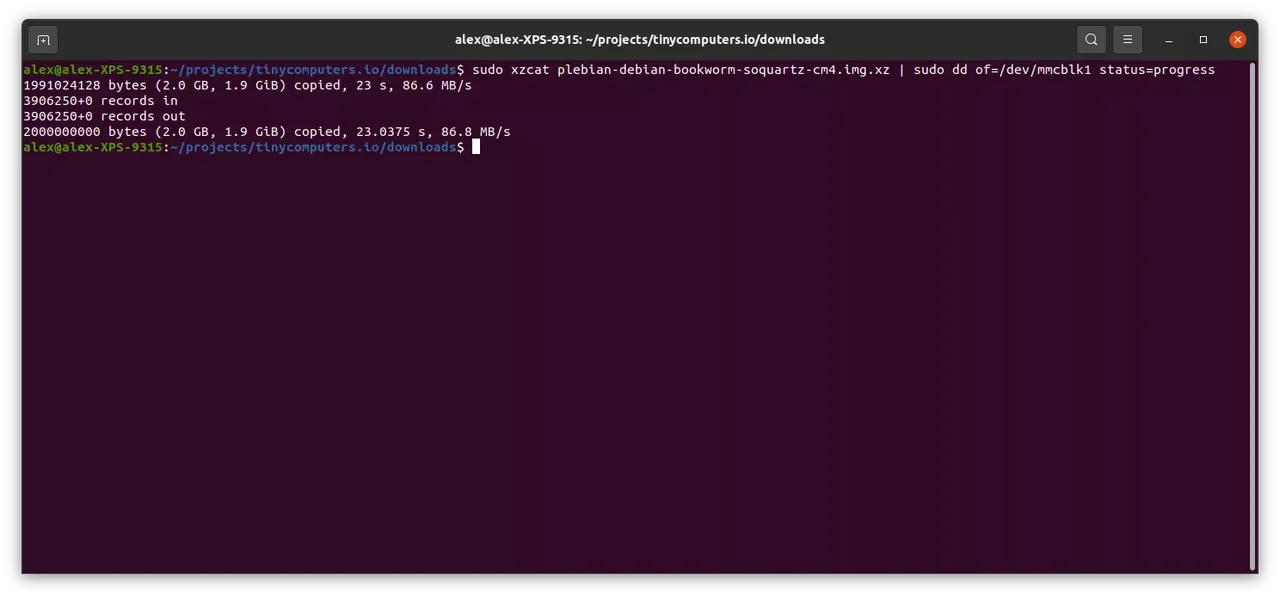
  11. Attach your eMMC module to your SOQuartz module and attach the module to an IO or carrier board.

  12. Attach peripherals and apply power. You'll eventually get presented with a prompt to set the password for the user pleb

If would be more cost effective if you were to buy a SOQuartz module, an USB to eMMC adapter and an eMMC module all at once; for orders being shipped to the United States, it is roughly a $9 flat rate.

Finally, if you really feel like going for an alternative to Linux, NetBSD will also work on the SOQuartz, but it is more complicated. You will need to download a Generic 64bit image from under the NetBSD-daily HEAD tab. This will need to be written to an eMMC module. Next, you will need to write the appropriate UEFI image to an SD card from Jared McNeill's port of Tianocore to the Quartz64 family. UEFI and the disk image cannot exist on the same media.

Pine64 sells SOQuartz modules directly from their site. The modules I have purchased and used are the 4gb models. They are about $50 excluding shipping.

Radxa CM3
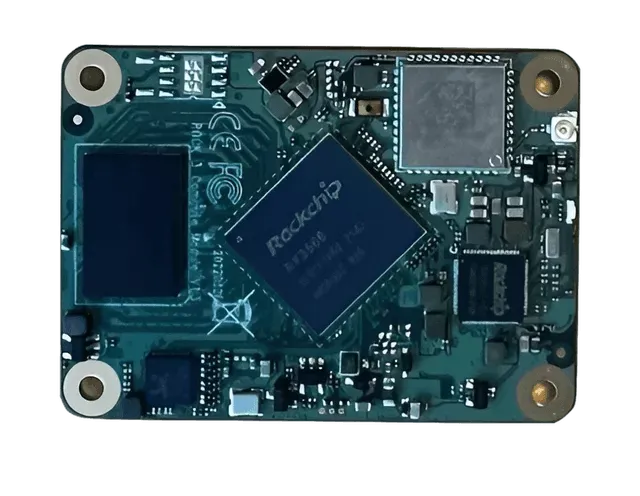

Radxa CM3, 4GB memory, without heatsinks

As far as performance goes, the Radxa CM3 is just above Pine64's SOQuartz module but below Raspberry Pi CM4. Radxa is better known for its Rock3 and Rock5 series of single board computers; available from ALLNET.China and eBay. The CM3 is in the Rock3 series of boards and modules. The series features Rockchip RK3566/RK3568 processors, the RK3566 also is used in Pine64's Quartz64 and SOQuartz boards. Even though the module will function without issue on a carrier or IO board designed for Raspberry Pi CM4, the CM3 IO board by Radxa exposes two SATA ports in addition to the PCIe 1x lane. The CM3 has an official Debian and Ubuntu distributions, but like all the other compute modules, these are artisanally crafted specifically for the CM3. That means, you can not take an actual-official Debian or Ubuntu disk image for Arm64 and have it just have it work. Radxa does, however, maintain an up-to-date Github build pipeline for producing both Debian and Ubuntu images for the CM3. Like the operating system's need to be different, so is the eMMC - it is not flashed in a typical manner - like what you would expect from a Raspberry Pi CM4 or even the Pine64 SOQuartz. In order to install Linux on the onboard eMMC, you need to use tools provided by Rockchip. The Radxa Wiki page for CM3 is a good place to start. The CM3 and its installation process are about as far from Raspberry Pi CM4 territory as you will deal with for the modules presented in this article. The following instructions are available from wiki.radxa.com but they are found across a disparate set of pages; some describing the rockchip tools with references to disk images but with no clear and convenient place to download the files. This is an attempt to streamline the process. Let's get at it!

Core Features:

  • On-module eMMC of 16 to 128GB
  • Two SATA (when using the appropriate IO board)

The Rockchip tools are available on Windows as well as macOS/Linux. Downloading, compiling and running the macOS/Linux tool is straightforward; Windows involves a set of drivers and an executable tool.

Linux/macOS
  • Install necessary USB and autoconf packages

sudo apt-get install libudev-dev libusb-1.0-0-dev dh-autoreconf pkg-config libusb-1.0

git clone https://github.com/rockchip-linux/rkdeveloptool
cd rkdeveloptool
autoreconf -i
./configure
make
sudo make install
  • Run rkdeveloptool --helpto verify it is installed
Windows
  1. Download RKDevTool
  2. Download RKDriverAssistant
  3. Unzip and execute RKDriverAssistant (DriverInstall.exe)
  4. Unzip RKDevTool
  5. Before executing the tool, you will want to change the language to English; change Chinese.ini to Englist.ini
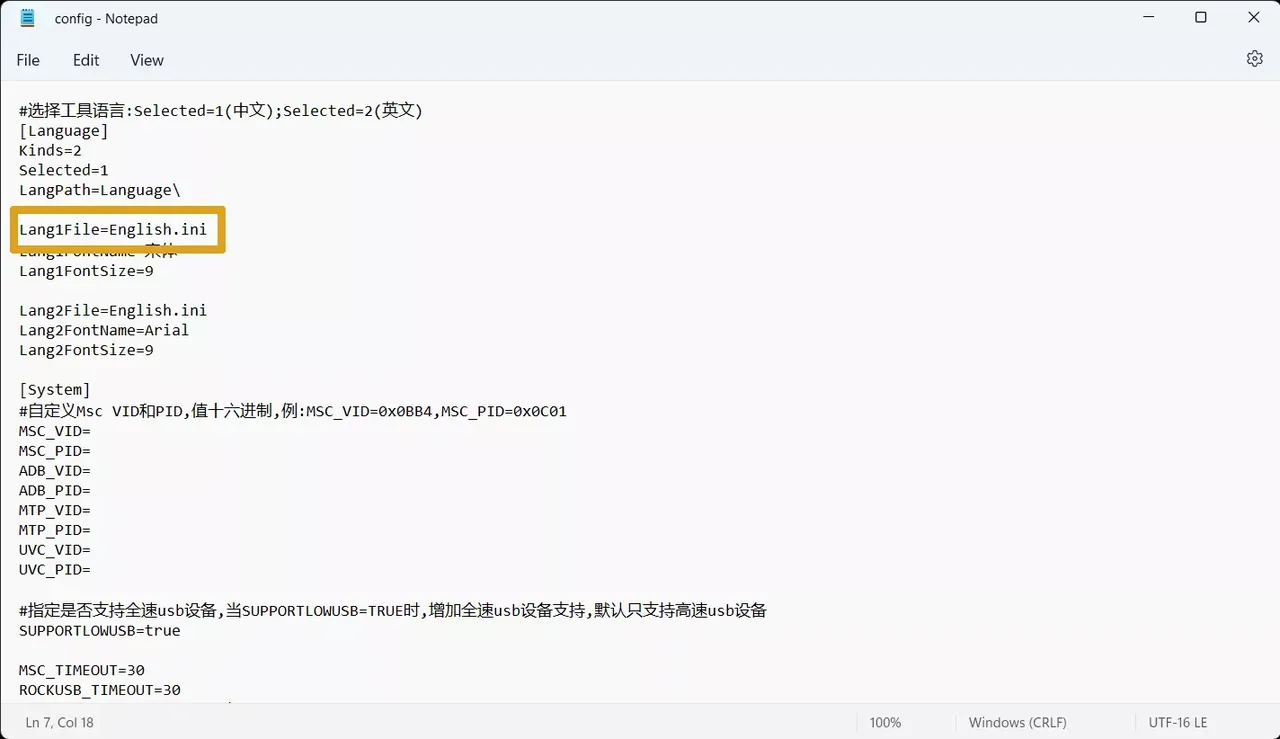
There is an assumption of using a Raspberry Pi CM4 IO Board.

Boot into maskrom mode
  1. Unplug the board and remove any SD card
  2. Plug a micro USB to USB Type-A cable into the micro USB port on the IO board. The other end of the cable gets plugged into your desktop or laptop. My laptop only has USB-C, so I had to use an adapter
  3. On the CM3, there is a very tiny golden button; while pressing this, plug the power back in on the IO board
  4. After a few seconds, you can stop pressing the button
  5. Check for a USB device
  6. Linux/macOS should show Bus 001 Device 112: ID 2207:350a Fuzhou Rockchip Electronics Company
  7. Windows, you will need to run RKDevTool; the status at the bottom of the application should read maskrom mode
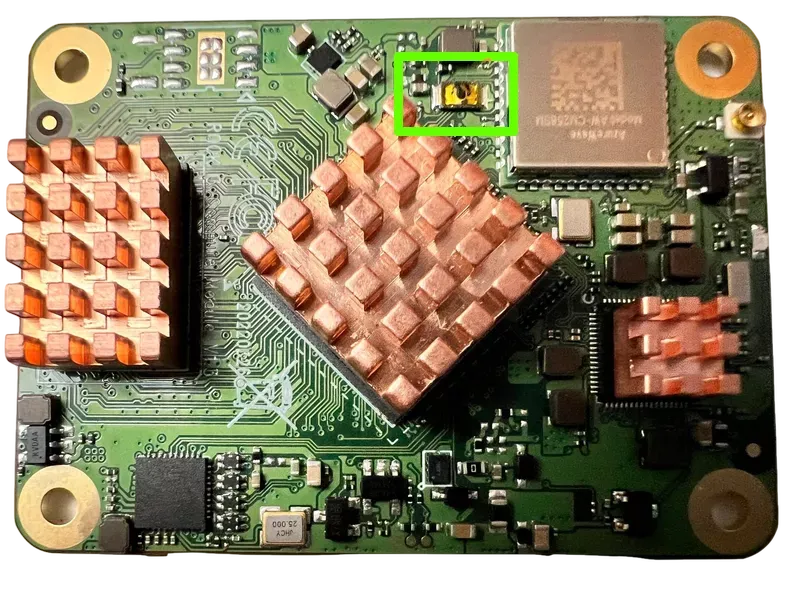
maskrom button
Flashing/Writing a Disk Image

You will need to download two files:

  1. rk356x_spl_loader_ddr1056_v1.06.110.bin
  2. A Radax CM3 disk image from https://wiki.radxa.com/Rock3/downloads or https://github.com/radxa-build/radxa-cm3-io/releases/latest or this mirror

We will be using radxa-cm3-io-ubuntu-focal-server-arm64-20221101-0254-gpt.img.xz; it is advisable to follow this and download a more recent disk image.

Linux Flashing
rkdeveloptool ld

DevNo=1 Vid=0x2207,Pid=0x350a,LocationID=104 Maskrom

rkdeveloptool db rk356x_spl_loader_ddr1056_v1.06.110.bin
rkdeveloptool wl 0 radxa-cm3-io-ubuntu-focal-server-arm64-20221101-0254-gpt.img.xz

Reboot CM3

rkdeveloptool rd
Windows Flashing

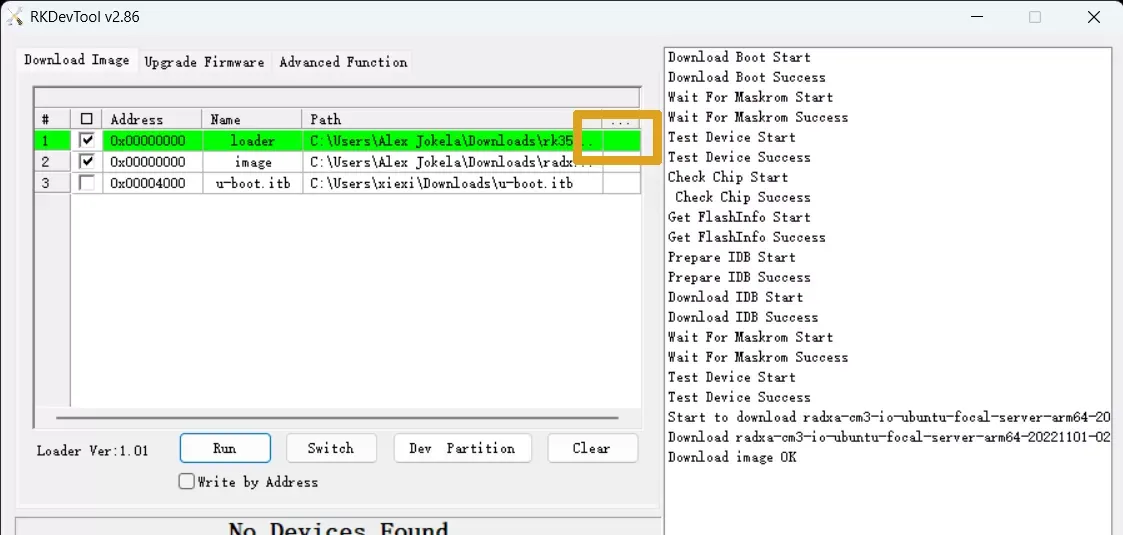
You will need to specify a loader as well as an image. In the table on the left side of the screenshot, click in right-most the rectangle of the first row. This should bring up a file dialog box. Navigate to where you downloaded rk356x_spl_loader_ddr1056_v1.06.110.bin. Likewise for the second row (image), navigate to where you downloaded radxa-cm3-io-ubuntu-focal-server-arm64-20221101-0254-gpt.img.xz

Click Run

This operation will take several minutes; be patient.

The CM3 should automatically boot and bring you to a login prompt. The default user is rock with a password of rock

The Radxa CM3 can be purchased from ALLNET.China for about $70 excluding shipping.

Banana Pi CM4
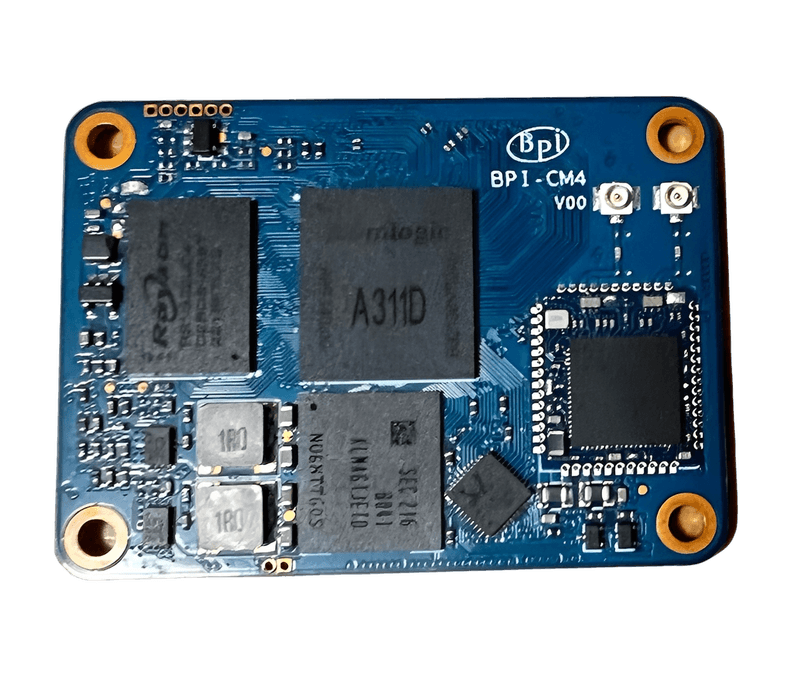

Banana Pi CM4, 4GB memory

Looking at the Geekbench table (above), you will notice at the Banana Pi CM4 seriously outperforms the other three modules I have tested. It is also the most expensive module - including shipping - it was about $120. This was not an inflated Raspberry Pi price, this is directly from Sinovoip, the company behind the Banana Pi family of single board computers. But, before you start searching for where you can buy one, as of the time of this writing, I purchased Sinovoip's last module that they had allocated to developers and testers; and they have not started to commercially produce any, yet.

Core Features:

  • 4 x ARM Cortex-A73 CPU cores
  • 2 x ARM Cortex-A53 CPU cores

  • 4GB of memory

Like the Radxa CM3, operating system software is very limited. For very detail instructions on install an operating system, in this case Android, check out https://wiki.banana-pi.org/Getting_Started_with_CM4.

Installing and boot Linux is fairly straight forward. You can either boot from an SD card, or you can choose to boot from the on-board eMMC module. That said, nonetheless, you will need an SD card.

Head over to https://wiki.banana-pi.org/Banana_Pi_BPI-M2S#Linux, and you find a similar table of distributions images:

Distributions
Ubuntu
  • 2022-06-20-ubuntu-20.04-mate-desktop-bpi-m2s-aarch64-sd-emmc.img.zip Baidu Cloud: https://pan.baidu.com/s/1kRukI-H-xliNqIqVacXWRw?pwd=8888 (pincode:8888) Google drive: https://drive.google.com/file/d/1P2YQUwdrREdiwidr8YtCvOdMmwLPerVu/view

S3 Mirror: https://s3.us-east-1.amazonaws.com/cdn.tinycomputers.io/banana-pi-m2s-cm4-linux/2022-06-20-ubuntu-20.04-mate-desktop-bpi-m2s-aarch64-sd-emmc.img.zip MD5:2945f225eadba1b350cd49f47817c0cd

  • 2022-06-20-ubuntu-20.04-server-bpi-m2s-aarch64-sd-emmc.img.zip Baidu Cloud:https://pan.baidu.com/s/1UoYR0k9YH9SE_A-MpqZ2fg?pwd=8888 (pincode: 8888) Google Drive:https://drive.google.com/file/d/1y0DUVDhLyhw_C7p6SD2q1EjOZLEV_c_w/view S3 Mirror: https://s3.us-east-1.amazonaws.com/cdn.tinycomputers.io/banana-pi-m2s-cm4-linux/2022-06-20-ubuntu-20.04-server-bpi-m2s-aarch64-sd-emmc.img.zip MD5:9b17a00cbc17c46e414a906e659e7ca2
Debian
  • 2022-06-20-debian-10-buster-bpi-m2s-aarch64-sd-emmc.img.zip Baidu Cloud: https://pan.baidu.com/s/1TTsdyy5I7HLWS_Tptg7r2w?pwd=8888 (pincode: 8888) Google Drive:https://drive.google.com/file/d/116ZydpggYpZ1WoSyVsc4QuchdIa3vGyI/view

S3 Mirror: https://s3.us-east-1.amazonaws.com/cdn.tinycomputers.io/banana-pi-m2s-cm4-linux/2022-06-20-debian-10-buster-bpi-m2s-aarch64-sd-emmc.img.zip MD5:9d39558ad37e5da47d7d144c8afec45e

Flashing/Writing Images

Let's assume we are using 2022-06-20-debian-10-buster-bpi-m2s-aarch64-sd-emmc.img.zip; the handiest thing to start out with is making a bootable sd card. On your laptop or desktop computer, and assuming you are using a flavor Linux, issue the following at a command line:

unzip 2022-06-20-debian-10-buster-bpi-m2s-aarch64-sd-emmc.img.zip
dd if=2022-06-20-debian-10-buster-bpi-m2s-aarch64-sd-emmc.img of=/dev/sda0

Change sda0 to the appropriate device.

Instead the sd card into the IO board, and apply power to the board. That's it for booting from an SD card. In order to boot from eMMC, you will need to follow the above steps, but instead of downloading and writing the image from your laptop or desktop, you will be using the BPI CM4 instead. Download and unzip the image file:

unzip 2022-06-20-debian-10-buster-bpi-m2s-aarch64-sd-emmc.img.zip
dd if=2022-06-20-debian-10-buster-bpi-m2s-aarch64-sd-emmc.img of=/dev/mmcblk0

Now, power down the IO board, and remove the SD card. Apply power once more, and you should be booting up from eMMC.

As a side note, when I first booted my CM4, it began an unattended system update and that took a while to complete. It will be best if you let it finish this before doing any serious usage. Just use top to check on the running processes.

Other bits of information:

As of this writing, the Banana Pi CM4 is currently unavailable for general purchase.

Final Thoughts

If you are needing to operate in a familiar environment, you will want to go with the Raspberry Pi CM4. As of this writing, you will pay a premium - a 100% markup or more. You can get high priced CM4s from eBay or Amazon. If you need performance, and are not needing to use crazy shields and hats, you will want to go with the Banana Pi CM4, but the catch is, it has not been released yet. It is hands down the most robust compute module. If you are looking to use bleed-edge Linux and want a bit of a challenge, the Pine64 SOQuartz module is for you. And that leaves the Radxa CM3. If you willing to use the Rockchip tools to flash the eMMC module, and you are not concerned with software compatibility for shields and hats and you want similar performance to an RPi CM4, the Radxa might be a good choice.
Pine64 Quartz64 A - Running Docker

Getting Started

Getting docker installed and running on a Pine64 Quartz64 A is relatively straightforward once you have found a disk image that has a few necessary things. We have a number of artisan-crafted operating systems. Most are Debian/Ubuntu feeling; there is DietPi which has a very nice look and feel - minimalist creation. There is also Plebian Linux, which is maintained by CounterPillow. It is very bleeding edge for its development stage. It feels less like a Linux system and more like a quirky NetBSD system. But, will not be using either of those; we will be using Armbian. There are community maintained disk images but there is one problem: as of the time this post has been written, Dec 12, 2022, the images available from Armbian on Github do not have functioning ethernet. There is a paragraph or so on Pine64's wiki about network connectivity, but I am not certain if the issue I am experiencing is related to that or if it is just a red herring.

Even though DietPi and Plebian have that familiar Debian/Ubuntu smell, each has its own issue that makes us drive toward Armbian.

First, DietPi. I love the minimalist feel but attempting to run sudo apt install docker-ceresults in dpkg failing for some unclear reason. I really wanted something that should easily follow instructions that are found just about anywhere on internet for installing Docker on a Debian/Ubuntu system -- I did not want to take time trying to figure what was causing this error.

Second, Plebian. Plebian feels like NetBSD from early 2000s. It's rough around the edges and according its maintainer, should not be used in any capacity other than trying to help develop the distribution. The main issue that I found is it is based upon Debian bookworm, also known as testing. Docker does not have readily available Debian packages for bookworm. Bookworm is too new. I could have taken the time to figure out how to handcraft an install, but that is not what I am looking to do.

If you dig deep enough into the world of niche internet forums related to Pine64, Quartz64 or single board computers, you may find your way to Quartz64 Model A installation help --> brings you to this forum post on Armbian's main forum site. Scroll down, and you find another link, this time to use balbes150's Armbian's file storage (mirror).

I selected a Jammy distribution image. Why? Because Docker has packages readily available for Jammy.

Write a Disk Image

There are literally thousands of examples of how to write a disk image to an SD card or eMMC module; everyone's setup maybe a different from others. If you are GUI-inclined, I would recommend balena Etcher. One of the only issues I can see if it will not run on Arm-based computers, it is only available for x86|64.

If you are more command line inclined, you can use the program dd. Here is one that is fairly indepth look at using dd. If you are impatient and know what the name is of your device, something like the following:

xzcat Armbian-Quartz64-jammy-edge.img.xz | dd of=/dev/mmcblk1 status=progress

This assumes many things, but as a skilled and sophisticated Linux/UNIX user, you should not have any issues writing an image to a media type.

dd-writing-image-to-media

Installing Docker

The following is a summarization of Install Docker Engine on Ubuntu.

Cleanup Old Versions

Previous versions of docker were called a few things; let's remove the cruft.

$ sudo apt-get remove docker docker-engine docker.io containerd runc

With those things removed, we will move onto setting a few things up to use Docker's package repository.

 $ sudo apt-get update
 $ sudo apt-get install \
    ca-certificates \
    curl \
    gnupg \
    lsb-release

Add Docker's GPG key (this makes it so you are less likely to get a compromised docker patch from Docker):

 $ sudo mkdir -p /etc/apt/keyrings
 $ curl -fsSL https://download.docker.com/linux/ubuntu/gpg | sudo gpg --dearmor -o \
    /etc/apt/keyrings/docker.gpg

Setup the repository:

echo \
  "deb [arch=$(dpkg --print-architecture) signed-by=/etc/apt/keyrings/docker.gpg] \    
      https://download.docker.com/linux/ubuntu \
      $(lsb_release -cs) stable" | sudo tee /etc/apt/sources.list.d/docker.list > /dev/null

This settings things up for us to be able to pull down officials packages from Docker. Let's refresh our available packages and install Docker.

$ sudo apt-get update
$ sudo apt-get install docker-ce docker-ce-cli containerd.io docker-compose-plugin

Docker should be running; let's test it.

$ sudo docker run hello-world

success!

Arduino Uno (Rev 3) + LoRaWAN + Helium

The goal of this post is allow the use of an Arduino Uno (Rev 3) or compatible board with a LoRa shield or breakout sending telemetry over the Helium network and ultimately into a storage destination. For simplicity, we will be using Google Sheets to as our storage destination. There are many other destinations available, Amazon Web Services (AWS) and its different database services would be another option if you were wanting to make a more production quality product. Why an Uno or compatible? They are ubiquitous and relatively inexpensive. My target project, which I hope to write about here in the future, is a water sensors project that will send telemetry data over LoRa and into AWS. My first prototype shield was made using a standard Uno footprint proto-shield.

If you are unfamiliar with LoRa , checkout The Things Network Tutorial on LoRa . This post is by no means meant to be an introduction to LoRa, it is, instead, a quick guide for getting LoRa communications up and working, at minimum, using an Arduino Uno (Rev 3) with a LoRa radio shield, sending data over The Helium network. The New York Times has an article on what Helium is in layman's terms. Or here for slick pitch on the prospects of Helium.

Getting an Arduino Uno (Rev 3) or a compatible board - my personal choice is SparkFun's RedBoard Plus - seemed straightforward from the start. I only needed to find a LoRa breakout or shield, and use an existing library and that would be it.

Grove Wio-E5 on a SparkFun Qwiic shield

Initially, I picked a Grove - Wio-E5 (STM32WLE5JC). But, I did not realize that this particular module uses AT commands and requires a second Serial device on your Arduino for communications; an Arduino Mega or SparkFun's RedBoard Plus Artemis ATP will work. This means the Uno and those compatible are not usable as they only have one Serial device.

What I really wanted was a howto that walked me through using a regular old Uno-footprint LoRa shield to send data over the Helium network. That is the aim of this article. Let's get started.
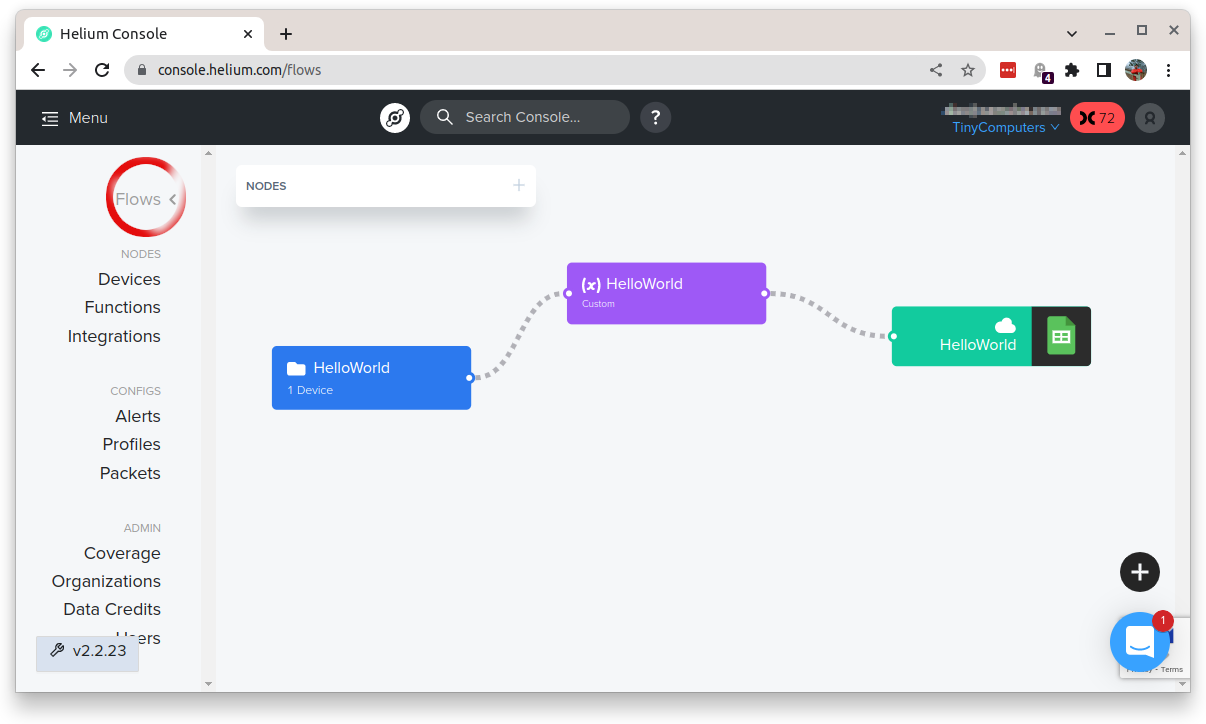
Things you will need:

Dragino and Elecrow LoRa Shields
  1. Arduino Uno (Rev 3) or compatible

  2. Dragino or Elecrow LoRa RFM95 Keep in mind the Elecrow LoRa RFM95 and Draginos have different pin configurations.

  3. Helium Network Coverage - use Helium Explorer

  4. Use of Helium Console

  5. A few dollars to buy Helium Data Credits in the Helium Console

  6. Google Forms and Google Sheets (for use as a simple storage mechanism for our data)

Preparations:

  1. Install MCCI LoRaWAN LMIC library in the Arduino IDE; as of this writing, I'm are using version 4.1.1

/images/installing-lmic-library.png
  1. With LMIC installed, we need to configure LMIC to your particular correct board`; edit the lmic_project_config.h which is found in /home/user/Arduino/libraries/MCCI_LoRaWAN_LMIC_library/project_config/

// project-specific definitions

// We're in the US, so we go with 915mhz
#define CFG_us915 1

//#define CFG_eu868 1
//#define CFG_au915 1
//#define CFG_as923 1
// #define LMIC_COUNTRY_CODE LMIC_COUNTRY_CODE_JP      /* for as923-JP; also define CFG_as923 */
//#define CFG_kr920 1
//#define CFG_in866 1
#define CFG_sx1276_radio 1
//#define LMIC_USE_INTERRUPT
  1. Now get our basic Arduino Sketch from Github and open the file in Arduino IDE.

    Depending upon which board you are using, you may need to change the pin mapping. The pin mapping can be found toward the top of the previously linked sketch. Here are two examples; for the purposes of this article, we will be using Dragino's LoRa shield.

    Pin Mappings for LoRa Shields

    //////////////////////////////////////////////////
    //
    // Dragino LoRa Shield Pin mapping
    // All jumpers need to be to the LEFT
    //
    const lmic_pinmap lmic_pins = {
        .nss = 10,
        .rxtx = LMIC_UNUSED_PIN,
        .rst = 7,
        .dio = {2, 5, 6},
    };
    
    /////////////////////////////////////////////////
    //
    // Elecrow
    //
    // Pin mapping
    const lmic_pinmap lmic_pins = {
        .nss = 10,
        .rxtx = LMIC_UNUSED_PIN,
        .rst = 9,
        .dio = {2, 6, 7},
    };
    
  2. After setting the correct pin mapping for your shield, compile sketch to verify it will actually compile.

    A warning will be displayed: This is expected as we are explicitly setting our pinmap in our sketch. See the step above.

/home/alex/Arduino/libraries/MCCI_LoRaWAN_LMIC_library/src/hal/getpinmap_thisboard.cpp: In function 'const Arduino_LMIC::HalPinmap_t* Arduino_LMIC::GetPinmap_ThisBoard()':
/home/alex/Arduino/libraries/MCCI_LoRaWAN_LMIC_library/src/hal/getpinmap_thisboard.cpp:71:72: note: #pragma message: Board not supported -- use an explicit pinmap
         #pragma message("Board not supported -- use an explicit pinmap")
  1. Now log into the Helium Console. If this is your first login to the console, you will be prompted for a bit of setup information.

  2. Create an Organization

/images/1_setup_helium_organization.png
  1. Lower right, click the "+" and then Add Device; we will name it HelloWorld.

/images/2_add_device_menu.png
  1. Name your device and add a label.

  2. Every time you want to add a new device, the Helium console will generate a unique Dev EUI, App EUI, and App Key. Copy Dev EUI, App EUI and App Key to the fields found in TinyComputers' LMIC EUI Generator. Make sure you remember to save your device in the Helium Console. Once saved, your device will have a status of Pending. It can take a while to be fully added; do not get frustrated by the Pending status.

This step is necessary because DevEUI and AppEUI need to be in little-endian (also called least signicant byte order).

/images/4_generate-EUIs-Screenshot_20220918_202235.png/images/source_with_euis_Screenshot_20220919_190932.png
  1. When using the Dragino LoRa shield, jumpers need to be correctly set.

Orient the shield so the antenna is pointing to the right. There are three yellow jumpers. All three to need to jumper the far left pins to the middle pins.

/images/dragino-lora-signal-2022-09-29-180810_006.jpeg
  1. Having added the converted EUI values to your sketch, it's time to compile it and upload the compiled sketch to your Arduino Uno (Rev 3) (or compatible)

If all the things are connected, and pin mapping is correct, and you have Helium network coverage, after a few moments, your LoRa powered device will connect to the network and begin sending packages to the Helium network.

/images/LMIC_pinmapping-Elecrow_vs_Dragino.png
  1. Go to Google Forms and create a form with a single, short answer field.

We will name this form HelloWorld. Under the Responses menu, select the three vertical dots in the upper right of the modal, and select Response Destination. Select Create a new spreadsheet; we will name it HelloWorld.

/images/google_forms_destination.png
  1. While still in Forms, in the menu bar, click Send, and click on the link icon.

Copy the part of the Link that is between "form/d/e" and "/viewform?usp=sf_link"

https://docs.google.com/forms/d/e/1FAIpQLSfJqbxlibFl94q-IJ_Jaw27LIgYjoUZCdlxRH9A_4XiHsI-Dg/viewform?usp=sf_link

to

1FAIpQLSfJqbxlibFl94q-IJ_Jaw27LIgYjoUZCdlxRH9A_4XiHsI-Dg

You will need this value for when you create a Helium Console Integration. This is called a Form Id.

/images/send_form_link.png
  1. Create an Integration; let's name it HelloWorld.

Select the Google Sheets under the Community Integration section. Select Add Integration; in Step 2, paste the Form Id from Step 13 into the form field. Click Get Google Form Fields. This should return a snippet of JSON containing our single field we added. Then click on Generate Function Body w/Fields Above

/images/google_sheets_integration.png/images/helium_console_generate_function.png
  1. Step 3 of the Integration will create a Function; let's name it HelloWorld.

In the body of the Function, change "FILL ME IN" to bytes

function Decoder(bytes, port) {
  // TODO: Transform bytes to decoded payload below
  var decodedPayload = {
    "message": "FILL ME IN"
  };
  // END TODO

  return Serialize(decodedPayload)
}
function Decoder(bytes, port) {
  // TODO: Transform bytes to decoded payload below
  var decodedPayload = {
    "message": bytes
  };
  // END TODO

  return Serialize(decodedPayload)
}
/images/helium_console_function.png
  1. Let's connect our Device to a Function to a Integration in the Helium Console.

Click on Flow. Drag your Device, Function and Integration on to the board. Connect the right side (output) of the Device to the left side (input) of the Function. Connect the right side of the Function to the left side of the Integration.

/images/helium_console_flow.png
  1. With your Arduino + LoRa shield powered, wait for the device to join the LoRa network.

/images/lora_joined_helium_network.png
  1. After a successful join, let it run for a little while; ten minutes should be fine.

Now, check on your Google Sheet, and you should see gibberish data. This just a byte array of the phrase Hello World. I will leave you with the simple task of altering the Function in the Helium Console to convert a byte array to a String before sending it off to Google Sheets.

/images/google_sheets_gibberish_data.png

There will be more posts about Arduino + Sensors + LoRa. The bulk of this post is trivial, and was spent going over connecting Google Sheets through the Helium Console. My hope is that someone finds the first part of this post useful. I wrote it because I could not easily find a howto of taking an Arduino Uno (Rev 3) board and form factor, and put a LoRaWAN shield on it, and take advantage of the Helium Network.

If you have questions or comments, feel free to open a Github Issue.

This article was greatly inspired by Build an IoT Project Using LoraWAN with Helium Network.