
So, you find your with about nineteen Raspberry Pi 4b single board computers, and you want to run Kubernetes?
Over the course of 2022, I slowly assembled the requisite number of Raspberry Pis, despite the fact that all things Raspberry Pi were in short supply. Basically, I used technology to pay attention to sites selling Pis. It was as simple as that. No automatic buying or the like; I would get a text message and then I would have to act quickly.
Why nineteen when there are clearly only eighteen in the above photo? There needs to be a control node (call it master or controlplane). This is the node that orchestrates the building of the cluster.
Now that you have all of your nodes assembled and in a very nice 2U rack mount assembly, it is time to provision things.
We will be using Ansible for provisioning and it will handle around 95% of the work. The other 5% is manual setup. The manual task is getting a public ssh key onto all of the nodes. If I had been smart, I would have added this into the imaging process with Imager, but I did not. When imaging, if you are not setting initial ssh key within Imager, make sure to set the password on all nodes the same. Ideally, you would want to set the ssh key during imaging; doing so, will take out a small portion of the needed manually tasks.
Pre-game Setup
We will be executing from the controlplane or master node. Before we get into that, let's establish our base parameters and assumptions.
- All nodes, including
masterwill be running Raspberry Pi OS 64bit - The
masternode will be namedrpi-cluster-master - Each worker node will be named
rpi-cluster-[1-18]; e.g.rpi-cluster-1and so one - Each node,
masterandworkerswill have IP addresses ranging from10.1.1.100to10.1.1.18 - You are using ethernet and not wifi.
- This is important because the Ansible playbooks that we are going to use assume there is
eth0and notwlan0 - If you are wanting to insert the ssh key during imaging, run the following command, and then copy the contents of
.ssh/id_rsa.pubfrom themasternode to the Advanced section of the setup inImagerwhere it says ""
Now, let's distribute our public ssh key. As the user pi on rpi-cluster-master, run the following:
pi@rpi-cluster-master:~ $ ssh-keygen
If needing to transfer the public key manually, make the following script (saved as 'dist-key.sh') on master
#!/bin/bash

ssh-copy-id 10.1.1.101
ssh-copy-id 10.1.1.102
ssh-copy-id 10.1.1.103
ssh-copy-id 10.1.1.104
ssh-copy-id 10.1.1.105
ssh-copy-id 10.1.1.106
ssh-copy-id 10.1.1.107
ssh-copy-id 10.1.1.108
ssh-copy-id 10.1.1.109
ssh-copy-id 10.1.1.110
ssh-copy-id 10.1.1.111
ssh-copy-id 10.1.1.112
ssh-copy-id 10.1.1.113
ssh-copy-id 10.1.1.114
ssh-copy-id 10.1.1.115
ssh-copy-id 10.1.1.116
ssh-copy-id 10.1.1.117
ssh-copy-id 10.1.1.118
Execute!
pi@rpi-cluster-master:~ $ bash dist-key.sh
Assuming you set the default password for the pi user when using Imager, you will be prompted eighteen times to accept the connection and then the enter in your password.
If you are smart and, unlike me, you put your id_rsa.pub key into Imager, it should look like:
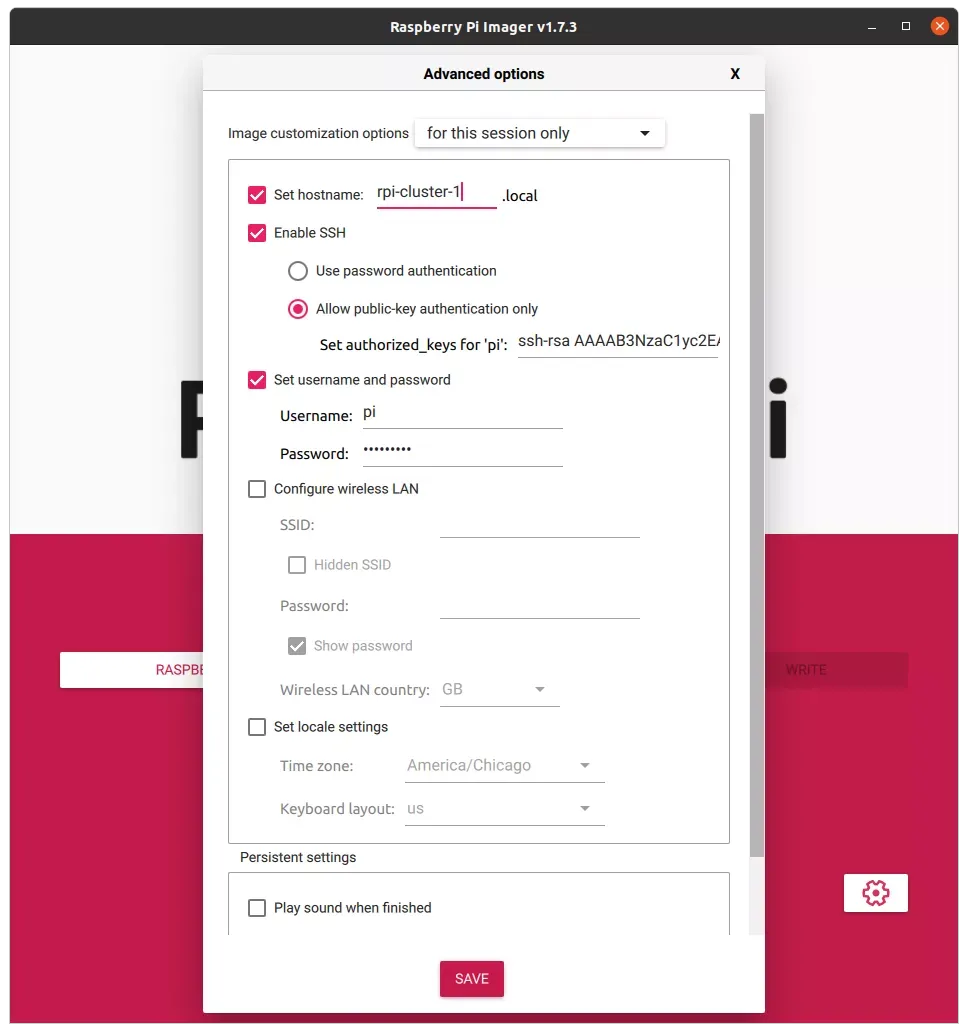
And then you will not have to dink-around with transferring your key, individually, to each node.
Now, let's install ansibleon our master node; we will be following this.
pi@rpi-cluster-master:~ $ sudo apt update
pi@rpi-cluster-master:~ $ sudo apt install -y ansible sshpass
pi@rpi-cluster-master:~ $ echo "deb http://ppa.launchpad.net/ansible/ansible/ubuntu trusty main" | sudo tee \
-a /etc/apt/sources.list
pi@rpi-cluster-master:~ $ sudo apt install dirmngr -y
pi@rpi-cluster-master:~ $ sudo apt-key adv --keyserver keyserver.ubuntu.com --recv-keys 93C4A3FD7BB9C367
pi@rpi-cluster-master:~ $ sudo apt update
pi@rpi-cluster-master:~ $ sudo apt install -y ansible
pi@rpi-cluster-master:~ $ ansible --version
ansible 2.10.8
  config file = None
  configured module search path = ['/home/pi/.ansible/plugins/modules', '/usr/share/ansible/plugins/modules']
  ansible python module location = /usr/lib/python3/dist-packages/ansible
  executable location = /usr/bin/ansible
  python version = 3.9.2 (default, Feb 28 2021, 17:03:44) [GCC 10.2.1 20210110]
If you have made it to this point, you should have eighteen nodes with the master node's public ssh key install. You should also have ansible installed.
Let's get Ansible'ing
Now, we will be following the steps outlined in this git repo.
pi@rpi-cluster-master:~ $ git clone https://github.com/ajokela/rpi-k8s-ansible.git
Change directory into rpi-k8s-ansible
pi@rpi-cluster-master:~ $ cd rpi-k8s-ansible
Now, if you want to customize your list of nodes, this is the time. Edit cluster.yml; if you only have sixteen nodes, comment out the two you do not have; there are a couple spots where each node is mentioned.
On to provisioning! These steps are fairly intelligent at being atomic and repeatable without causing issues. In provisioning the cluster in the picture (above), some of the steps had to be repeated because of lost ssh connections and other mysterious errors. Let's first see if we have our basic configuration in working order. The following assumes you are in the directory ~/rpi-k8s-ansible on your master node.
$ ansible -i cluster.yml all -m ping
This will execute a simple ping/pong between your master node and the worker nodes.
rpi-cluster-1.local | SUCCESS => {
    "changed": false,
    "ping": "pong"
}
rpi-cluster-2.local | SUCCESS => {
    "changed": false,
    "ping": "pong"
}
rpi-cluster-3.local | SUCCESS => {
    "changed": false,
    "ping": "pong"
}
...
rpi-cluster-16.local | SUCCESS => {
    "changed": false,
    "ping": "pong"
}
rpi-cluster-17.local | SUCCESS => {
    "changed": false,
    "ping": "pong"
}
rpi-cluster-18.local | SUCCESS => {
    "changed": false,
    "ping": "pong"
}
If you get an error, double you have your nodes correctly named in cluster.yml if all looks good, try Googling the error.
Update all Your Nodes' Packages
$ ansible-playbook -i cluster.yml playbooks/upgrade.yml
As we start to run ansible playbooks, this is where you just might have to rerun a playbook to get beyond an error. The most common error I ran into was peer connections dropped. It is a bit of a mystery why; the aforementioned cluster is connected via a managed HP gigabit switch.
Install Kubernetes
# Bootstrap the master and all slaves
$ ansible-playbook -i cluster.yml site.yml
This will reboot your cluster nodes This might cause issues and force you to repeat this step. After my initial execution of that command, I followed it up with:
# When running again, feel free to ignore the common tag as this will reboot the rpi's
$ ansible-playbook -i cluster.yml site.yml --skip-tags common
This will run everything except the reboot command.
If you want to only rerun a single node and the master node, you can do something like the following:
# Bootstrap a single slave (rpi-cluster-5) and the master node
$ ansible-playbook -i cluster.yml site.yml -l rpi-cluster-master.local,rpi-cluster-5.local
Copy over the .kube/config and verification
We need to copy over your kubernetes configuration file.
# Copy in your kube config
$ ansible-playbook -i cluster.yml playbooks/copy-kube-config.yml

# Set an alias to make it easier
$ alias kubectl='docker run -it --rm -v ~/.kube:/.kube -v $(pwd):/pwd -w /pwd bitnami/kubectl:1.21.3'

# Run kubectl within docker
$ sudo kubectl version
Client Version: version.Info{Major:"1", Minor:"21", GitVersion:"v1.21.3", GitCommit:"ca643a4d1f7bfe34773c74f79527be4afd95bf39", GitTreeState:"clean", BuildDate:"2021-07-15T21:04:39Z", GoVersion:"go1.16.6", Compiler:"gc", Platform:"linux/arm64"}
Server Version: version.Info{Major:"1", Minor:"21", GitVersion:"v1.21.14", GitCommit:"0f77da5bd4809927e15d1658fb4aa8f13ad890a5", GitTreeState:"clean", BuildDate:"2022-06-15T14:11:36Z", GoVersion:"go1.16.15", Compiler:"gc", Platform:"linux/arm64"}
Let's get a little information about the cluster:
$ sudo kubectl  cluster-info
Kubernetes control plane is running at https://10.1.1.100:6443
CoreDNS is running at https://10.1.1.100:6443/api/v1/namespaces/kube-system/services/kube-dns:dns/proxy

To further debug and diagnose cluster problems, use 'kubectl cluster-info dump'.
Helm
If you need to install helm; Helm is a package manager for Kubernetes: Helm is the best way to find, share, and use software built for Kubernetes - follow these instructions:
$ curl https://baltocdn.com/helm/signing.asc | gpg --dearmor | sudo tee /usr/share/keyrings/helm.gpg > \
/dev/null
$ sudo apt-get install apt-transport-https --yes
$ echo "deb [arch=$(dpkg --print-architecture) signed-by=/usr/share/keyrings/helm.gpg] \
https://baltocdn.com/helm/stable/debian/ all main" | \
sudo tee /etc/apt/sources.list.d/helm-stable-debian.list
$ sudo apt-get update
$ sudo apt-get install helm
If you do not have gpg installed, you will need to install it.
Here is a more in depth look at helm and its role within kubernetes.
This is going to be anticlimactic, but we will start to run our first container on our shiny new kubernetes cluster in our next posting.