The goal of this post is allow the use of an Arduino Uno (Rev 3) or compatible board with a LoRa shield or breakout sending telemetry over the Helium network and ultimately into a storage destination. For simplicity, we will be using Google Sheets to as our storage destination. There are many other destinations available, Amazon Web Services (AWS) and its different database services would be another option if you were wanting to make a more production quality product. Why an Uno or compatible? They are ubiquitous and relatively inexpensive. My target project, which I hope to write about here in the future, is a water sensors project that will send telemetry data over LoRa and into AWS. My first prototype shield was made using a standard Uno footprint proto-shield.
If you are unfamiliar with LoRa , checkout The Things Network Tutorial on LoRa . This post is by no means meant to be an introduction to LoRa, it is, instead, a quick guide for getting LoRa communications up and working, at minimum, using an Arduino Uno (Rev 3) with a LoRa radio shield, sending data over The Helium network. The New York Times has an article on what Helium is in layman's terms. Or here for slick pitch on the prospects of Helium.
Getting an Arduino Uno (Rev 3) or a compatible board - my personal choice is SparkFun's RedBoard Plus - seemed straightforward from the start. I only needed to find a LoRa breakout or shield, and use an existing library and that would be it.

Initially, I picked a Grove - Wio-E5 (STM32WLE5JC). But, I did not realize that this particular module uses AT commands and requires a second Serial device on your Arduino for communications; an Arduino Mega or SparkFun's RedBoard Plus Artemis ATP will work. This means the Uno and those compatible are not usable as they only have one Serial device.
What I really wanted was a howto that walked me through using a regular old Uno-footprint LoRa shield to send data over the Helium network. That is the aim of this article. Let's get started.
Things you will need:
Arduino Uno (Rev 3) or compatible
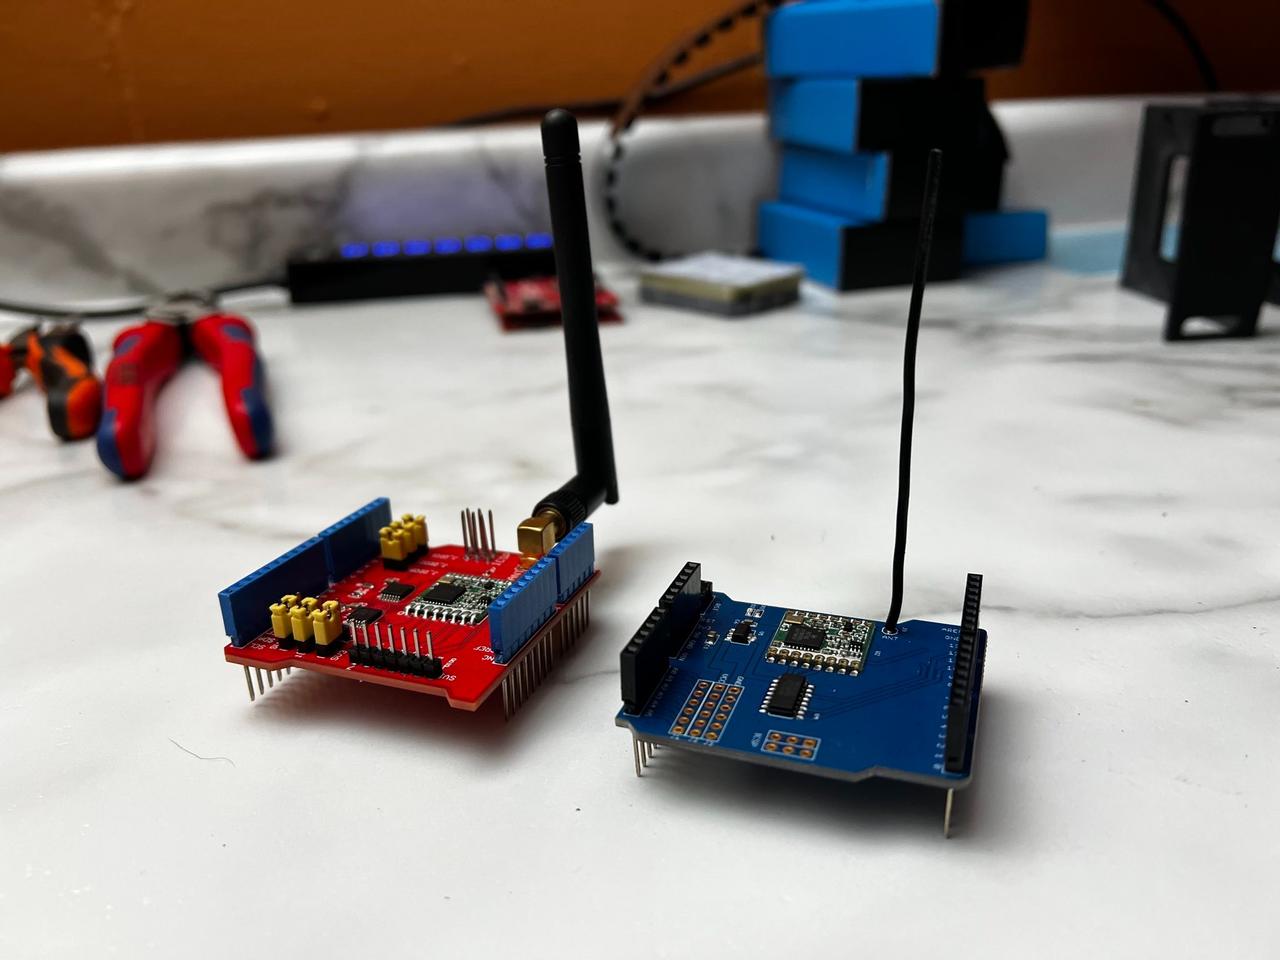
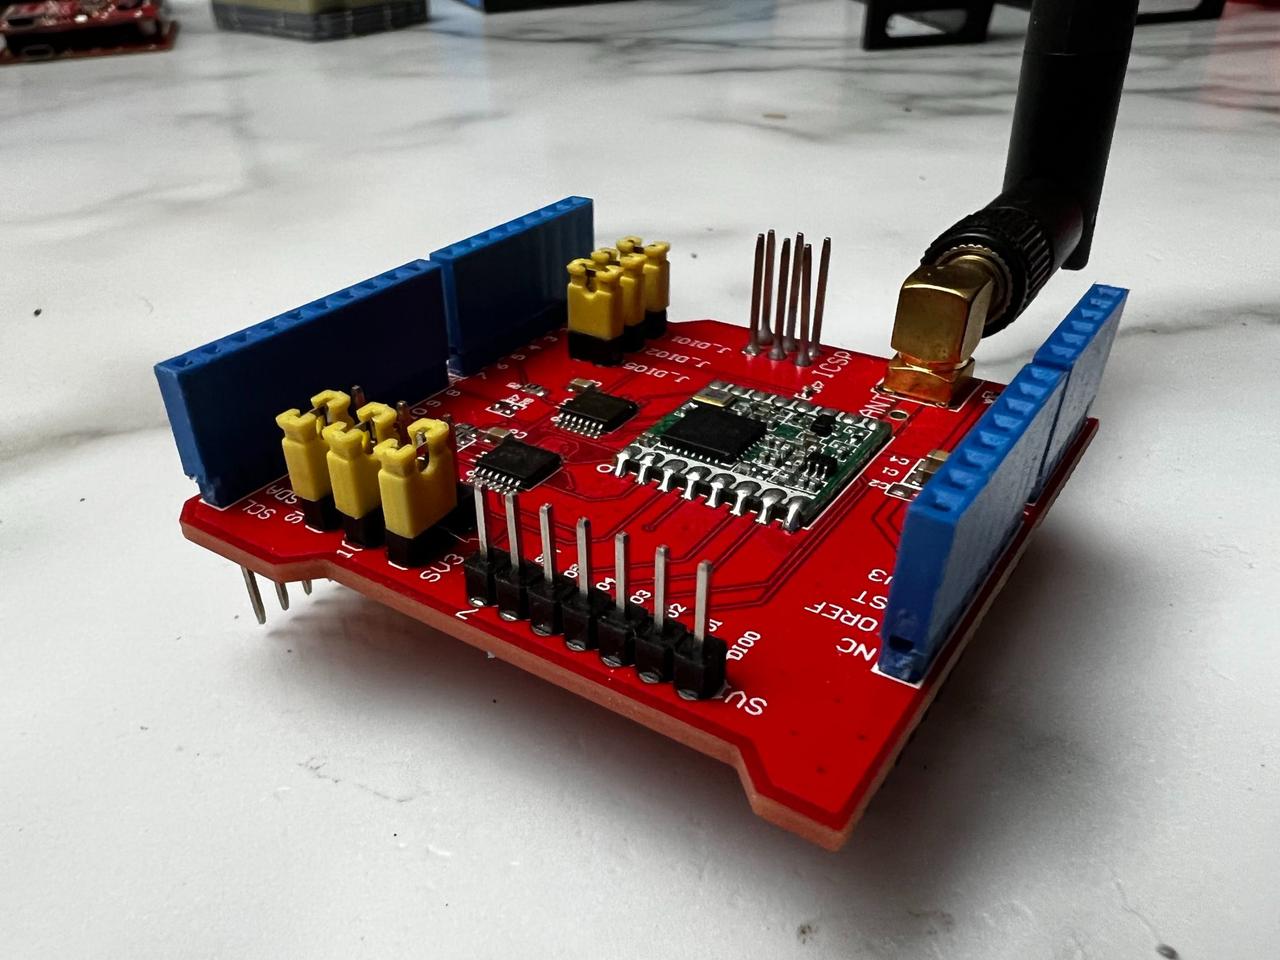
Dragino or Elecrow LoRa RFM95 Keep in mind the Elecrow LoRa RFM95 and Draginos have different pin configurations.
Helium Network Coverage - use Helium Explorer
Use of Helium Console
A few dollars to buy Helium Data Credits in the Helium Console
Google Forms and Google Sheets (for use as a simple storage mechanism for our data)
Preparations:
Install MCCI LoRaWAN LMIC library in the Arduino IDE; as of this writing, I'm are using version 4.1.1
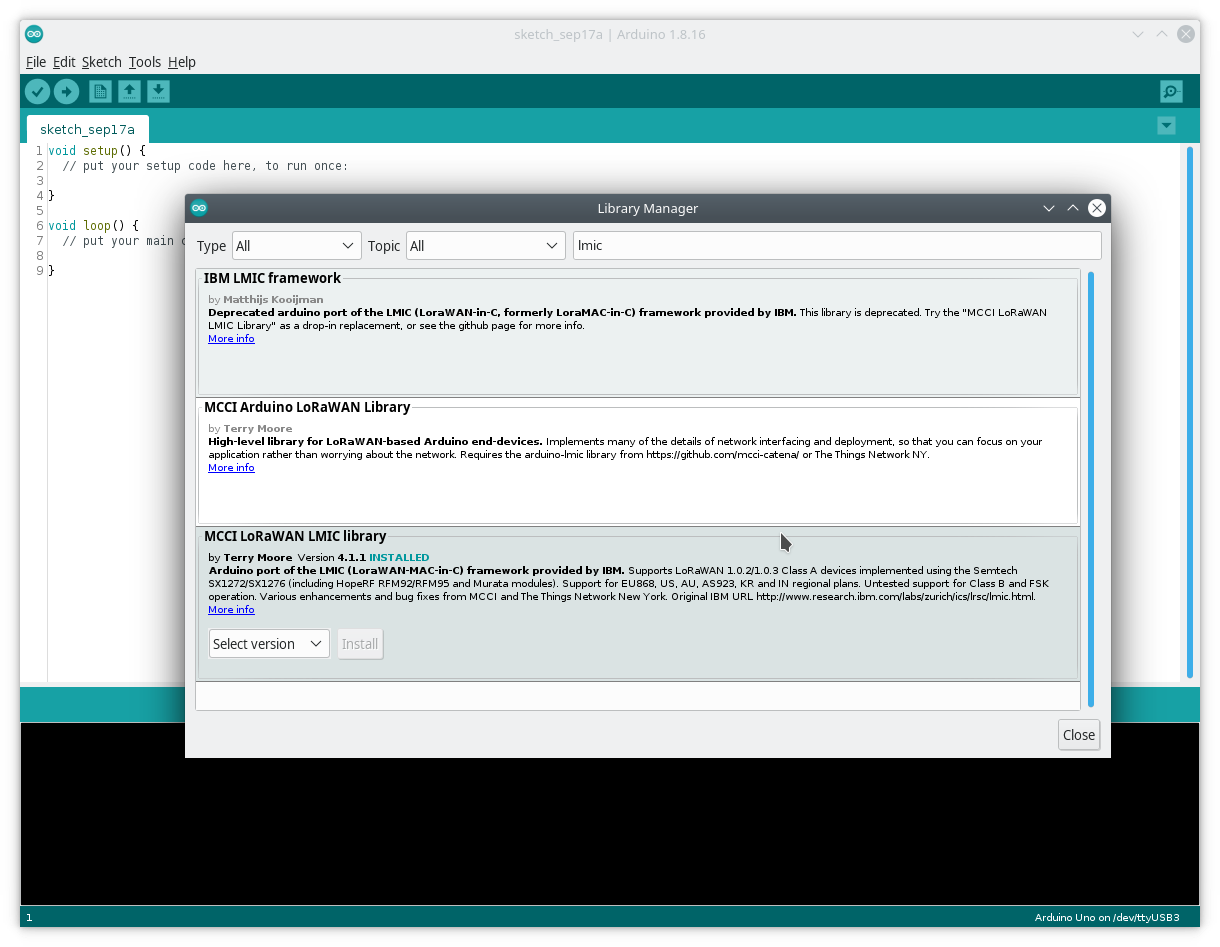
With LMIC installed, we need to configure LMIC to your particular correct board`; edit the lmic_project_config.h which is found in /home/user/Arduino/libraries/MCCI_LoRaWAN_LMIC_library/project_config/
// project-specific definitions

// We're in the US, so we go with 915mhz
#define CFG_us915 1

//#define CFG_eu868 1
//#define CFG_au915 1
//#define CFG_as923 1
// #define LMIC_COUNTRY_CODE LMIC_COUNTRY_CODE_JP      /* for as923-JP; also define CFG_as923 */
//#define CFG_kr920 1
//#define CFG_in866 1
#define CFG_sx1276_radio 1
//#define LMIC_USE_INTERRUPT
-
Now get our basic Arduino Sketch from Github and open the file in Arduino IDE.
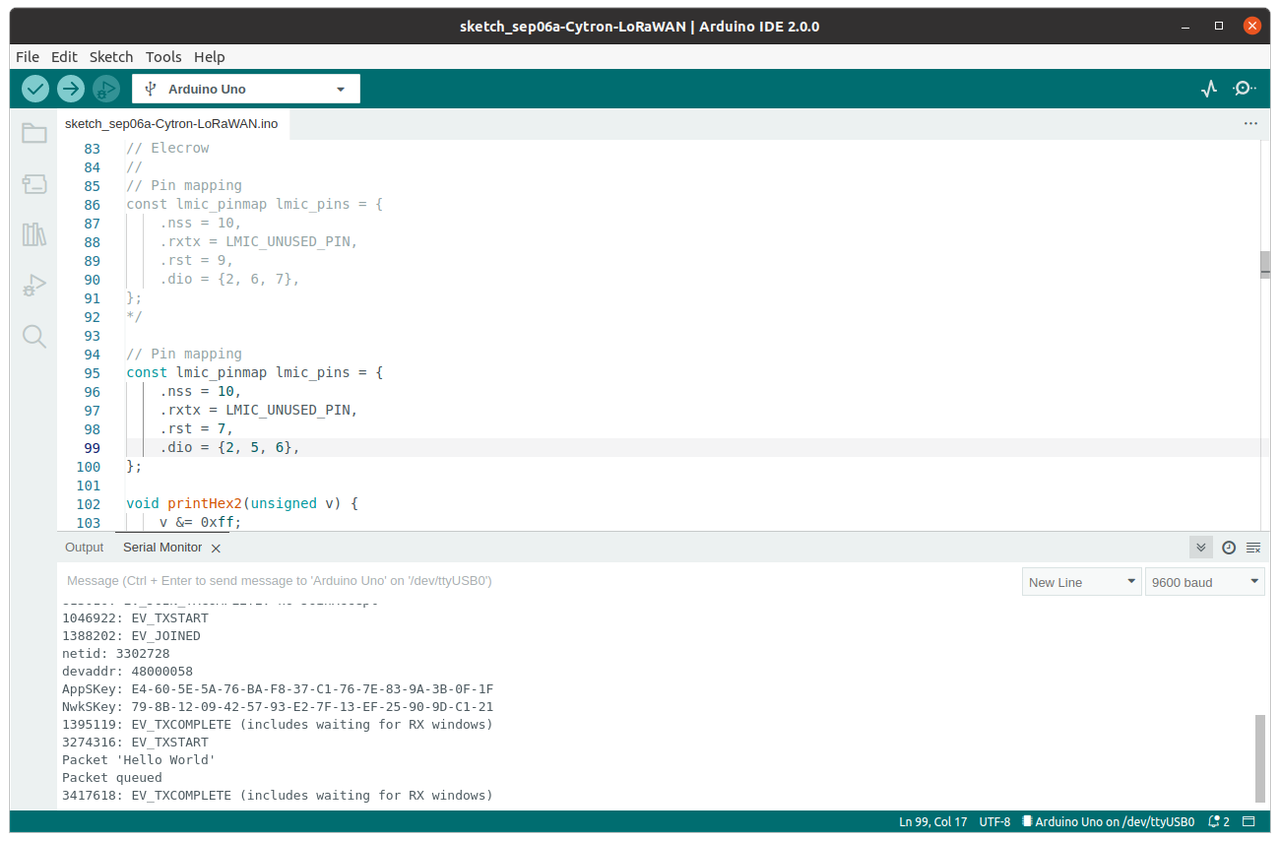
Depending upon which board you are using, you may need to change the pin mapping. The pin mapping can be found toward the top of the previously linked sketch. Here are two examples; for the purposes of this article, we will be using Dragino's LoRa shield.
Pin Mappings for LoRa Shields
-
After setting the correct pin mapping for your shield, compile sketch to verify it will actually compile.
A warning will be displayed: This is expected as we are explicitly setting our pinmap in our sketch. See the step above.
/home/alex/Arduino/libraries/MCCI_LoRaWAN_LMIC_library/src/hal/getpinmap_thisboard.cpp: In function 'const Arduino_LMIC::HalPinmap_t* Arduino_LMIC::GetPinmap_ThisBoard()':
/home/alex/Arduino/libraries/MCCI_LoRaWAN_LMIC_library/src/hal/getpinmap_thisboard.cpp:71:72: note: #pragma message: Board not supported -- use an explicit pinmap
         #pragma message("Board not supported -- use an explicit pinmap")
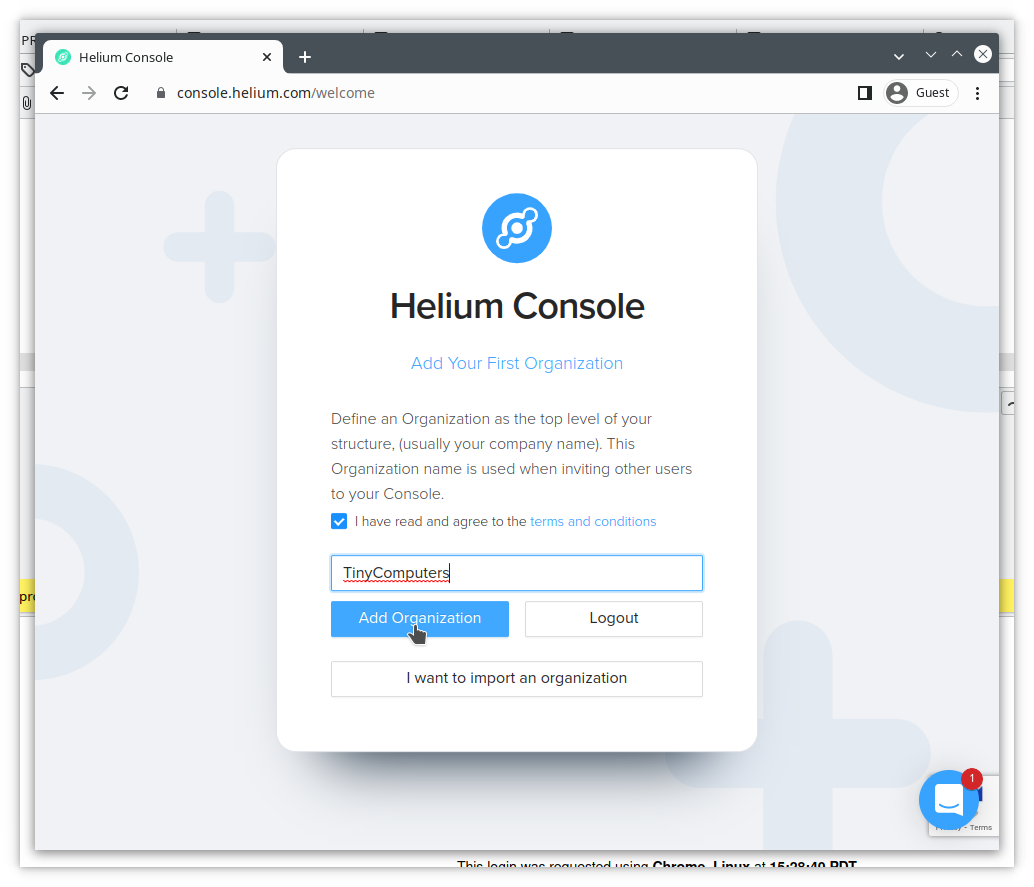
Now log into the Helium Console. If this is your first login to the console, you will be prompted for a bit of setup information.
Create an Organization
Lower right, click the "+" and then Add Device; we will name it HelloWorld.

Name your device and add a label.
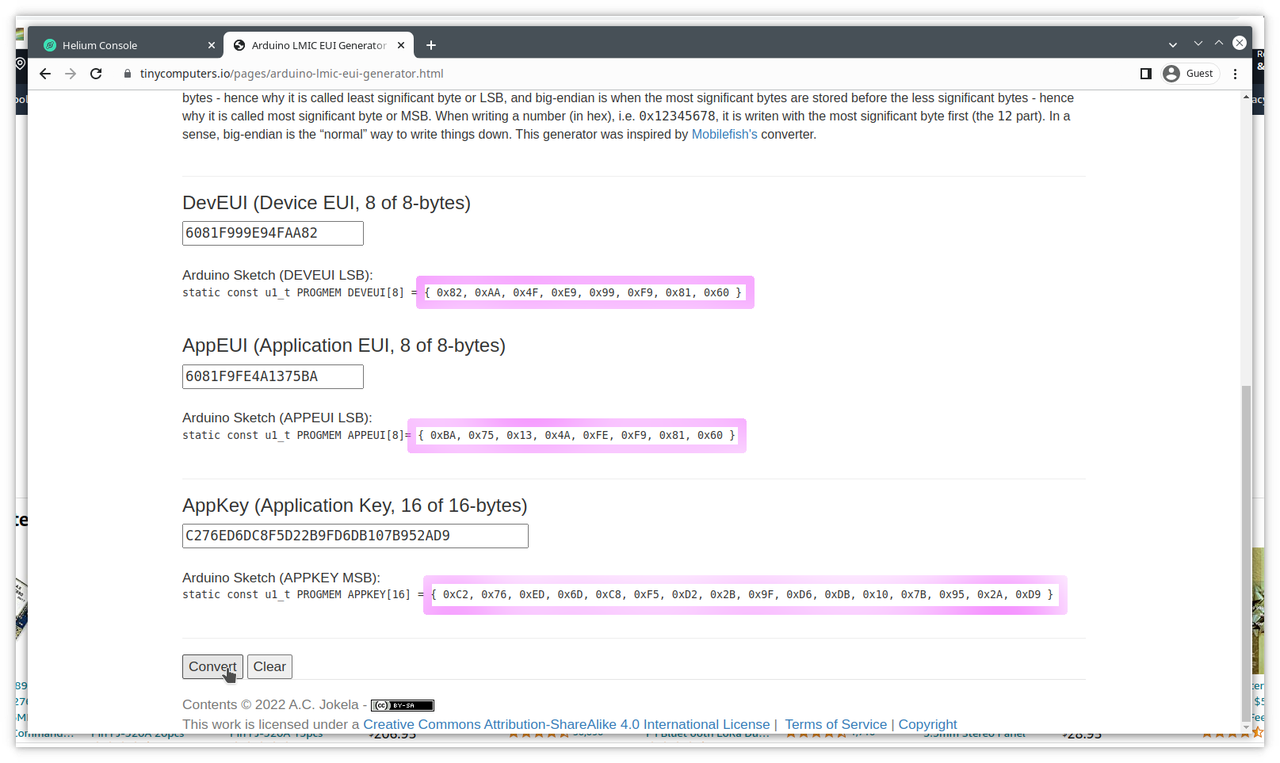
Every time you want to add a new device, the Helium console will generate a unique Dev EUI, App EUI, and App Key. Copy Dev EUI, App EUI and App Key to the fields found in TinyComputers' LMIC EUI Generator. Make sure you remember to save your device in the Helium Console. Once saved, your device will have a status of Pending. It can take a while to be fully added; do not get frustrated by the Pending status.
This step is necessary because DevEUI and AppEUI need to be in little-endian (also called least signicant byte order).

When using the Dragino LoRa shield, jumpers need to be correctly set.
Orient the shield so the antenna is pointing to the right. There are three yellow jumpers. All three to need to jumper the far left pins to the middle pins.
Having added the converted EUI values to your sketch, it's time to compile it and upload the compiled sketch to your Arduino Uno (Rev 3) (or compatible)
If all the things are connected, and pin mapping is correct, and you have Helium network coverage, after a few moments, your LoRa powered device will connect to the network and begin sending packages to the Helium network.
Go to Google Forms and create a form with a single, short answer field.
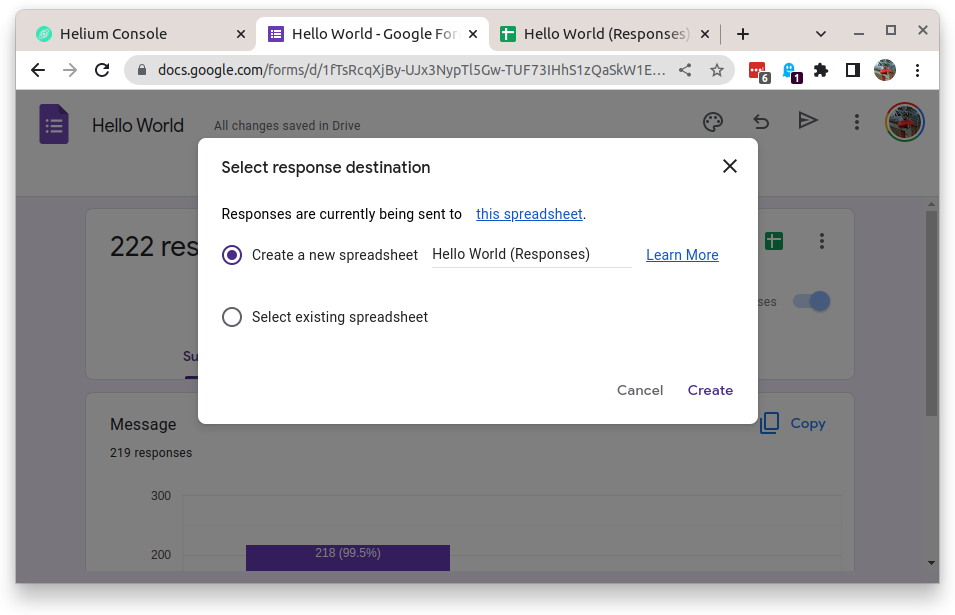
We will name this form HelloWorld. Under the Responses menu, select the three vertical dots in the upper right of the modal, and select Response Destination. Select Create a new spreadsheet; we will name it HelloWorld.
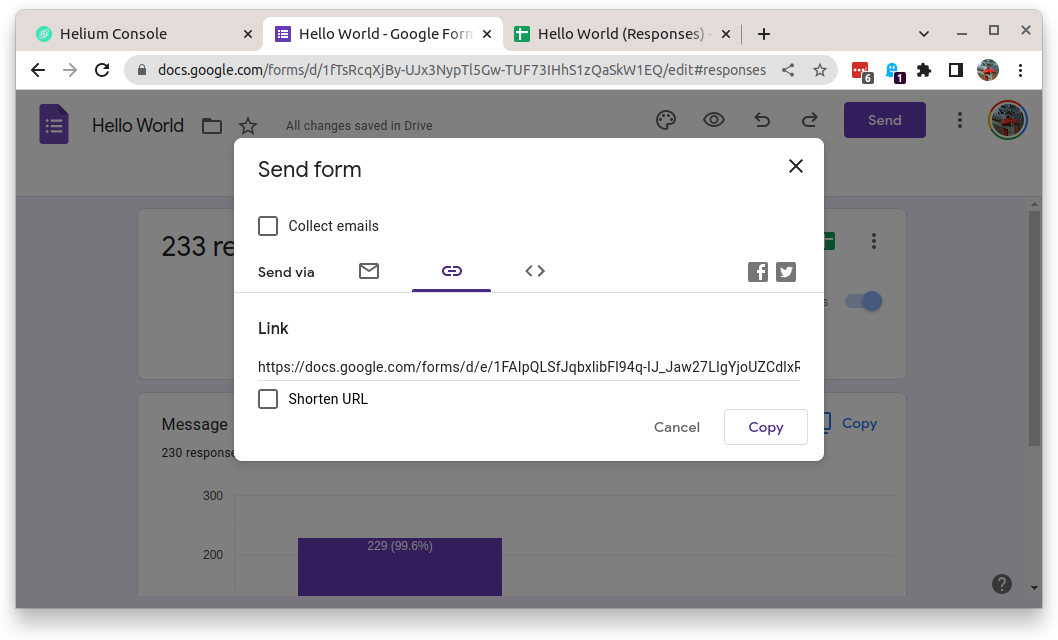
While still in Forms, in the menu bar, click Send, and click on the link icon.
Copy the part of the Link that is between "form/d/e" and "/viewform?usp=sf_link"
to
1FAIpQLSfJqbxlibFl94q-IJ_Jaw27LIgYjoUZCdlxRH9A_4XiHsI-Dg
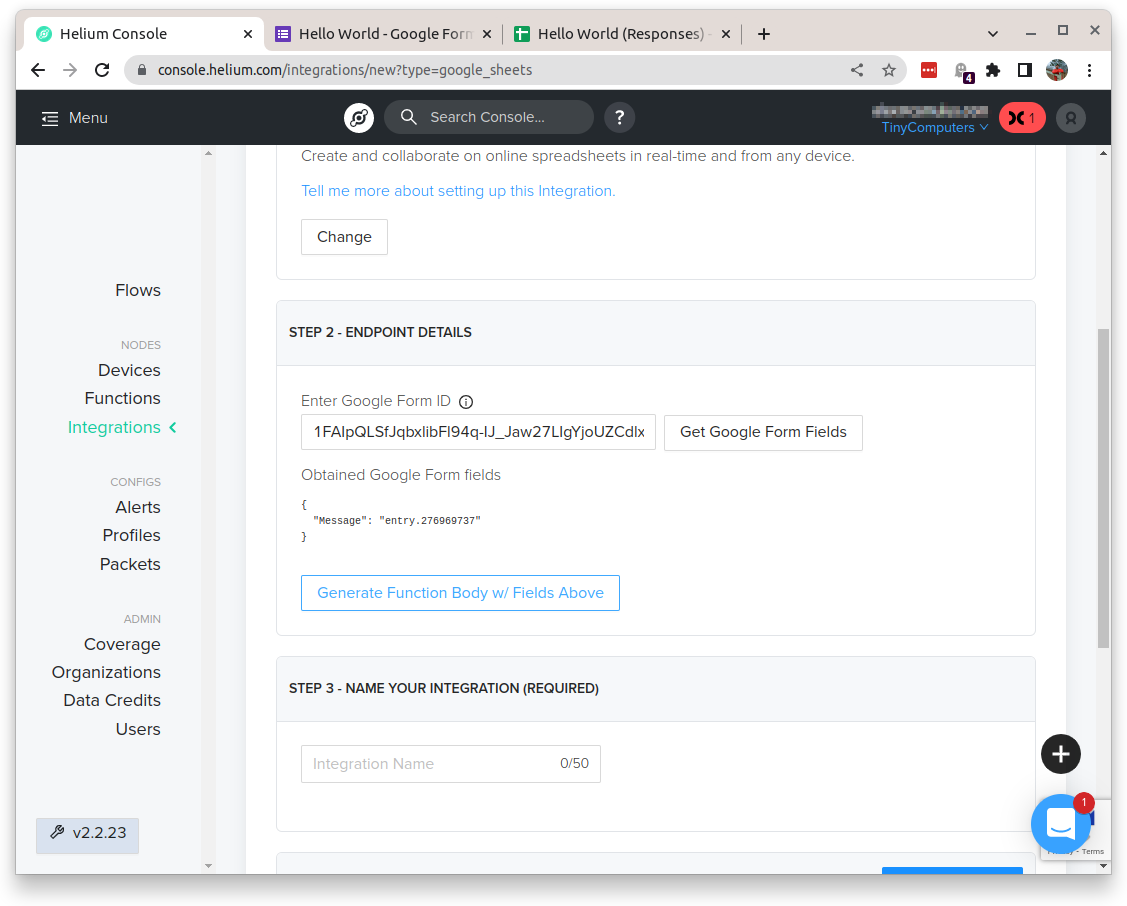
You will need this value for when you create a Helium Console Integration. This is called a Form Id.
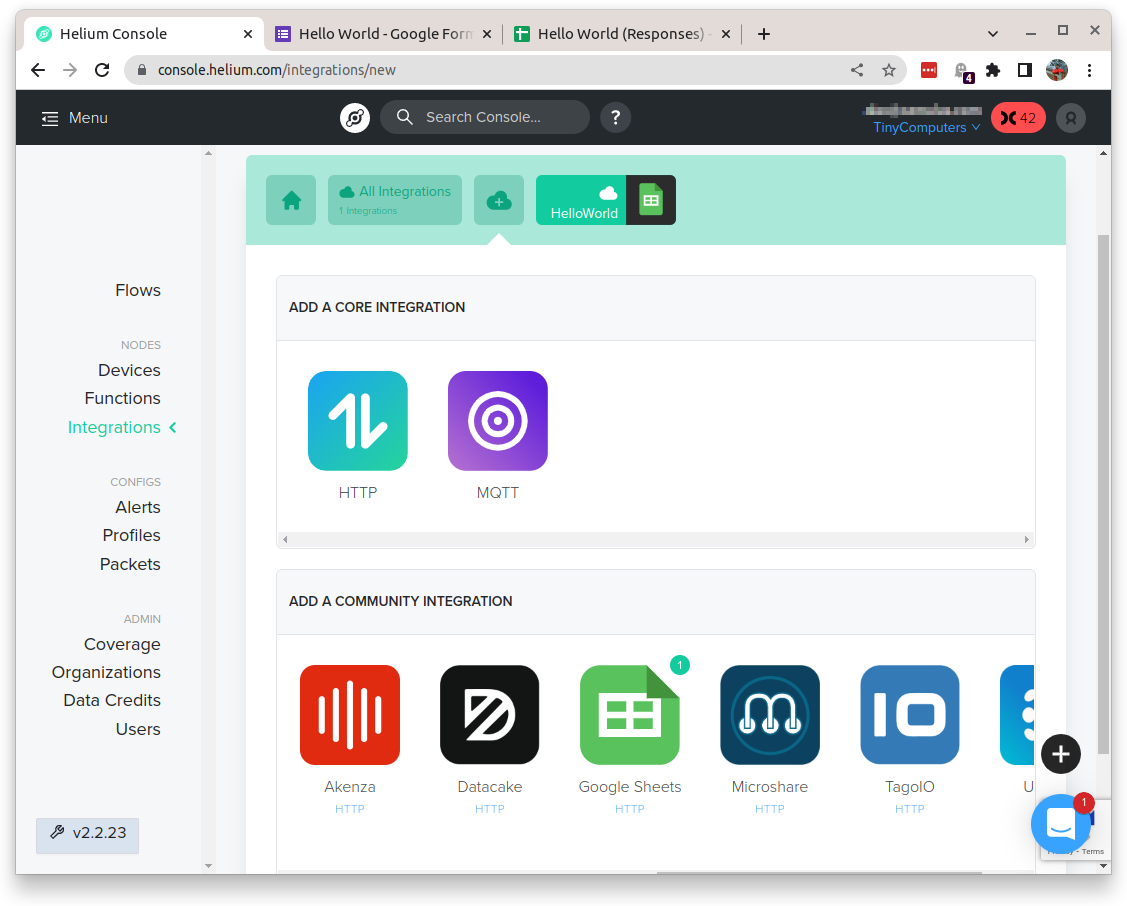
Create an Integration; let's name it HelloWorld.
Select the Google Sheets under the Community Integration section. Select Add Integration; in Step 2, paste the Form Id from Step 13 into the form field. Click Get Google Form Fields. This should return a snippet of JSON containing our single field we added. Then click on Generate Function Body w/Fields Above
Step 3 of the Integration will create a Function; let's name it HelloWorld.
In the body of the Function, change "FILL ME IN" to bytes
function Decoder(bytes, port) {
  // TODO: Transform bytes to decoded payload below
  var decodedPayload = {
    "message": "FILL ME IN"
  };
  // END TODO

  return Serialize(decodedPayload)
}
function Decoder(bytes, port) { // TODO: Transform bytes to decoded payload below var decodedPayload = { "message": bytes }; // END TODO return Serialize(decodedPayload) }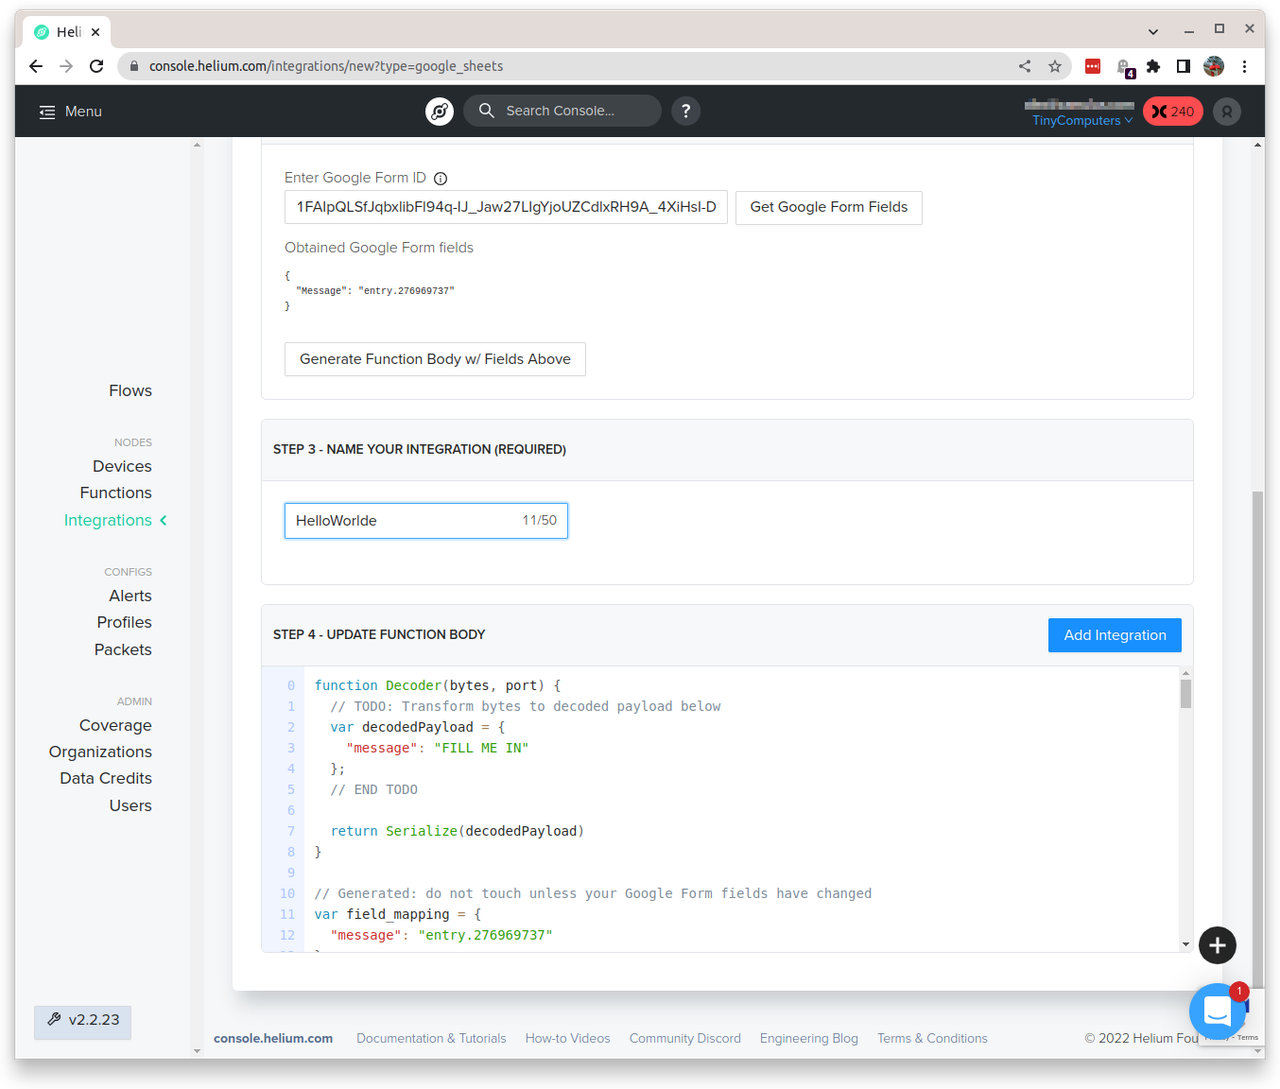
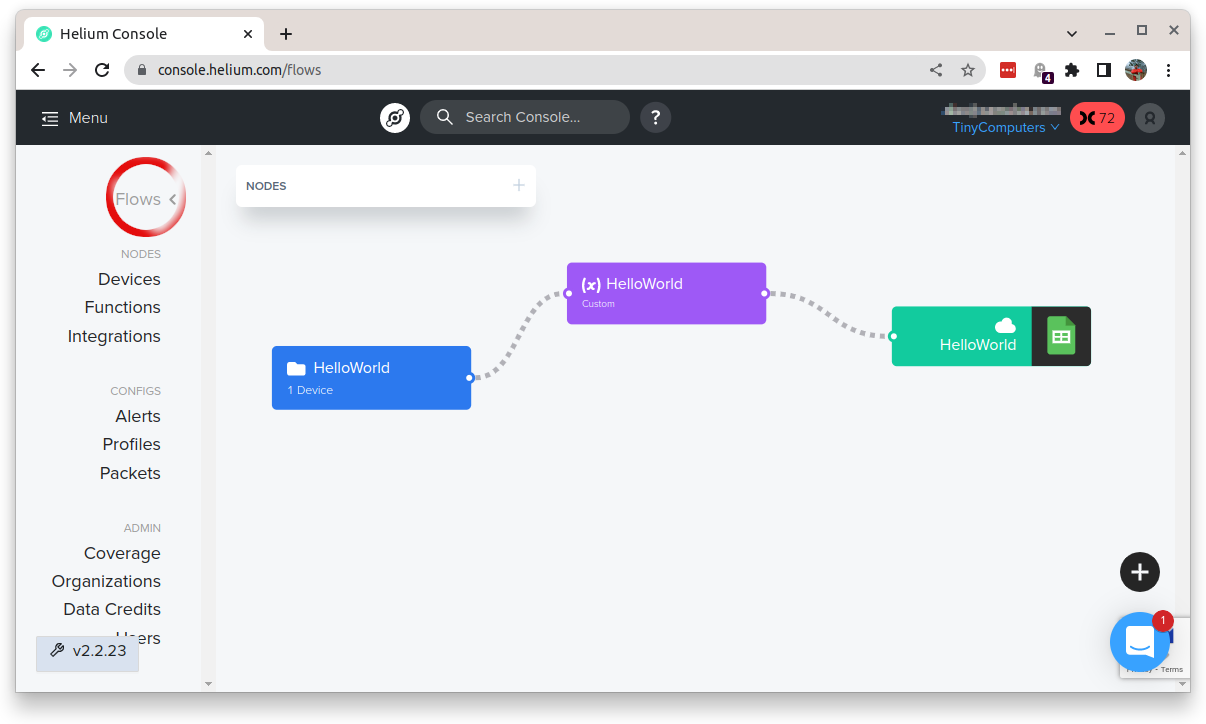
Let's connect our Device to a Function to a Integration in the Helium Console.
Click on Flow. Drag your Device, Function and Integration on to the board. Connect the right side (output) of the Device to the left side (input) of the Function. Connect the right side of the Function to the left side of the Integration.
With your Arduino + LoRa shield powered, wait for the device to join the LoRa network.
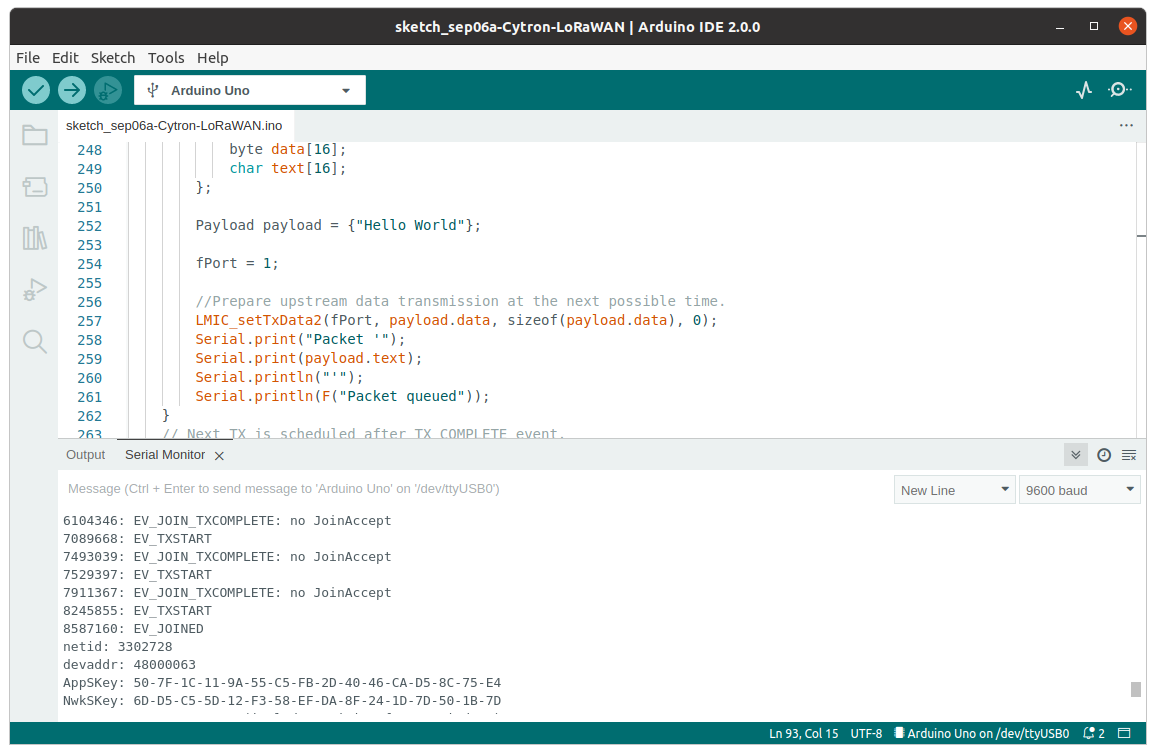
After a successful join, let it run for a little while; ten minutes should be fine.
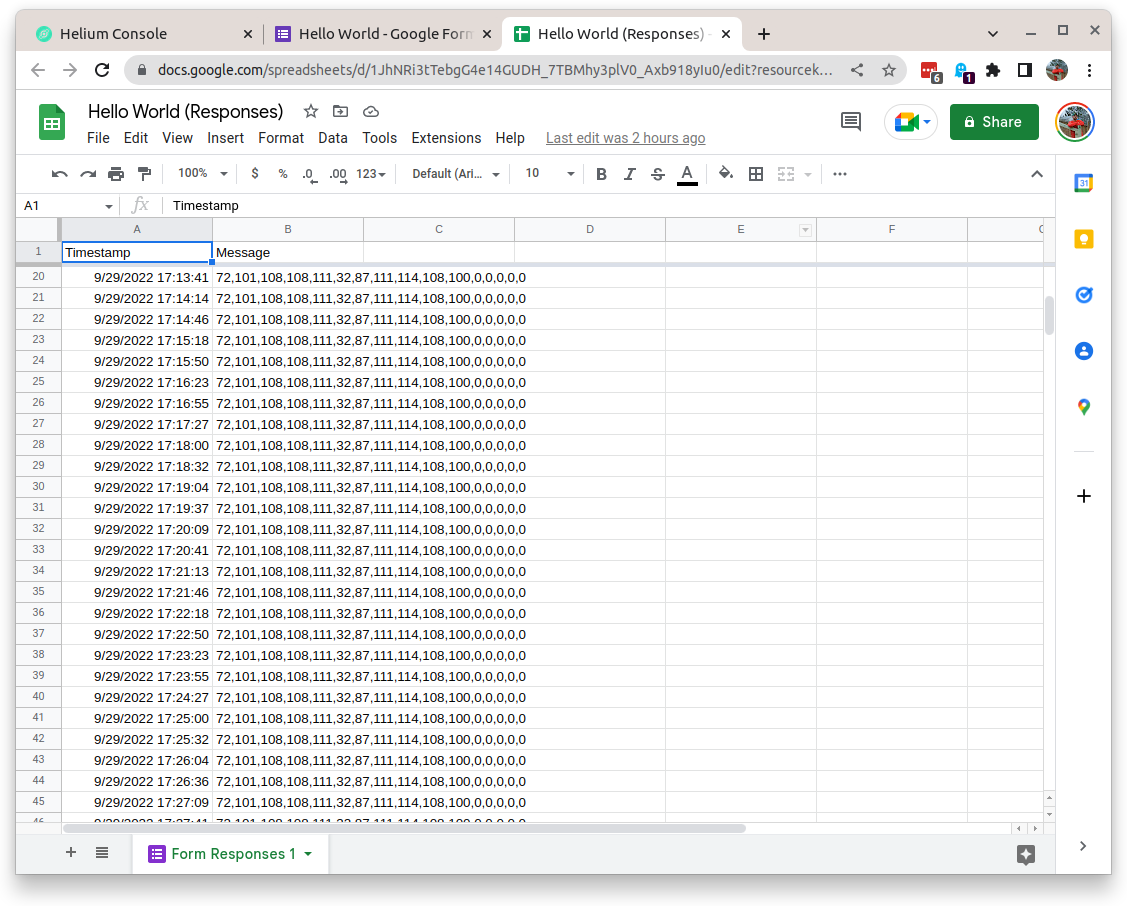
Now, check on your Google Sheet, and you should see gibberish data. This just a byte array of the phrase Hello World. I will leave you with the simple task of altering the Function in the Helium Console to convert a byte array to a String before sending it off to Google Sheets.
There will be more posts about Arduino + Sensors + LoRa. The bulk of this post is trivial, and was spent going over connecting Google Sheets through the Helium Console. My hope is that someone finds the first part of this post useful. I wrote it because I could not easily find a howto of taking an Arduino Uno (Rev 3) board and form factor, and put a LoRaWAN shield on it, and take advantage of the Helium Network.
If you have questions or comments, feel free to open a Github Issue.
This article was greatly inspired by Build an IoT Project Using LoraWAN with Helium Network.