.. title: Raspberry Pi CM4 and Pin Compatible Modules
.. slug: raspberry-pi-cm4-and-pin-compatible-modules
.. date: 2022-12-22 10:30:00 UTC-06:00
.. tags: Raspberry Pi CM4, Pine64 SOQuartz, Radxa CM3, Banana Pi CM4, compute module, pine64, raspberry pi
.. category:
.. link:
.. description: Comparison of Compute Modules.
.. type: text

<style>
  td {
      /*color: red;*/
      text-align: center;
      border-right: thin dotted grey;
      padding; 4px;
    };
  th {
    padding: 4px;
    text-align: center;
    width: 100%;
    border-top: thin dotted grey;
  };
  tr {
    text-align: center;
    border-bottom: thin dotted grey;
    margin: 2px;
  }
</style>

<div style="padding-bottom: 50px; padding-top: 50px;">
<p><span style="font-weight: bold;">UPDATE: 2023/02/04:</span>&nbsp;<a href="../posts/bigtreetech-cb1-review.html">Review of BIGTREETECH CB1 - RPi CM4 Pin Compatible Module</a>
</p>
</div>

<div class="audio-widget">
<div class="audio-widget-header">
<span class="audio-widget-icon">🎧</span>
<span class="audio-widget-label">Listen to this article</span>
</div>
<audio controls preload="metadata">
<source src="/raspberry-pi-cm4-and-pin-compatible-modules_tts.mp3" type="audio/mpeg">
</audio>
<div class="audio-widget-footer">38 min · AI-generated narration</div>
</div>

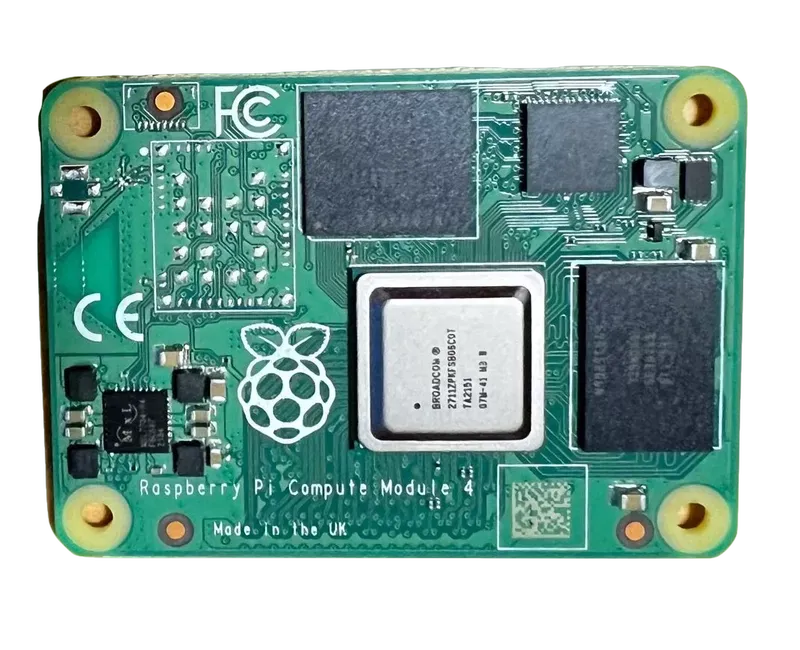
Hardware, in our modern era, does not exist in a vacuum; it requires software to function and be useful. One of main benefits of living within the Raspberry Pi ecosystem is you get up-to-date software that is maintained by a large network of source code contributors.  Just for the <a href="https://baud.rs/TlfHWz">linux kernel</a> used in Raspberry Pi OS, there have been over 5,000 people contributing to the project.  That's hundreds of thousands of lines of code added, removed and modified. Raspberry Pi is successful because of its ecosystem.  It is so large, it is self-sustaining. The Raspberry Pi Compute Module 4 (_announcement of the <a href="https://baud.rs/Apl872">"CM4"</a>_) was introduced about two years ago.  [Official Raspberry Pi CM4 Datasheet](https://baud.rs/3BKSA3). It is a followup to the wildly successful <a href="https://baud.rs/pTI87p" target="_blank">Raspberry Pi 4b</a>.  The CM4 is a different form factor from the 4b.  Unlike the 4b, it requires a <a href="https://baud.rs/Do6Piv" target="_blank">carrier or IO board</a> to be useful. The good news is it is compatible with a <a href="https://baud.rs/J064D2">bewildering array of carrier and IO boards</a>.

## Raspberry Pi CM4

<div style="width: 100%; text-align: center; padding-bottom: 1em;">
    <img src="../images/rpi-cm4-1gb-signal-2022-12-19-162656.png.webp" style="width:45%; text-align:center; float:center; padding: 2px;"  loading="lazy" /><br/>
Raspberry Pi Compute Module 4, 1GB memory
</div>

<div></div>

There are IO boards that give you the same form factor as the RPi 4b, there are also IO boards that turn your CM4 into a KVM for a server management, there are boards with two ethernet ports -- allowing for the creation of a simple router.  There also boards that expose the CM4's PCIe bus. This opens up the possibilities for using peripherals like addition network adapters or SATA controllers. More on that later.

Since the CM4's release, there have been a few pin compatible modules developed by other firms.  By _pin compatible_, I mean that these other modules can correctly be attached via [Hirose mating connectors](https://baud.rs/XzHRWI) to the IO boards.

One of the primary benefits of using a genuine Raspberry Pi CM4, as I mentioned in the first paragraph, is the ecosystem.  The CM4 uses the same operating system as the 4b.  This allows for nearly all the same software to be usable across the RPi family of single board computers.  This sheds light on one of the most commonly brought up issues with non-Raspberry Pi single board computers: the software ecosystem just is not as robust as Raspberry Pi.  This is not limited to the alternatives to the CM4.   There are an array of alternatives to the RPi family, like the boards made by [Pine64](https://baud.rs/Gm3wOf), or [Libre](https://baud.rs/kIdGna), or [Hardkernel's](https://baud.rs/tb2333) Odroid series.  These all cannot run the official Raspberry Pi OS.

Jeff Geerling does a fantastic job of [reviewing the RPi CM4](https://baud.rs/81s7YT).  I am not going to give a complete, indepth review; Jeff has already done that.

Core Features:

- Optional eMMC, zero to 32GB
- Optional Wireless (WiFi and Bluetooth)
- Variety of memory sizes, 1GB to 8GB

If by some chance you stumbled onto this post and you need assistance in getting Raspberry Pi OS running on a CM4 unit, check out [this](https://baud.rs/Da8w5j).  I'm not going to go into details here; it is [a solved problem](https://baud.rs/Da8w5j).

Many of the alternatives to Raspberry Pi OS have a very similar feel and shallow curve for learning and setting up, but they are not 100% the same.  Take for example, the the multi-board Linux distribution [Armbian](https://baud.rs/So0E3c).  Armbian supports over 160 different single board computers.  If you have a well established board, there is a good chance there's an Armbian build for it.  Armbian is very similar to RPi OS; they are both derivatives of [Debian](https://baud.rs/afjxQe), both can use standard Ubuntu and Debian packages, both have a similar method of writing a disk image to an SD card and booting the OS.  There is no guarantee, however, that all software designed for the Raspberry Pi OS will run under Armbian.  Particularly when dealing with third party shields and GPIO boards as well as things that I tend to ignore like video encoding/decoding and sound.

The common quip as of late goes something like this: _because of the shortage of Raspberry Pi computers, some people have turned to alternatives._ This might be the case for some, but this is not going to be my justification for using or testing out the three alternatives that will be present throughout the rest of this article.

**All Raspberry Pi single board computers and modules are in tight supply for the retail and hobbists markets.  Check out [Raspberry Pi Locator](https://baud.rs/T47bcN) for places that might have supply.  If you are willing to pay a significant premium, [eBay has quite a few available](https://baud.rs/TiQUmU).**

With the RPi CM4 having been covered extensively - like [Jeff Geerling's Review](https://baud.rs/81s7YT); instead, I'll be looking at the remaining three modules.
<br /><br />
### Performance Metrics

<table style="width: 100%; text-align: center; border: thin dotted grey; padding: 2px;">
  <tr style="text-align: center; border-bottom: thin dotted grey; margin: 2px;">
    <th colspan="3" style="text-align: left; font-weight: bold; margin-left: 2px; padding-left: 10px;">
      <a href="https://baud.rs/f75xQY" target="_blank">Geekbench Metrics</a>
    </th>
  </tr>
  <tr>
    <th>
      Module
    </th>
    <th>
      Single CPU Metrics
    </th>
    <th>
      Multi-CPU Metrics
    </th>
  </tr>
  <tr style="background-color: #F5F5F5;">
    <td>
      <a href="https://baud.rs/ChASve" target="_blank">Raspberry Pi CM4</a>
    </td>
    <td>228</td><td>644</td>
  </tr>
  <tr>
    <td>
      <a href="https://baud.rs/axATbL" target="_blank">Radxa CM3</a>
    </td>
    <td>163</td><td>508</td>
  </tr>
  <tr style="background-color: #F5F5F5;">
    <td>
      <a href="https://baud.rs/4oDIbw" target="_blank">Pine64 SOQuartz</a>
    </td>
    <td>156</td><td>491</td>
  </tr>
  <tr style="text-align: center;">
    <td>
      <a href="https://baud.rs/OM5ve0" target="_blank">Banana Pi CM4</a>
    </td>
    <td>295</td><td>1087</td>
  </tr>
</table>


<div style="height: 3em;"></div>
<table style="width: 100%; text-align: center; border: thin dotted grey; padding: 2px;">
  <tr style="text-align: center; border-bottom: thin dotted grey; margin: 2px;">
    <th colspan="5" style="text-align: left; font-weight: bold; margin-left: 2px; padding-left: 10px;">
    Features Comparison
    </th>
  </tr>
  <tr style="border-bottom: thin dotted grey; text-align: center;">
    <th></th>
    <th><a href="https://baud.rs/DhjhXx" target="_blank">Raspberry Pi CM4</a></th>
    <th><a href="https://baud.rs/yZ7msy" target="_blank">Radxa CM3</a></th>
    <th><a href="https://baud.rs/Ixvxd7" target="_blank">Pine64 SOQuartz</a></th>
    <th><a href="https://baud.rs/lBRH90" target="_blank">Banana Pi CM</a></th>
  </tr>
  <tr style="background-color: #F5F5F5;">
    <td></td>
  	<td><a href="https://baud.rs/AVEUtR" target="_blank">Specifications</a></td>
    <td><a href="https://baud.rs/uHkpAS" target="_blank">Specifications</a></td>
    <td><a href="https://baud.rs/Sedjyf" target="_blank">Specifications</a></td>
	<td><a href="https://baud.rs/eDS2LT" target="_blank">Specifications</a></td>
  </tr>
  <tr style="border-bottom: thin dotted grey;">
    <td style="border-right: thin dotted grey;">Core</td>
    <td>Broadcom BCM2711, Quad core Cortex-A72 (ARM v8) 64-bit SoC @ 1.5GHz</td>
    <td>Rockchip RK3566, Quad core Cortex-A55 (ARM v8) 64-bit SoC @ 2.0GHz</td>
    <td>Rockchip RK3566, Quad core Cortex-A55 (ARM v8) 64-bit SoC @ 1.8GHz and Embedded 32-bit RISC-V CPU</td>
    <td>Amlogic A311D Quad core ARM Cortex-A73 and dual core ARM Cortex-A53 CPU</td>
  </tr>
  <tr style="border-bottom: thin dotted grey; background-color: #F5F5F5;">
    <td style="border-right: thin dotted grey;">NPU</td>
    <td>-</td>
    <td>0.8T NPU</td>
    <td>0.8 TOPS Neural Network Acceleration Engine</td>
    <td>5.0 TOPS</td>
  </tr>
  <tr style="border-bottom: thin dotted grey;">
    <td style="border-right: thin dotted grey;">GPU</td>
    <td>-</td>
    <td>Mali G52 GPU</td>
    <td>Mali-G52 2EE Bifrost GPU</td>
    <td>Arm Mali-G52 MP4 (6EE) GPU</td>
  </tr>
  <tr style="border-bottom: thin dotted grey; background-color: #F5F5F5;">
    <td style="border-right: thin dotted grey;">Memory</td>
    <td>1GB, 2GB, 4GB or 8GB LPDDR4</td>
    <td>1GB, 2GB, 4GB or 8GB LPDDR4</td>
    <td>2GB, 4GB, 8GB LPDDR4</td>
    <td>4GB LPDDR4</td>
  </tr>
  <tr style="border-bottom: thin dotted grey;">
    <td style="border-right: thin dotted grey;">eMMC</td>
    <td>On module - 0GB to 32GB</td>
    <td>On module - 0GB to 128GB</td>
    <td>External - 16GB to 128GB</td>
    <td>On module - 16GB to 128G)</td>
  </tr>
  <tr style="border-bottom: thin dotted grey; background-color: #F5F5F5;">
    <td style="border-right: thin dotted grey;">Network</td>
    <td>1Gbit Ethernet - Option for WiFi5 with Bluetooth 5.0</td>
    <td>1Gbit Ethernet - Option for WiFi5 with Bluetooth 5.0</td>
    <td>1Gbit Ethernet - WiFi 802.11 b/g/n/ac with Bluetooth 5.0</td>
    <td>1Gbit Ethernet</td>
  </tr>
  <tr style="border-bottom: thin dotted grey;">
    <td style="border-right: thin dotted grey;">PCIe</td>
    <td>1-lane</td>
    <td>1-lane</td>
    <td>1-lane</td>
    <td>1-lane</td>
  </tr>
  <tr style="border-bottom: thin dotted grey; background-color: #F5F5F5;">
    <td style="border-right: thin dotted grey;">HDMI</td>
    <td>2x HDMI</td>
    <td>1x HDMI</td>
    <td>1x HDMI</td>
    <td>1x HDMI</td>
  </tr>
  <tr style="border-bottom: thin dotted grey;">
    <td style="border-right: thin dotted grey;">GPIO</td>
    <td>28 pin</td>
    <td><a href="https://baud.rs/Bc6LKT" target="_blank">40 pin</a></td>
    <td>28 pin</td>
    <td>26 pin</td>
  </tr>
  <tr style="border-bottom: thin dotted grey; background-color: #F5F5F5;">
    <td style="border-right: thin dotted grey;">Extras</td>
    <td>-</td>
    <td>-</td>
    <td>-</td>
    <td>SATA ports, one shared with USB 3, one shared with PCIe; Audio Codec</td>
  </tr>
  <tr style="border-bottom: thin dotted grey;">
  	<td style="border-right: thin dotted grey;">Geekbench Score - Single CPU</td>
    <td>228</td>
    <td>163</td>
    <td>156</td>
    <td>295</td>
  </tr>
  <tr style="border-bottom: thin dotted grey; background-color: #F5F5F5;">
  	<td style="border-right: thin dotted grey;">Geekbench Score - Multi CPU</td>
    <td>644</td>
    <td>508</td>
    <td>491</td>
    <td>1087</td>
  </tr>
  <tr style="border-bottom: thin dotted grey;">
  	<td style="border-right: thin dotted grey;">Price of Tested*</td>
    <td>$65</td>
    <td>$69</td>
    <td>$49</td>
    <td>$105</td>
  </tr>
  <tr style="border-bottom: thin dotted grey; background-color: #F5F5F5;">
  	<td style="border-right: thin dotted grey;">Power Consumption</td>
    <td>7 watts</td>
    <td>N/A</td>
    <td>2 watts</td>
    <td>N/A</td>
  </tr>

</table>

<div>
    * Prices exclude shipping
</div>
<div style="height: 3em;"></div>

## Pine64 SOQuartz

<div style="width: 100%; text-align: center; padding-bottom: 1em;">
    <img src="../images/signal-2022-11-30-202052_004-SOQuartz-module.png.webp" style="width:45%; text-align:center; float:center; padding: 2px;"  loading="lazy" /><br/>
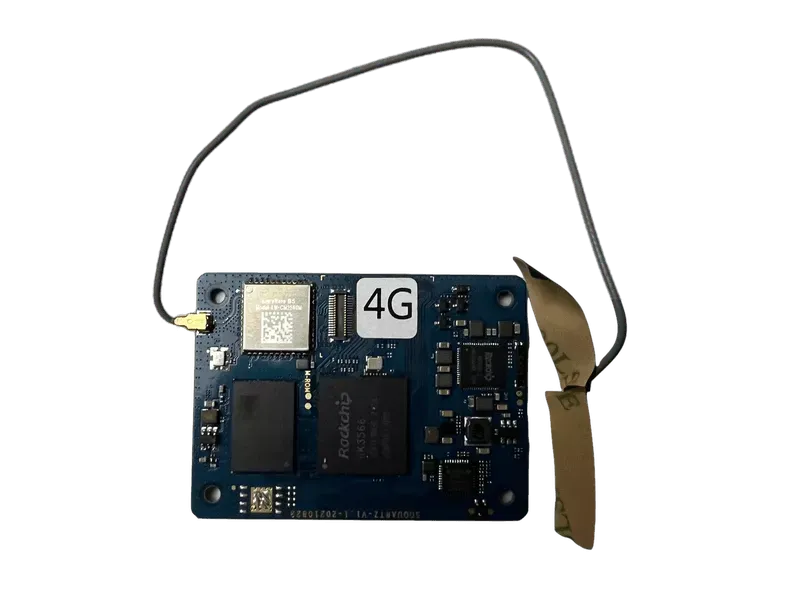
Pine64 SOQuartz Module, 4GB memory
</div>


For whatever reason, I really like [Pine64's SOQuartz module](https://baud.rs/Ixvxd7).  It is by far the least performant of the four compute modules I have tried.  It has a wonky antenna and needs a far from mainstream variety of Linux to be useful. There are two Linux distributions available: [DietPI](https://baud.rs/C90mkB) and [Plebian Linux](https://baud.rs/YHvnIM). I settled upon using Plebian.  I would have gone with DietPi but my initial use case of making a two ethernet router using a [Waveshare Dual Gigabit Ethernet Base Board Designed for Raspberry Pi Compute Module 4](https://baud.rs/yEWFBM), but I was unable to get both ethernet ports working.  Plebian was simpler.  For those interested in trying Plebian, you can download recent disk images by going to [Plebian Linux's Github Actions](https://baud.rs/AlW7P2), and select one of the recent "Build Quartz64 Images"; at the bottom there will be zipped disk image Artifacts to download for the various flavors of Quartz64.  Plebian is a bit rough around the edges.  It is derived from Debian Testing (currently codenamed _bookworm_) and runs a release candidate Linux Kernel. Its developer, [CounterPillow](https://baud.rs/TRsCK2), also states that "***This is a work-in-progress project. Things don't work yet. Please do not flash these images yet unless you are trying to help develop this pipeline.***" The interactions with the system feel similar to that of [NetBSD](https://baud.rs/SxjjCl) from the early-2010s.  It is not to say it is not a modern flavor of Linux, it is simply lacking some of the usual expectations.  You want your network interfaces to be named `eth0`?  How about no.  Interfaces have not been aliased, if you can get WiFi drivers working, you will end up with a device named something like `wlxe84e069541e6` instead of `wlan0`.  Given that it is running a testing branch of Debian, things like docker and the like will likely not work without some significant wrangling.  

Why do I like this compute module?  I like Pine64's products.  I like the community that has grown up around the products.  In the course of trying to get an operating system up and running, I had numerous questions that I asked on [Pine64's Discord Server](https://baud.rs/qTkb1S).  Everyone was extremely helpful and despite my own feelings that some of my questions were simplistic, no one expressed that sentiment.  There were no massive egos to speak of.

Core Features:

- Variety of memory options: 2gb to 8gb
- external eMMC module support: 8gb to 128gb
- Wifi

Getting Plebian running on a SOQuartz module is straightforward; write the appropriate image to an eMMC module, attach the eMMC onto the SOQuartz and place it into a carrier or IO board.  You should get working HDMI, one ethernet port, along with USB working.  A quick run down of the steps are as follows:

1. Get a USB to eMMC adapter; Pine64 has [one available](https://baud.rs/kYq1jk); you could also try [eBay](https://baud.rs/KhNPnd); you may need to get a micro SD to USB adapter, too.

2. Get an eMMC module. Pine64 has [a few available](https://baud.rs/7jS57l)

3. Obvious step: connect your eMMC to your USB to eMMC adapter and then connect that to your desktop/laptop/etc.

4. Download a SOQuartz Plebian Linux disk image from [Plebian Linux's Github Actions](https://baud.rs/AlW7P2)

   - Download`SOQuartz CM4 IO Board Image`
   - Unzip the contents
   - You will end up with a file called `plebian-debian-bookworm-soquartz-cm4.img.xz`;

5. Write to your eMMC module.  You could use something [balena Etcher](https://baud.rs/aD1DsC) or, if you're command-line-comfortable, use `dd`

   - balena Etcher will take care of decompressing `plebian-debian-bookworm-soquartz-cm4.img.xz`

   - using `dd`, you can do something like this:

     ```bash
     sudo xzcat plebian-debian-bookworm-soquartz-cm4.img.xz | sudo dd of=/dev/mmcblk1 status=progress
     ```

     where `/dev/mmcblk1` is the correct device for your USB to eMMC adapter.

     ![](../images/2022-12-19 22-28-59.png.webp)

6. Attach your eMMC module to your SOQuartz module and attach the module to an IO or carrier board.

7. Attach peripherals and apply power.  You'll eventually get presented with a prompt to set the password for the user `pleb`

If would be more cost effective if you were to buy a SOQuartz module, an USB to eMMC adapter and an eMMC module all at once; for orders being shipped to the United States, it is roughly a $9 flat rate.

Finally, if you really feel like going for an alternative to Linux, [NetBSD](https://baud.rs/SxjjCl) will also work on the SOQuartz, but it is more complicated.  You will need to download a [Generic 64bit](https://baud.rs/9ys0JN) image from under the NetBSD-daily HEAD tab.  This will need to be written to an eMMC module.  Next, you will need to write the appropriate [UEFI image](https://baud.rs/1QWxpx) to an SD card from Jared McNeill's port of [Tianocore](https://baud.rs/fLhWeN) to the Quartz64 family.  UEFI and the disk image cannot exist on the same media.  

**Pine64 sells [SOQuartz modules](https://baud.rs/SZPeXv) directly from their site.  The modules I have purchased and used are the 4gb models.  They are about $50 excluding shipping.**


## Radxa CM3

<div style="width: 100%; text-align: center; padding-bottom: 1em;">
    <img src="../images/RADXA-CM3-IMG_0733.png.webp" style="width:45%; text-align:center; float:center; padding: 2px;"  loading="lazy" /><br/>
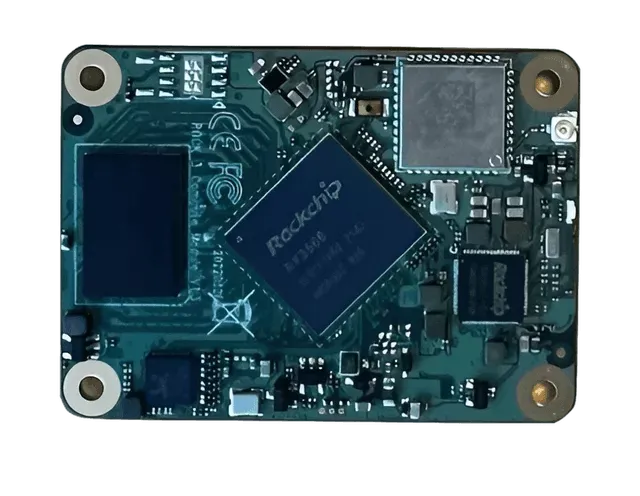
Radxa CM3, 4GB memory, without heatsinks
</div>


As far as performance goes, the [Radxa CM3](https://baud.rs/EhCt5f) is just above Pine64's SOQuartz module but below Raspberry Pi CM4.  Radxa is better known for its [Rock3](https://baud.rs/gs6UMD) and [Rock5](https://baud.rs/MHLWc7) series of single board computers; available from [ALLNET.China](https://baud.rs/gPp8C4) and [eBay](https://baud.rs/HtzTer).  The CM3 is in the Rock3 series of boards and modules.  The series features Rockchip RK3566/RK3568 processors, the RK3566 also is used in Pine64's Quartz64 and SOQuartz boards.  Even though the module will function without issue on a carrier or IO board designed for Raspberry Pi CM4, the [CM3 IO board](https://baud.rs/1FBRAx) by Radxa exposes two SATA ports in addition to the PCIe 1x lane.  The CM3 has an [_official_ Debian](https://baud.rs/nLD0Ny) and [Ubuntu](https://baud.rs/FINKqE) distributions, but like all the other compute modules, these are artisanally crafted specifically for the CM3.  That means, you can not take an actual-official Debian or Ubuntu disk image for [Arm64](https://baud.rs/8dbtmL) and have it just have it work.  Radxa does, however, maintain an up-to-date Github build pipeline for producing both [Debian and Ubuntu images](https://baud.rs/Srcxcu) for the CM3.  Like the operating system's need to be different, so is the eMMC - it is not flashed in a typical manner - like what you would expect from a Raspberry Pi CM4 or even the Pine64 SOQuartz.  In order to install Linux on the onboard eMMC, you need to use tools provided by Rockchip.  The [Radxa Wiki page for CM3](https://baud.rs/6jhsLH) is a good place to start.  The CM3 and its installation process are about as far from Raspberry Pi CM4 territory as you will deal with for the modules presented in this article.  The following instructions are available from [wiki.radxa.com](https://baud.rs/rMQyR2) but they are found across a disparate set of pages; some describing the rockchip tools with references to disk images but with no clear and convenient place to download the files.  This is an attempt to streamline the process.  Let's get at it!

Core Features:

* On-module eMMC of 16 to 128GB
* Two SATA (when using the appropriate IO board)

The Rockchip tools are available on Windows as well as macOS/Linux.  Downloading, compiling and running the macOS/Linux tool is straightforward; Windows involves a set of drivers and an executable tool.

#### Linux/macOS

* Install necessary USB and `autoconf` packages

`sudo apt-get install libudev-dev libusb-1.0-0-dev dh-autoreconf pkg-config libusb-1.0`

* Clone the [github](https://baud.rs/h25r9A) repository

```
git clone https://github.com/rockchip-linux/rkdeveloptool
cd rkdeveloptool
autoreconf -i
./configure
make
sudo make install
```

* Run `rkdeveloptool --help`to verify it is installed

#### Windows

1. Download [RKDevTool](https://baud.rs/q8646k)
2. Download [RKDriverAssistant](https://baud.rs/1gWMTJ)
3. Unzip and execute RKDriverAssistant (`DriverInstall.exe`)
4. Unzip RKDevTool
   * Before executing the tool, you will want to change the language to English; change `Chinese.ini` to `Englist.ini`

![](../images/rkdevtools-set-english-config.ini.png.webp)


There is an assumption of using a [Raspberry Pi CM4 IO Board](https://baud.rs/qCeIq9).

#### Boot into maskrom mode

1. Unplug the board and remove any SD card
2. Plug a micro USB  to USB Type-A cable into the micro USB port on the IO board.  The other end of the cable gets plugged into your desktop or laptop.  My laptop only has USB-C, so I had to use an [adapter](https://baud.rs/H6VzqO)
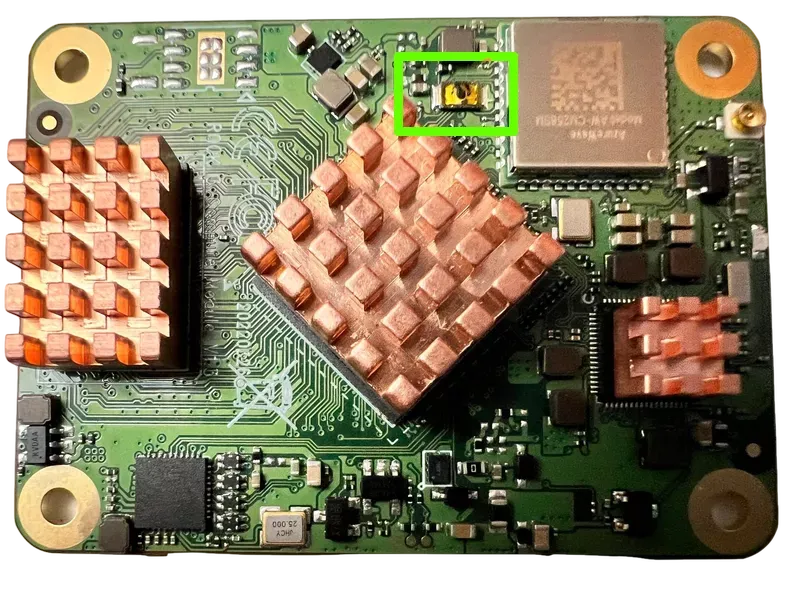
3. On the CM3, there is a very tiny golden button; while pressing this, plug the power back in on the IO board
4. After a few seconds, you can stop pressing the button
5. Check for a USB device
   1. Linux/macOS should show `Bus 001 Device 112: ID 2207:350a Fuzhou Rockchip Electronics Company`
   2. Windows, you will need to run `RKDevTool`; the status at the bottom of the application should read `maskrom mode`

<div style="width: 100%; text-align: center; padding-bottom: 1em;">
    <img src="../images/radxa-cm3.png.webp" style="width:45%; text-align:center; float:center; padding: 2px;" loading="lazy"  /><br/>
maskrom button
</div>

#### Flashing/Writing a Disk Image

You will need to download two files:

1. [rk356x_spl_loader_ddr1056_v1.06.110.bin](https://baud.rs/oKnlZU)
2. A Radax CM3 disk image from [https://wiki.radxa.com/Rock3/downloads](https://baud.rs/D8ahKW) or [https://github.com/radxa-build/radxa-cm3-io/releases/latest](https://baud.rs/EMVLsQ) or this [mirror](https://baud.rs/4tBfCb)

We will be using [radxa-cm3-io-ubuntu-focal-server-arm64-20221101-0254-gpt.img.xz](https://baud.rs/twMlSZ); it is advisable to follow [this](https://baud.rs/EMVLsQ) and download a more recent disk image.

#### Linux Flashing

```
rkdeveloptool ld
```

`DevNo=1	Vid=0x2207,Pid=0x350a,LocationID=104	Maskrom`

```
rkdeveloptool db rk356x_spl_loader_ddr1056_v1.06.110.bin
rkdeveloptool wl 0 radxa-cm3-io-ubuntu-focal-server-arm64-20221101-0254-gpt.img.xz
```

Reboot CM3

```
rkdeveloptool rd
```

#### Windows Flashing

![](../images/RKDevTool-complete-english.png.webp)

You will need to specify a `loader` as well as an `image`.  In the table on the left side of the screenshot, click in right-most the rectangle of the first row.  This should bring up a file dialog box.  Navigate to where you downloaded `rk356x_spl_loader_ddr1056_v1.06.110.bin`. Likewise for the second row (`image`), navigate to where you downloaded `radxa-cm3-io-ubuntu-focal-server-arm64-20221101-0254-gpt.img.xz`

Click `Run`

This operation will take several minutes; be patient.

The CM3 should automatically boot and bring you to a login prompt.  **The default user is `rock` with a password of `rock`**

<iframe width="100%" height="480" src="https://www.youtube-nocookie.com/embed/49zG4EZiJKo" title="Radxa CM3 Linux Booting" frameborder="0" loading="lazy" allow="accelerometer; autoplay; clipboard-write; encrypted-media; gyroscope; picture-in-picture; web-share" allowfullscreen></iframe>


**The Radxa CM3 can be purchased from [ALLNET.China](https://baud.rs/EhCt5f) for about $70 excluding shipping.**


## Banana Pi CM4


<div style="width: 100%; text-align: center; padding-bottom: 1em;">
    <img src="../images/BPi-CM4-IMG_0754.png" style="width:45%; text-align:center; float:center; padding: 2px;" loading="lazy"  /><br/>
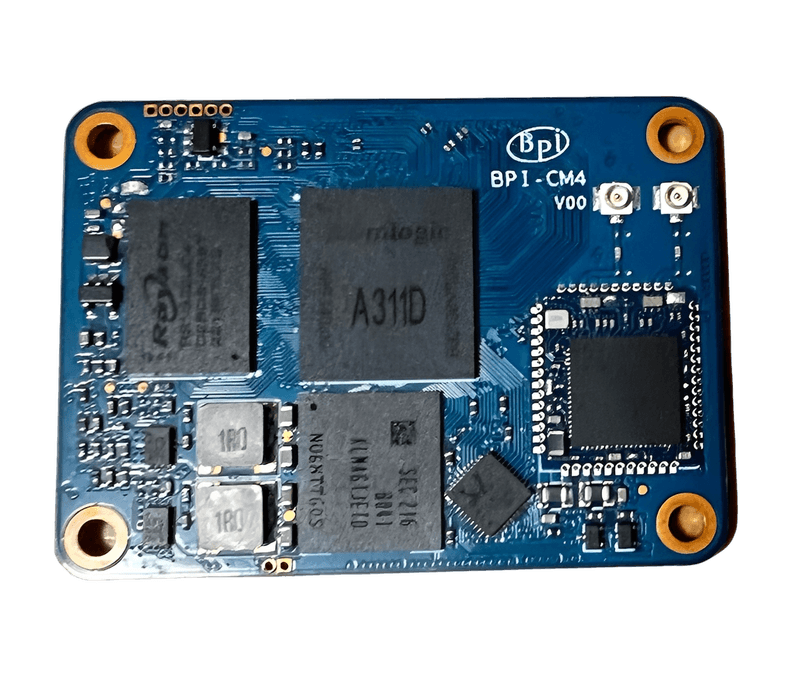
Banana Pi CM4, 4GB memory
</div>
Looking at the Geekbench table (above), you will notice at the Banana Pi CM4 seriously outperforms the other three modules I have tested.  It is also the most expensive module - including shipping - it was about $120.  This was not an inflated Raspberry Pi price, this is directly from [Sinovoip](https://baud.rs/NY3ajd), the company behind the Banana Pi family of single board computers.  But, before you start searching for where you can buy one, as of the time of this writing, I purchased Sinovoip's last module that they had allocated to developers and testers; and they have not started to commercially produce any, yet.

<img src="../images/sinovoip-banana-pi-correspondence.png.webp" style="zoom:45%;"  loading="lazy" />

Core Features:

- 4 x ARM Cortex-A73 CPU cores
- 2 x ARM Cortex-A53 CPU cores

* 4GB of memory

Like the Radxa CM3, operating system software is very limited.  For very detail instructions on install an operating system, in this case Android, check out [https://wiki.banana-pi.org/Getting_Started_with_CM4](https://baud.rs/V3k6T1).

Installing and boot Linux is fairly straight forward. You can either boot from an SD card, or you can choose to boot from the on-board eMMC module. That said, nonetheless, you will need an SD card.

Head over to [https://wiki.banana-pi.org/Banana_Pi_BPI-M2S#Linux](https://baud.rs/mTiyTj), and you find a similar table of distributions images:

#### Distributions

##### Ubuntu

* 2022-06-20-ubuntu-20.04-mate-desktop-bpi-m2s-aarch64-sd-emmc.img.zip
  Baidu Cloud: https://pan.baidu.com/s/1kRukI-H-xliNqIqVacXWRw?pwd=8888 (pincode:8888)
  Google drive: https://drive.google.com/file/d/1P2YQUwdrREdiwidr8YtCvOdMmwLPerVu/view

  S3 Mirror: https://s3.us-east-1.amazonaws.com/cdn.tinycomputers.io/banana-pi-m2s-cm4-linux/2022-06-20-ubuntu-20.04-mate-desktop-bpi-m2s-aarch64-sd-emmc.img.zip
  MD5:2945f225eadba1b350cd49f47817c0cd

* 2022-06-20-ubuntu-20.04-server-bpi-m2s-aarch64-sd-emmc.img.zip
  Baidu Cloud:https://pan.baidu.com/s/1UoYR0k9YH9SE_A-MpqZ2fg?pwd=8888 (pincode: 8888)
  Google Drive:https://drive.google.com/file/d/1y0DUVDhLyhw_C7p6SD2q1EjOZLEV_c_w/view
  S3 Mirror: https://s3.us-east-1.amazonaws.com/cdn.tinycomputers.io/banana-pi-m2s-cm4-linux/2022-06-20-ubuntu-20.04-server-bpi-m2s-aarch64-sd-emmc.img.zip
  MD5:9b17a00cbc17c46e414a906e659e7ca2

##### Debian

* 2022-06-20-debian-10-buster-bpi-m2s-aarch64-sd-emmc.img.zip
  Baidu Cloud: https://pan.baidu.com/s/1TTsdyy5I7HLWS_Tptg7r2w?pwd=8888 (pincode: 8888)
  Google Drive:https://drive.google.com/file/d/116ZydpggYpZ1WoSyVsc4QuchdIa3vGyI/view

  S3 Mirror: https://s3.us-east-1.amazonaws.com/cdn.tinycomputers.io/banana-pi-m2s-cm4-linux/2022-06-20-debian-10-buster-bpi-m2s-aarch64-sd-emmc.img.zip
  MD5:9d39558ad37e5da47d7d144c8afec45e

#### Flashing/Writing Images

Let's assume we are using `2022-06-20-debian-10-buster-bpi-m2s-aarch64-sd-emmc.img.zip`; the handiest thing to start out with is making a bootable sd card.  On your laptop or desktop computer, and assuming you are using a flavor Linux, issue the following at a command line:

```
unzip 2022-06-20-debian-10-buster-bpi-m2s-aarch64-sd-emmc.img.zip
dd if=2022-06-20-debian-10-buster-bpi-m2s-aarch64-sd-emmc.img of=/dev/sda0
```

Change `sda0` to the appropriate device.

Instead the sd card into the IO board, and apply power to the board.  That's it for booting from an SD card. In order to boot from eMMC, you will need to follow the above steps, but instead of downloading and writing the image from your laptop or desktop, you will be using the BPI CM4 instead.  Download and unzip the image file:

```
unzip 2022-06-20-debian-10-buster-bpi-m2s-aarch64-sd-emmc.img.zip
dd if=2022-06-20-debian-10-buster-bpi-m2s-aarch64-sd-emmc.img of=/dev/mmcblk0
```

Now, power down the IO board, and remove the SD card.  Apply power once more, and you should be booting up from eMMC.

As a side note, when I first booted my CM4, it began an unattended system update and that took a while to complete.  It will be best if you let it finish this before doing any serious usage.  Just use `top` to check on the running processes.

#### Other bits of information:

* [Forum posting and associated threads](https://baud.rs/IOB5X4) for discussion of BPI CM4 and its release.

* [Linux Board Support Package (BSP)](https://baud.rs/oYrAfm)

**As of this writing, the Banana Pi CM4 is currently unavailable for general purchase.**


### Final Thoughts

If you are needing to operate in a familiar environment, you will want to go with the Raspberry Pi CM4.  As of this writing, you will pay a premium - a 100% markup or more.  You can get high priced CM4s from [eBay](https://baud.rs/huy6c3) or [Amazon](https://baud.rs/voR4vd).  If you need performance, and are not needing to use crazy shields and hats, you will want to go with the Banana Pi CM4, but the catch is, it has not been released yet.  It is hands down the most robust compute module. If you are looking to use bleed-edge Linux and want a bit of a challenge, the Pine64 SOQuartz module is for you.  And that leaves the Radxa CM3.  If you willing to use the Rockchip tools to flash the eMMC module, and you are not concerned with software compatibility for shields and hats and you want similar performance to an RPi CM4, the Radxa might be a good choice.

<script type="text/javascript">
amzn_assoc_placement = "adunit0";
amzn_assoc_tracking_id = "tinycompute05-20";
amzn_assoc_ad_mode = "search";
amzn_assoc_ad_type = "smart";
amzn_assoc_marketplace = "amazon";
amzn_assoc_region = "US";
amzn_assoc_title = "Affiliate Links";
amzn_assoc_default_search_phrase = "raspberry pi compute module";
amzn_assoc_default_category = "All";
amzn_assoc_linkid = "5fc86499de521ab9aacd2a8118914cfd";
amzn_assoc_rows = "4";
amzn_assoc_design = "text_links";
</script>
<script src="//z-na.amazon-adsystem.com/widgets/onejs?MarketPlace=US"></script>